Jim Truett has been working on my Lanzar amps for a while now, and I'm currently up to 11 of them in various states of disrepair. The last time I saw Jim he showed me his 3-day install and basically it has motivated me to get off my ass and think about my car.
So what I did is, I built up the amp rack in stages. I laid down the bottom floor piece so that I had a foundation to build on. As you can see I have the big fuel pump hump in the way that basically killed off any volume in the spare tire well area (damn Toyota!!!)
There is still some usable space where I can put the ES changer, and possibly 4 1-farad caps that I still have lying around. I forsee the power, ground and remote distribution blocks sitting in there as well. I still need to find a place for the AudioControl DQX.


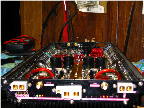
Once I had that nice and level, I built the amp rack to go on top of it. I completely copied Jim's amp rack idea of installing fans, and took his advice on using low low amp rated fans for quiet- this is a hatchback, so I will be in the same room as the fans. The sets of 2 on the left are push, the sets of 3 on the right are pull.


Now I come to the problem I am having. Unlike my old Accord or Jim's CL, I don't have the "trunk" space room to pull panels out easily. Basically if you were to be at the back of my car, looking eye level with my taillights, my hatch's factory interior panels start wide at the bottom of the hatch and then curve inward towards the top. This makes pulling a panel that stretches the entire width of the car impossible to put in or pull out.
So I made some templates of 2 panels, with the cut down the center. I then taped a spare old plexi piece I had to one o fthe panels, to mimic the overall look I was hoping to get.


Having done this, I can now foresee that it would be a big pain in the ass to screw the plexi to just one half of the panel. The panels can come in and out of the car easily but it just doesn't seem right not having the plexi completely bolted to something. On the other hand, the amp rack is 48 inches wide, the widest point of the hatch is 51 inches, with some parts almost touching the amp rack, so I don't think I have any room to create an "inner border panel" around the plexi by itself, and then another "outside border panel" surrounding that one, and still have it wide enough that you can see the width of the amps.
But maybe I'm wrong? Maybe I do 3 panels, with one big "inner panel" and two "outer panels" split in half?
So help me install pros, I think that with my limited experience I'm probably not seeing something correctly or haven't figured out something completely obvious to you guys. I want to have this up and running by, say, 2011 if I could. That seems like a reasonable goal.
And BTW, Jim had said I should do this install so that I could have the satisfaction of having done it myself. You know what? That feeling is completely overrated. I think I would have had a lot better feeling seeing this car come back after a week with all this crap already installed for me.