Reconditioning ZX600TI & ZX400TI, need more help.
Re: Reconditioning ZX600TI & ZX400TI, need more help.
if u plan to remove then add a shot of new solder then make sure ur solder gun is atleast 40 watt or better the hotter the better since ull spend less time on via u want to keep tip of solder gun on the middle when u see the solder moltn slowly work cap to one side then do same to other side little at a time till it pops out

Re: Reconditioning ZX600TI & ZX400TI, need more help.
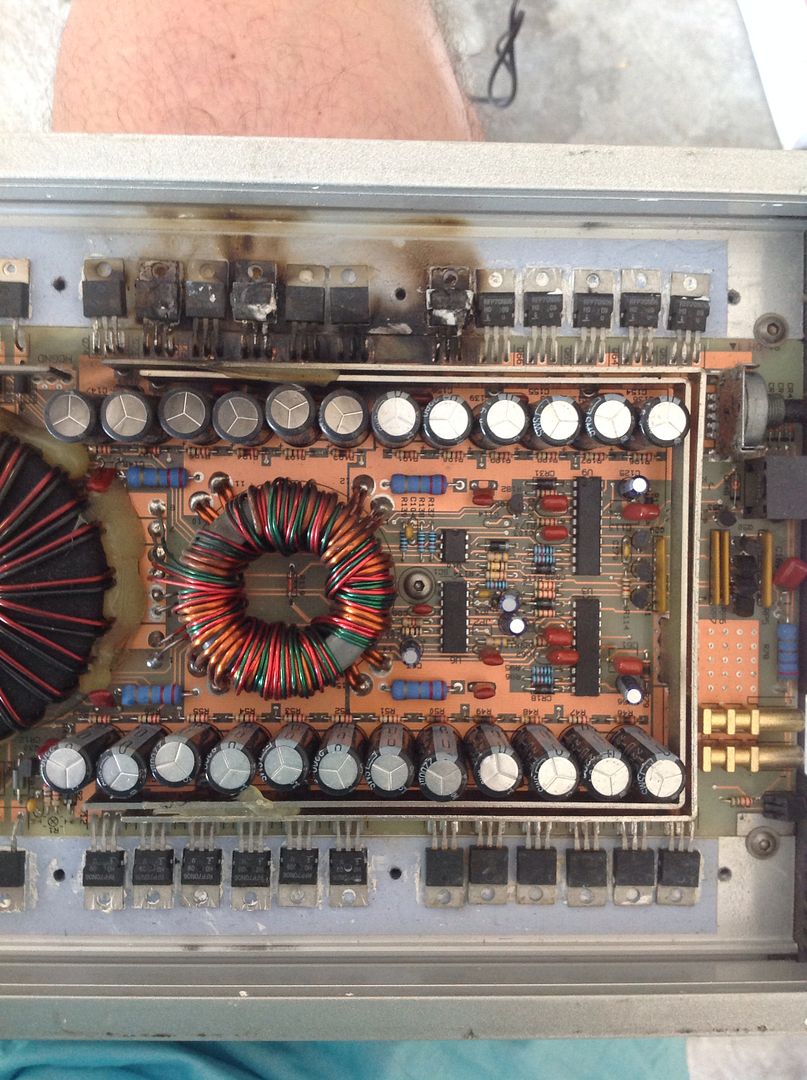
trickyricky wrote:If you want peace of mind then replace them, remove the top black plastic that is bulging and you might not even see anything on it leaking. They usually bulge like that due to heat, so if your concerned you can pop the black tops off and see for yourself. Now I did have a ZX400ti here that the rail caps seem to have been leaking as there is corrosion on the top of the caps.
I dont see any corrosion on them but on one there is a tiny brown rust spot, i will take a picture when i am off work.
In the picture i posted u do not see how much they are bulging, i think i will change them but i will train on an old amplifier first.
Thanks for the answers so far
zpa0.5(V210245)
zpa0.3(00618)
zx600ti x2
600titanium
zx400ti
sd500.4
XSC5 x2
pld1
sdt-ti
tba
bass cube
tld66
zpa0.3(00618)
zx600ti x2
600titanium
zx400ti
sd500.4
XSC5 x2
pld1
sdt-ti
tba
bass cube
tld66
Re: Reconditioning ZX600TI & ZX400TI, need more help.
usally signs they are bad or are suspect ull see the foil on the tops and sides shinking showing the silver casing a way to see if there slightly leaking is to use a piece of white notebook paper and slide it under cap on all sides see if any liquid is coming out
-
trickyricky
- Posts: 1653
- Joined: Sun May 06, 2012 8:01 am
Re: Reconditioning ZX600TI & ZX400TI, need more help.
I don't see how shrinkage of the "foil" (sleeves perhaps) or the top cap/cover indicates a bad/faulty cap. That is usually a sign that it is near by a hot component/area, large resistors that dissipate lots of heat.
Now if the top bulges like a mountain or pops wide open is a CLEAR indicator of a bad cap. Same with actually seeing the leakage around the cap.
Now if the top bulges like a mountain or pops wide open is a CLEAR indicator of a bad cap. Same with actually seeing the leakage around the cap.
Re: Reconditioning ZX600TI & ZX400TI, need more help.
Well i removed the rail caps and i understand why its not recomended, i were realy carefull and i used alot of time and different tools to do it without getting any damage to the vias.
I have not cleaned up the vias yet im going to suck ut the rest off the solder, i had never made it without my 65watt soldering station in my mind it was a bit on the weak side and an 80watt would be alot better i hate applying heat to the vias for too long.
I have not cleaned up the vias yet im going to suck ut the rest off the solder, i had never made it without my 65watt soldering station in my mind it was a bit on the weak side and an 80watt would be alot better i hate applying heat to the vias for too long.
- Attachments
-
-
zpa0.5(V210245)
zpa0.3(00618)
zx600ti x2
600titanium
zx400ti
sd500.4
XSC5 x2
pld1
sdt-ti
tba
bass cube
tld66
zpa0.3(00618)
zx600ti x2
600titanium
zx400ti
sd500.4
XSC5 x2
pld1
sdt-ti
tba
bass cube
tld66
Re: Reconditioning ZX600TI & ZX400TI, need more help.
cause cap is expanding tricky ........... yea not sure if that's just the angle of picture but looks to me like u burnt the bottom of the board like a torch was used a 65 watt iron is plenty ht enough to remove them I use the weller 51 that's only 50 watts just clean board up with rubbing alchol and make sure all surrounding traces are still good
-
trickyricky
- Posts: 1653
- Joined: Sun May 06, 2012 8:01 am
Re: Reconditioning ZX600TI & ZX400TI, need more help.
There are no large traces in that spot your talking about brinrose thats why light barely goes through that spot. If you look at both pics posted you can see from the top side that there is a large spot without copper.
It actually looks pretty good Alfaholic, just like you mention vacuum the rest of the left over solder from the via's and your good to go with the new snap in's.
It actually looks pretty good Alfaholic, just like you mention vacuum the rest of the left over solder from the via's and your good to go with the new snap in's.
Re: Reconditioning ZX600TI & ZX400TI, need more help.
3.Cleaning/Washing Circuit Boards:
Note:
Many people are concerned about washing circuit boards with water. As long as no power is applied to the amp when washing, the amplifier is dried relatively quickly and is thoroughly dry before power is again applied, it is unlikely to do any harm.
Some amplifiers will come in with circuit boards that are too dirty/nasty to work on. Sometimes, the board will be covered with dirt. Other times they will come in with insect infestation (mostly spiders or cockroaches - don't ask me how an amplifier can become infested with cockroaches). They may even be covered with electrolyte from failed capacitors. No matter the reason for the mess, you can clean them relatively easily. I generally spray the board down with something like Fantastic or Formula 409 (trying not to get too much into the potentiometers). After soaking for a few minutes, I will wash the board with hot tap water or with a pressure washer. Rinse it until all of the cleaner is removed (even from under the capacitors and ICs). If you use the car wash to wash the board, keep the wand far away from the board or just use the low pressure setting. The stream from a car wash wand easily has enough force to break some of the electronic components if the tip of the wand is held too close to the board/components when rinsing the board.
After washing the board, shake as much water as possible from the board and set the board in the sun to dry. If you have access to an air compressor (one that does NOT have an automatic oiler -- used to keep air tools properly oiled), use it to blow all of the water from under the components (this will greatly reduce drying time). Typical drying time in bright sun and low to moderate humidity will be a few hours so try to do it early in the day to ensure that the board doesn't have to remain wet overnight. If this is done in the winter, the board can be dried in a conventional oven. Set the oven for ~150°F and check it often. Make sure that none of the plastics are getting soft. If you're not sure that the oven's thermostat is accurate, use an oven thermometer to make sure the temp doesn't go too high. The temperature inside a vehicle in the summer can easily reach 150° so using an oven at 150° is generally OK.
Note:
When using an oven, you want to make sure that the amp is well away from the heating element being used. If the oven is set to 'broil', the top element will be used to heat the oven. When 'bake' is used, the bottom element is used. Some ovens have a 'preheat' setting where both elements will be used. When using an oven to dry a board, preheat the oven and check the temperature before placing the board in the oven. Set the amp on the highest rack possible and set the oven to 'bake'. This will ensure that the amp doesn't receive any direct heating from the element.
The next 4 images show the before and after condition of two amps that were too filthy to work on. One was covered with a black dust. The other had gotten wet and was covered with rust. Not only are the amps going to be easier to service, they'll look better when the job is done.
Back To The Top
4.Using the Proper Cleaners:
When a board needs cleaning, you need to use the correct type of cleaner. For example, you will encounter many amplifiers with blown power supplies. When the power supply transistors fail, they will often coat the board with a layer of black soot. To clean this, a solvent like acetone works very well. If you tried to remove the soot with some type of common household cleaner like 409 or Fantastic, you would not get good results. If you try removing the residue from a sugary soft drink with solvent, you will not get good results but a household cleaner will remove the residue very easily. If you don't know what will work best, try both types.
Note:
Solvents like acetone will evaporate relatively quickly. Household cleaners (mostly water) will take much longer to evaporate completely. You should be absolutely sure that the board is completely dry before applying power to the amplifier. Failure to do so can cause amplifier failure (in the case of the household cleaners) or could be a fire hazard (in the case of the solvents).
Back To The Top
5.Watching for Open Traces:
Sometimes, when power supply transistors (typically FETs) fail, the foil trace that connects the center leg to the power transformer will open. Many times, the open gap is very small (just a few thousandths of an inch). If you don't see it and allow the amplifier to leave the shop without proper testing, the amplifier may fail prematurely. Until you notice the trace and repair it, the amplifier will likely continue to fail every time you replace the FETs. Having the open trace is effectively removing one of the FETs from the power supply.
In the following photo you can see an open trace. It's relatively easy to see here because it's been tinned and cleaned. If you don't take the time to clean the board, an opening this narrow in the foil can be difficult to see. For reference, the transistor through-hole is ~0.05 in diameter. More on this type of damage (and repair) can be found on the Repairing Physically Damaged Traces page (section 4).
Back To The Top
6.No Open Soft Drinks on Bench:
Many people have a habit of always having a soft drink close at hand. This is a bad habit at the work bench. The containers of some solvents are similar in size and shape to soft drink bottles. If you're not paying attention, it's possible that you could pick up a solvent container instead of a soft drink. I know the chance of doing that is slim but it IS possible. In my opinion, you should not have soft drinks on the bench.
If you must have a drink on the bench, only drink bottled drinks and ALWAYS tightly replace the cap when you're not drinking from it. Also, non-diet drinks have a lot of sugar. If any drink with sugar is spilled into any piece of equipment, it will be necessary to thoroughly wash the unit out (as described in a previous tech tip). Diet drinks leave little residue when the water in them evaporates and make much less mess in case of a spill.
Back To The Top
7.Vented Capacitors:
When a capacitor is stressed (due to too high ripple current or too much voltage or reverse voltage), it will overheat. When this happens, the electrolyte boils and pressure builds in the capacitor. To prevent the capacitors from exploding as the pressure builds, the manufacturer provides intentionally weakened areas of the aluminum can.
As you can see in the next image, the capacitor obviously overheated. The open vents in the top of the can are a sure sign that the capacitor was pushed well beyond its limits. When a capacitor vents like this, it must be replaced. The loss of electrolyte will cause a change in value. This means that the capacitor cannot possibly perform to spec. When a capacitor vents, the electrolyte will spray or leak out and get all over the enclosure, heatsink and circuit board. When this happens, you must wash all affected parts. Failure to do so will lead to significant corrosion of all of the unprotected metal parts. If the board isn't cleaned, the amplifier will likely fail in the future as the copper traces are eaten away by the electrolyte.
From a different angle, you can see how the top of the vented cap is bulging and how the top of a normal cap is flat.
Sometimes it appears that a capacitor may have vented but it's actually OK. In the case of the capacitor below, the shrink-wrap on the capacitor split and the top was bowed up. After removing the plastic insulator from the top of the capacitor, I could see that the capacitor was not bulging and it had not vented. There's no reason to change this capacitor.
This cap has a bulging top and the shrink-wrap has split. This cap has definitely failed.
Back To The Top
8.Leaked Electrolyte:
Some capacitors have poor seals and will leak electrolyte onto the circuit board. The electrolyte is corrosive and will cause damage to anything metallic (particularly copper). The image below shows a capacitor that has leaked. You can see that one lead of the capacitor has been eaten away. You can also see that there is considerable corrosion to the circuit board. The solder pad for one resistor was completely eaten away. To make a solid electrical connection, I wrapped the lead of the new resistor around the lead of another component. I could have alternately scraped the solder mask from the copper trace and soldered the lead directly to the trace. When you encounter this problem, you need to pay attention to the surrounding area. If you see signs of corrosion on the leads of other components, they need to be thoroughly cleaned, inspected and replaced if the damage is significant. Pay close attention to diodes. If you see signs that electrolyte has entered the body of the diode (you can see discoloration on the leads inside the case -- for clear diodes), replace the diode. All areas contaminated with electrolyte need to be cleaned with acetone.
For more repair notes on boards badly damaged by electrolyte, read the Board Badly Damaged by Leaking Capacitors section of the Repairing Badly Damaged Circuit Boards page.
Back To The Top
9.Removing Large Snap-In Capacitors:
Removal of most components is relatively straightforward but the snap-in capacitors are slightly different. These capacitors get their name from the way their leads go into the circuit board. As you can see in the next two photos, the leads are bent outward at the center of the lead. When installing these caps, the cap will snap into place as the leads are pushed through the board. The spring tension on the leads prevents the capacitor from moving when the boards are being handled (before soldering).
When removing two terminal components, it's common practice to heat one lead and tilt the component (so that the terminal being heated can pull out of the hole in the board). Then you heat the other terminal and tilt it the other direction until the leads have have cleared the board. You will do the same with these components but you must remove the tension in the terminals.
Below, you can see that solder has been removed from one of the capacitor's leads. The way that the lead has been cut has left a chisel-shaped tip. If you try to remove this type of capacitors without removing the stress on the via in the circuit board, you risk damaging the via. If the via is damaged, it may be VERY difficult to repair the connection. To prevent tearing the via, with your soldering iron, you push the terminal toward the opposite side of the hole/via (being sure to apply no pressure to the copper pad - the tip can't touch the circuit board, only the terminal). When done properly and the pressure from the iron is removed, the terminal will remain centered in the hole instead of applying pressure to the side of the hole. When removing the capacitor, is should come out smoothly. If you feel resistance, grinding or squeaking (you'll understand what I mean if it happens) as the terminal is removed, pressure is being applied to the via and you're likely doing serious damage.
Right-click the file above to zoom in if you want to see slightly better detail.
Notes:
◦When performing the procedure described above, you may need to desolder the capacitor's terminal to see how it's oriented. When actually pushing it to the center of the hole, you need to have plenty of solder on the connection. This will assure that there is good heat conduction to all of the solder in the via. If you try to move the terminal with little or no solder, you may pull the via from the copper pad.
◦You will need a very good iron to remove this type of cap from some boards. The combination of heavy copper on the circuit board, the large terminals and the large cap sinking heat make this difficult to do on some amps. A 50 watt iron seems to be the minimum. An 80 watt iron would not be too large.
hope this helps people in future like I said tricky it was hard for me to see in picture
Note:
Many people are concerned about washing circuit boards with water. As long as no power is applied to the amp when washing, the amplifier is dried relatively quickly and is thoroughly dry before power is again applied, it is unlikely to do any harm.
Some amplifiers will come in with circuit boards that are too dirty/nasty to work on. Sometimes, the board will be covered with dirt. Other times they will come in with insect infestation (mostly spiders or cockroaches - don't ask me how an amplifier can become infested with cockroaches). They may even be covered with electrolyte from failed capacitors. No matter the reason for the mess, you can clean them relatively easily. I generally spray the board down with something like Fantastic or Formula 409 (trying not to get too much into the potentiometers). After soaking for a few minutes, I will wash the board with hot tap water or with a pressure washer. Rinse it until all of the cleaner is removed (even from under the capacitors and ICs). If you use the car wash to wash the board, keep the wand far away from the board or just use the low pressure setting. The stream from a car wash wand easily has enough force to break some of the electronic components if the tip of the wand is held too close to the board/components when rinsing the board.
After washing the board, shake as much water as possible from the board and set the board in the sun to dry. If you have access to an air compressor (one that does NOT have an automatic oiler -- used to keep air tools properly oiled), use it to blow all of the water from under the components (this will greatly reduce drying time). Typical drying time in bright sun and low to moderate humidity will be a few hours so try to do it early in the day to ensure that the board doesn't have to remain wet overnight. If this is done in the winter, the board can be dried in a conventional oven. Set the oven for ~150°F and check it often. Make sure that none of the plastics are getting soft. If you're not sure that the oven's thermostat is accurate, use an oven thermometer to make sure the temp doesn't go too high. The temperature inside a vehicle in the summer can easily reach 150° so using an oven at 150° is generally OK.
Note:
When using an oven, you want to make sure that the amp is well away from the heating element being used. If the oven is set to 'broil', the top element will be used to heat the oven. When 'bake' is used, the bottom element is used. Some ovens have a 'preheat' setting where both elements will be used. When using an oven to dry a board, preheat the oven and check the temperature before placing the board in the oven. Set the amp on the highest rack possible and set the oven to 'bake'. This will ensure that the amp doesn't receive any direct heating from the element.
The next 4 images show the before and after condition of two amps that were too filthy to work on. One was covered with a black dust. The other had gotten wet and was covered with rust. Not only are the amps going to be easier to service, they'll look better when the job is done.
Back To The Top
4.Using the Proper Cleaners:
When a board needs cleaning, you need to use the correct type of cleaner. For example, you will encounter many amplifiers with blown power supplies. When the power supply transistors fail, they will often coat the board with a layer of black soot. To clean this, a solvent like acetone works very well. If you tried to remove the soot with some type of common household cleaner like 409 or Fantastic, you would not get good results. If you try removing the residue from a sugary soft drink with solvent, you will not get good results but a household cleaner will remove the residue very easily. If you don't know what will work best, try both types.
Note:
Solvents like acetone will evaporate relatively quickly. Household cleaners (mostly water) will take much longer to evaporate completely. You should be absolutely sure that the board is completely dry before applying power to the amplifier. Failure to do so can cause amplifier failure (in the case of the household cleaners) or could be a fire hazard (in the case of the solvents).
Back To The Top
5.Watching for Open Traces:
Sometimes, when power supply transistors (typically FETs) fail, the foil trace that connects the center leg to the power transformer will open. Many times, the open gap is very small (just a few thousandths of an inch). If you don't see it and allow the amplifier to leave the shop without proper testing, the amplifier may fail prematurely. Until you notice the trace and repair it, the amplifier will likely continue to fail every time you replace the FETs. Having the open trace is effectively removing one of the FETs from the power supply.
In the following photo you can see an open trace. It's relatively easy to see here because it's been tinned and cleaned. If you don't take the time to clean the board, an opening this narrow in the foil can be difficult to see. For reference, the transistor through-hole is ~0.05 in diameter. More on this type of damage (and repair) can be found on the Repairing Physically Damaged Traces page (section 4).
Back To The Top
6.No Open Soft Drinks on Bench:
Many people have a habit of always having a soft drink close at hand. This is a bad habit at the work bench. The containers of some solvents are similar in size and shape to soft drink bottles. If you're not paying attention, it's possible that you could pick up a solvent container instead of a soft drink. I know the chance of doing that is slim but it IS possible. In my opinion, you should not have soft drinks on the bench.
If you must have a drink on the bench, only drink bottled drinks and ALWAYS tightly replace the cap when you're not drinking from it. Also, non-diet drinks have a lot of sugar. If any drink with sugar is spilled into any piece of equipment, it will be necessary to thoroughly wash the unit out (as described in a previous tech tip). Diet drinks leave little residue when the water in them evaporates and make much less mess in case of a spill.
Back To The Top
7.Vented Capacitors:
When a capacitor is stressed (due to too high ripple current or too much voltage or reverse voltage), it will overheat. When this happens, the electrolyte boils and pressure builds in the capacitor. To prevent the capacitors from exploding as the pressure builds, the manufacturer provides intentionally weakened areas of the aluminum can.
As you can see in the next image, the capacitor obviously overheated. The open vents in the top of the can are a sure sign that the capacitor was pushed well beyond its limits. When a capacitor vents like this, it must be replaced. The loss of electrolyte will cause a change in value. This means that the capacitor cannot possibly perform to spec. When a capacitor vents, the electrolyte will spray or leak out and get all over the enclosure, heatsink and circuit board. When this happens, you must wash all affected parts. Failure to do so will lead to significant corrosion of all of the unprotected metal parts. If the board isn't cleaned, the amplifier will likely fail in the future as the copper traces are eaten away by the electrolyte.
From a different angle, you can see how the top of the vented cap is bulging and how the top of a normal cap is flat.
Sometimes it appears that a capacitor may have vented but it's actually OK. In the case of the capacitor below, the shrink-wrap on the capacitor split and the top was bowed up. After removing the plastic insulator from the top of the capacitor, I could see that the capacitor was not bulging and it had not vented. There's no reason to change this capacitor.
This cap has a bulging top and the shrink-wrap has split. This cap has definitely failed.
Back To The Top
8.Leaked Electrolyte:
Some capacitors have poor seals and will leak electrolyte onto the circuit board. The electrolyte is corrosive and will cause damage to anything metallic (particularly copper). The image below shows a capacitor that has leaked. You can see that one lead of the capacitor has been eaten away. You can also see that there is considerable corrosion to the circuit board. The solder pad for one resistor was completely eaten away. To make a solid electrical connection, I wrapped the lead of the new resistor around the lead of another component. I could have alternately scraped the solder mask from the copper trace and soldered the lead directly to the trace. When you encounter this problem, you need to pay attention to the surrounding area. If you see signs of corrosion on the leads of other components, they need to be thoroughly cleaned, inspected and replaced if the damage is significant. Pay close attention to diodes. If you see signs that electrolyte has entered the body of the diode (you can see discoloration on the leads inside the case -- for clear diodes), replace the diode. All areas contaminated with electrolyte need to be cleaned with acetone.
For more repair notes on boards badly damaged by electrolyte, read the Board Badly Damaged by Leaking Capacitors section of the Repairing Badly Damaged Circuit Boards page.
Back To The Top
9.Removing Large Snap-In Capacitors:
Removal of most components is relatively straightforward but the snap-in capacitors are slightly different. These capacitors get their name from the way their leads go into the circuit board. As you can see in the next two photos, the leads are bent outward at the center of the lead. When installing these caps, the cap will snap into place as the leads are pushed through the board. The spring tension on the leads prevents the capacitor from moving when the boards are being handled (before soldering).
When removing two terminal components, it's common practice to heat one lead and tilt the component (so that the terminal being heated can pull out of the hole in the board). Then you heat the other terminal and tilt it the other direction until the leads have have cleared the board. You will do the same with these components but you must remove the tension in the terminals.
Below, you can see that solder has been removed from one of the capacitor's leads. The way that the lead has been cut has left a chisel-shaped tip. If you try to remove this type of capacitors without removing the stress on the via in the circuit board, you risk damaging the via. If the via is damaged, it may be VERY difficult to repair the connection. To prevent tearing the via, with your soldering iron, you push the terminal toward the opposite side of the hole/via (being sure to apply no pressure to the copper pad - the tip can't touch the circuit board, only the terminal). When done properly and the pressure from the iron is removed, the terminal will remain centered in the hole instead of applying pressure to the side of the hole. When removing the capacitor, is should come out smoothly. If you feel resistance, grinding or squeaking (you'll understand what I mean if it happens) as the terminal is removed, pressure is being applied to the via and you're likely doing serious damage.
Right-click the file above to zoom in if you want to see slightly better detail.
Notes:
◦When performing the procedure described above, you may need to desolder the capacitor's terminal to see how it's oriented. When actually pushing it to the center of the hole, you need to have plenty of solder on the connection. This will assure that there is good heat conduction to all of the solder in the via. If you try to move the terminal with little or no solder, you may pull the via from the copper pad.
◦You will need a very good iron to remove this type of cap from some boards. The combination of heavy copper on the circuit board, the large terminals and the large cap sinking heat make this difficult to do on some amps. A 50 watt iron seems to be the minimum. An 80 watt iron would not be too large.
hope this helps people in future like I said tricky it was hard for me to see in picture
Re: Reconditioning ZX600TI & ZX400TI, need more help.
sorry couldn't get the pictures up for better detail
Re: Reconditioning ZX600TI & ZX400TI, need more help.
Thanks tricky, you are spot on there are left over solder in the hole its from when i removed the cap the solder filled in the opening in the via.trickyricky wrote:There are no large traces in that spot your talking about brinrose thats why light barely goes through that spot. If you look at both pics posted you can see from the top side that there is a large spot without copper.
It actually looks pretty good Alfaholic, just like you mention vacuum the rest of the left over solder from the via's and your good to go with the new snap in's.
On nr2 it looks like i have burnt into the board but its my sucker iron that leaves a volcano shape so there is leftover solder on the outside.
I have testet the it wth my DMM and there is full contact through the via, when i test + & - from one via to another it seems like two off the caps have conntact but they are separeted from the two other caps like the red lines in my picture why are they connected two and two?
- Attachments
-
-
zpa0.5(V210245)
zpa0.3(00618)
zx600ti x2
600titanium
zx400ti
sd500.4
XSC5 x2
pld1
sdt-ti
tba
bass cube
tld66
zpa0.3(00618)
zx600ti x2
600titanium
zx400ti
sd500.4
XSC5 x2
pld1
sdt-ti
tba
bass cube
tld66
Re: Reconditioning ZX600TI & ZX400TI, need more help.
the positive connect to each other and the negitaves connect to each other
Re: Reconditioning ZX600TI & ZX400TI, need more help.
brinrose wrote:the positive connect to each other and the negitaves connect to each other
If that is true it would be connected like on this Picture but its not on the zx400ti?, if you see my drawing you see how they are hooked up two off the rail caps are conneceted + to + they are again Connected to the - on the other two rail caps.
- Attachments
-
-
zpa0.5(V210245)
zpa0.3(00618)
zx600ti x2
600titanium
zx400ti
sd500.4
XSC5 x2
pld1
sdt-ti
tba
bass cube
tld66
zpa0.3(00618)
zx600ti x2
600titanium
zx400ti
sd500.4
XSC5 x2
pld1
sdt-ti
tba
bass cube
tld66
Re: Reconditioning ZX600TI & ZX400TI, need more help.
I got some time on my hand and i started to test the zx600ti in the speaker where 8ohm and tweeter are blown but i got it tested and it works great.
i got some scrathing when adjusting sensetivity but i will fix it later, im not using this amplifier in my car im going with the 600titanium and the zx400ti for the Audison av voce comp set in my front doors i dont think my alternator woul like two 600 amps as it got 105amp alternator and a 54amp battery think i will change the battery to a 64amp or maybe a 70amp AGM battery.
i got some scrathing when adjusting sensetivity but i will fix it later, im not using this amplifier in my car im going with the 600titanium and the zx400ti for the Audison av voce comp set in my front doors i dont think my alternator woul like two 600 amps as it got 105amp alternator and a 54amp battery think i will change the battery to a 64amp or maybe a 70amp AGM battery.
- Attachments
-
-
-
zpa0.5(V210245)
zpa0.3(00618)
zx600ti x2
600titanium
zx400ti
sd500.4
XSC5 x2
pld1
sdt-ti
tba
bass cube
tld66
zpa0.3(00618)
zx600ti x2
600titanium
zx400ti
sd500.4
XSC5 x2
pld1
sdt-ti
tba
bass cube
tld66
Re: Reconditioning ZX600TI & ZX400TI, need more help.
alts are rated in amps(60-200A), batteries are normally rated (at least here) in CCA (cold cranking amps). Adding a 2nd battery to an already overloaded and underpowered alternator will not help much. Get the biggest battery you can fit and then you need to upgrade the alt first, then you can add another battery or two.
The scratch noise on the gain can normally be fixed by just swiping all the gain/cross over adjustments back/forth 5-6 times with the power off.
The scratch noise on the gain can normally be fixed by just swiping all the gain/cross over adjustments back/forth 5-6 times with the power off.
what else can I say I am a grumpy asshole most of the time.
Re: Reconditioning ZX600TI & ZX400TI, need more help.
Thanks for your reply i have cleaned the pots and swiped them many times but i will try some more cleaner and test it again.
Finished the zx400ti today and it sounds great, it has some flashing on the Three leds when i swipe the crossover i will try to figure out what the problem is.
Finished the zx400ti today and it sounds great, it has some flashing on the Three leds when i swipe the crossover i will try to figure out what the problem is.
- Attachments
-
zpa0.5(V210245)
zpa0.3(00618)
zx600ti x2
600titanium
zx400ti
sd500.4
XSC5 x2
pld1
sdt-ti
tba
bass cube
tld66
zpa0.3(00618)
zx600ti x2
600titanium
zx400ti
sd500.4
XSC5 x2
pld1
sdt-ti
tba
bass cube
tld66
Re: Reconditioning ZX600TI & ZX400TI, need more help.
I tested the zx600ti again today and the heatsink got so hot that i almost could not touch it but it did not go in thermal mode i did not play music on it i was just seeing how much ampere it used on idle(10ampere) and then i tested the speaker terminal on idle it has 8.8ampere out from the right speaker it also was 10volt on the speaker terminal but on the left side everything is ok 0,18Mv and no ampere.
Anyone got any thought on what can cause this before i take the heatsink of?, i was thinking on the sillypad but i changed them and i was really carefull i even used some termal paste under so it would stick.
Anyone got any thought on what can cause this before i take the heatsink of?, i was thinking on the sillypad but i changed them and i was really carefull i even used some termal paste under so it would stick.
zpa0.5(V210245)
zpa0.3(00618)
zx600ti x2
600titanium
zx400ti
sd500.4
XSC5 x2
pld1
sdt-ti
tba
bass cube
tld66
zpa0.3(00618)
zx600ti x2
600titanium
zx400ti
sd500.4
XSC5 x2
pld1
sdt-ti
tba
bass cube
tld66
Re: Reconditioning ZX600TI & ZX400TI, need more help.
Were you running a signal into the amp? Have you tried speakers hooked up to it yet? I have cheap bookshelf speakers from eBay that I use. Sometimes amps will put out a noise with no signal which would give you some voltage. That noise could be due to bad caps (not power supply but the smaller signal ones). There could also be an issue with your output transistors.
I'd say first step it to hook up speakers without audio going in and see if there's noise.
I'd say first step it to hook up speakers without audio going in and see if there's noise.
A few of these and a few of those.
Creator of www.phoenixgoldregistry.com
hit me up to add your limited edition amps.
Creator of www.phoenixgoldregistry.com
hit me up to add your limited edition amps.
Re: Reconditioning ZX600TI & ZX400TI, need more help.
It got new input caps and rail caps and everything looks ok there is no sign of something being wrong but when i measure the feet on the transistors that have the sillypad i get different readings on them, im thinking one of them is at fault.
I tested it with speakers before and it sounded good i then put it away and i was going to measure dc offset when it startet to heat up and it did not have audio inn, all 4 red lights on the motherboard were on.
I got enough of the zx600ti so im not in a rush to repair it as i got alot of other projects to finish, with the ampere and voltage coming out of the speaker terminal i think hooking a speaker on it would blow the speaker fast.
zpa0.5(V210245)
zpa0.3(00618)
zx600ti x2
600titanium
zx400ti
sd500.4
XSC5 x2
pld1
sdt-ti
tba
bass cube
tld66
zpa0.3(00618)
zx600ti x2
600titanium
zx400ti
sd500.4
XSC5 x2
pld1
sdt-ti
tba
bass cube
tld66
Re: Reconditioning ZX600TI & ZX400TI, need more help.
did you discharge the cap outside of the circuit or was it still connected? Outside of the circuit in your hands is fine but on the board could cuase a problem.
what else can I say I am a grumpy asshole most of the time.
Re: Reconditioning ZX600TI & ZX400TI, need more help.
I think it shorted in the circuit but i cant remember it, when i were going to remove the caps it shorted i now use a resistor to empty the caps before i start removing them but this was my first cap change.ttocs wrote:did you discharge the cap outside of the circuit or was it still connected? Outside of the circuit in your hands is fine but on the board could cuase a problem.
The thing is i played music on it for over one hour then i put it away and when i hooked it up to test it thats when it started heating up, the fan did not start to go faster and thermal did not come on, but i think i put some paste under the temp sensors on the heat sink maybe thats why it did not go in to thermal mode.
zpa0.5(V210245)
zpa0.3(00618)
zx600ti x2
600titanium
zx400ti
sd500.4
XSC5 x2
pld1
sdt-ti
tba
bass cube
tld66
zpa0.3(00618)
zx600ti x2
600titanium
zx400ti
sd500.4
XSC5 x2
pld1
sdt-ti
tba
bass cube
tld66
Re: Reconditioning ZX600TI & ZX400TI, need more help.
Forgot to ask in my reply, what happens when the caps are shorted in circuit what is the danger and what can break when doing so?.
zpa0.5(V210245)
zpa0.3(00618)
zx600ti x2
600titanium
zx400ti
sd500.4
XSC5 x2
pld1
sdt-ti
tba
bass cube
tld66
zpa0.3(00618)
zx600ti x2
600titanium
zx400ti
sd500.4
XSC5 x2
pld1
sdt-ti
tba
bass cube
tld66
Re: Reconditioning ZX600TI & ZX400TI, need more help.
I would not even bother guessing and err on the side of safety and replace them. I mean we are talking about an hour or two of your time and a few bucks vs hello magic smoke....
what else can I say I am a grumpy asshole most of the time.
Re: Reconditioning ZX600TI & ZX400TI, need more help.
If the caps are shorted then the amp itself is shorted as that's a direct link from power to ground on the amp. It will hopefully blow the fuse going to the amp before any damage occurs. If not, the point where the short happens (a stray wire maybe) will burn, hopefully not taking a lot of components with it.
Here's what happened when a stray copper strand got loose in this amp and shorted:
Btw that's how I bought the amp. I found the copper strand fused between two legs of one FET.
Here's what happened when a stray copper strand got loose in this amp and shorted:
Btw that's how I bought the amp. I found the copper strand fused between two legs of one FET.
A few of these and a few of those.
Creator of www.phoenixgoldregistry.com
hit me up to add your limited edition amps.
Creator of www.phoenixgoldregistry.com
hit me up to add your limited edition amps.
Re: Reconditioning ZX600TI & ZX400TI, need more help.
The short i had was smal i shorted it two days after i had powered it up it was a small spark between the fets on one of the input caps and the amp had no power on it when it happened it was just some leftover in the caps.
I will see if i can get the transistors that have sillypad on them but first i will check all the components on the motherboard, the weird thing is that i played music on it and it sounded great and this was after the short and cap change.
i have removed the heatsink on the side it got hot but i cant see anything wrong so i have to measure it
zpa0.5(V210245)
zpa0.3(00618)
zx600ti x2
600titanium
zx400ti
sd500.4
XSC5 x2
pld1
sdt-ti
tba
bass cube
tld66
zpa0.3(00618)
zx600ti x2
600titanium
zx400ti
sd500.4
XSC5 x2
pld1
sdt-ti
tba
bass cube
tld66