Page 1 of 1
how to repair damaged tru-holes while replacing caps
Posted: Sun Oct 11, 2009 10:43 am
by nico boom
Most of you know that all PG amps from the 90's need NEW CAPS in order to prevent the amp from catching fire, destroying the board in more than one case.
Beeing a MS-fan since the 90's, I started replacing caps some years ago, after learning a lot from both Cecil and Eric.
While replacing caps for a number of years now, I encountered all kinds of problems, which needed a solution.
One of them is how to repair damaged tru-holes; wether damaged by yourself, or the one that was there before you.....
These pics show my method, which also works as a solution for torn-off solderpads on the backside of the board ,due to overheating.
When there is a demand, I will post some more info with solutions for the various problems you can encounter while recapping your beloved amp[s].
The first pic shows how it's not to be done IMO.....
GOOD LUCK.

Nico
Posted: Sun Oct 11, 2009 10:49 am
by 76Trans Am
Great info Nico !
Posted: Sun Oct 11, 2009 11:13 am
by bogart
what fun would repairing amps be if you didn't have to repair a few pulled via's ah Nico

I've not pulled any off of any ms amps yet...but I am working on a zx450 that needs new potomiters and a few switches on the crossover board and I swear for everyone I get up it pulls two or three of the upper via's on legs....to many legs over a wide area....with one iron only it is a pain in the ass
If it is doing it like that on ms amps you are running your iron too hot or too cool....the rail caps are a bitch...but the signal caps shouldn't be doing that so much and it looks like it lifted pretty good. Nice work Nico....try adjusting the temp on the iron a bit and see if it helps.
After doing this a few times I quit lifting em like this as it is harded and more time consuming them just pulling the cap off the legs without heating the solder....then flush cut the bottom....heat the legs and they will fall right out and I havn't had any issues or vias lift doing it at all on the caps....
rail caps are another story....try leaving em soldered and twist it till the upper leg breaks off the bottom of the cap...don't go crazy with the wiggling or anything....just try to bust one leg and then you can lift the cap to a point to get long nosed flush cutters under the cap and cut the second....from there it is the same as the signal caps...heat the to of the leg and they should fall right out.....
Posted: Sun Oct 11, 2009 11:31 am
by marko
that's brilliant! many thanks for sharing this info!
i too have been doing cap replacements for some time now and still get the odd pulled via and always wondered how best to tackle the problem, this is by far the best method i've seen so far.
pic 1 is an ok job and invisible when board fitted back but the solder wick idea is very slick and a factory look

Mark.
Posted: Sun Oct 11, 2009 12:56 pm
by nico boom
bogart wrote:what fun would repairing amps be if you didn't have to repair a few pulled via's ah Nico
If it is doing it like that on ms amps you are running your iron too hot or too cool....the rail caps are a bitch...but the signal caps shouldn't be doing that so much and it looks like it lifted pretty good. Nice work Nico....try adjusting the temp on the iron a bit and see if it helps..
I have no problems with that, somebody had been there before me; I always use different temp. settings while working on my amps.....
Posted: Sun Oct 11, 2009 1:55 pm
by bogart
I hear you...I recently bought a few amps people had torn down and am spending more time on repairing the damage they did trying to remove parts.....
Posted: Sun Oct 11, 2009 4:54 pm
by Eric D
Those last photos are a method I often use, and you are doing an even better job of it than I.
However, that first photo is pretty scary. Those wires are far too small, and if the amp were under load, they could possibly burn open, or worse, melt their insulation and short on another trace causing a fire.
Posted: Mon Oct 12, 2009 5:23 am
by nico boom
Eric D wrote:Those last photos are a method I often use, and you are doing an even better job of it than I.
However, that first photo is pretty scary. Those wires are far too small, and if the amp were under load, they could possibly burn open, or worse, melt their insulation and short on another trace causing a fire.
Pretty scary indeed Eric; I found this "repair" after disassembling a MS 275 which had to be recapped.
The amp had more "solutions" like this for another few issues...

....
Posted: Mon Oct 12, 2009 5:32 am
by Eric D
Ok, that makes more sense. I got the impression you did that repair, which I did not understand, since the following photos showed you know far better methods.
Have you tried the "drill a small hole next to the damaged hole and run a wire" method before? In the case of the big rail caps on these amps, there is a lot of space to work with, so you can drill a small hole through the board, install a wire and solder it to both sides of the board, prior to installation of the cap. I personally prefer what you did above with the existing hole, but sometimes the drill a new hole method is an easier option.
Posted: Mon Oct 12, 2009 6:23 am
by nico boom
I have not tried that yet, but is a very good option indeed.
Most of the times running the lead through the existing hole work fine, but like you said; there's enough room to work there!
[I do always take care to let the soldering under the cap point away from the connectors on it..].
Thanks for bringing up the drill-a-hole-method.
Re: how to repair damaged tru-holes while replacing caps
Posted: Sun Oct 16, 2011 1:21 am
by todd131
so after reading this thread, do i need to replace the caps on the m44 i have recently purchased? i'm fine with that and can do it but they look great with no leaking.
common sense tells me they're beat however, there is no bulging or leaking.
i'll do the job if you guys think i should. i just need to know where to order new caps from and what part#'s work best.
thanks!
Re: how to repair damaged tru-holes while replacing caps
Posted: Tue Nov 01, 2011 6:16 pm
by thedeal7235
excellent ideas; ive lost more "pads" on zx450s then any other models, but to be fair, since i spent the 20bux on the cheap radio shack "desoldering" iron(has a bulb u suck old solder up with) ive had no issues- i even replaced tri leds earlier today on a ti500.4, used that desoldering iron, and it even sucked out the old led legs no problem, no pads lifted -
Re: how to repair damaged tru-holes while replacing caps
Posted: Sat Nov 12, 2011 8:16 am
by audiogood
Nice trick with the wick.... I have something I would like to add ... There is an tool called an desodering iron and if u repair your own stuff like I do its an must have ... Thee is two types of them ... One is an sodering iron with an squeeze balb on it ..you can find these on mcm electronics .com . what it dose is suck the hot soder out of the joint ... Next is an one that looks like an marker you use it with your sodering iron .. get the soder hot and it sucks the soder out of the joint ... It can be found at raido shack and mcm .. gents this tool makes lifted traces an thing of the pass and if you are trying to desoder something with a lot of soder points its the only way to go ..
how to repair damaged tru-holes while replacing caps
Posted: Wed Jan 25, 2012 10:13 am
by WhiteLX
I've got a sapphire 1.0 that had been working fine, but it's been probably 6 years since I powered it up. Am I going to need to have the caps replaced?

Re: how to repair damaged tru-holes while replacing caps
Posted: Wed Jan 25, 2012 1:09 pm
by audiogood
It looks like its all set . That said caps r cheap parts and easy to replace giving the correct tools . So it would not hurt to replace them .
Re: how to repair damaged tru-holes while replacing caps
Posted: Wed Jan 25, 2012 2:50 pm
by ttocs
take a small piece of paper and slide it under the caps and see if it is wet under them. Even still if you have the time/money to do it it would be wise.
how to repair damaged tru-holes while replacing caps
Posted: Wed Jan 25, 2012 3:09 pm
by WhiteLX
Where would I purchase the correct or upgraded caps? I have soldered circuit boards before. I imagine I could do it. Which ones am I replacing?
Re: how to repair damaged tru-holes while replacing caps
Posted: Wed Jan 25, 2012 3:35 pm
by ttocs
most of us go through digikey. Take note of how many microfarads they are as well as the height, width and how far the pins are apart unless one of the regular techs can tell you which ones will work.
Re: how to repair damaged tru-holes while replacing caps
Posted: Mon Jul 02, 2012 9:08 pm
by JayGold
Nico, can you provide me some pointers on the following from a Route66 M44 side.
Previous repair on RCA terminals, before:
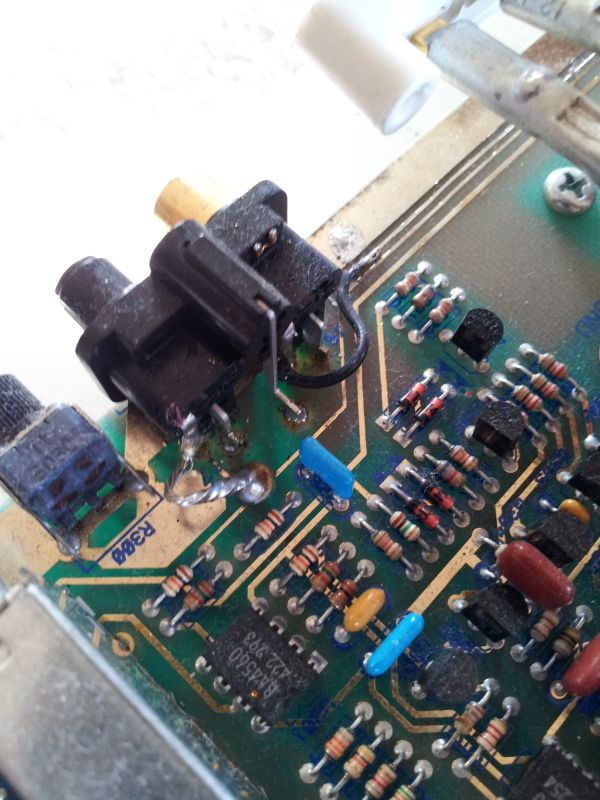
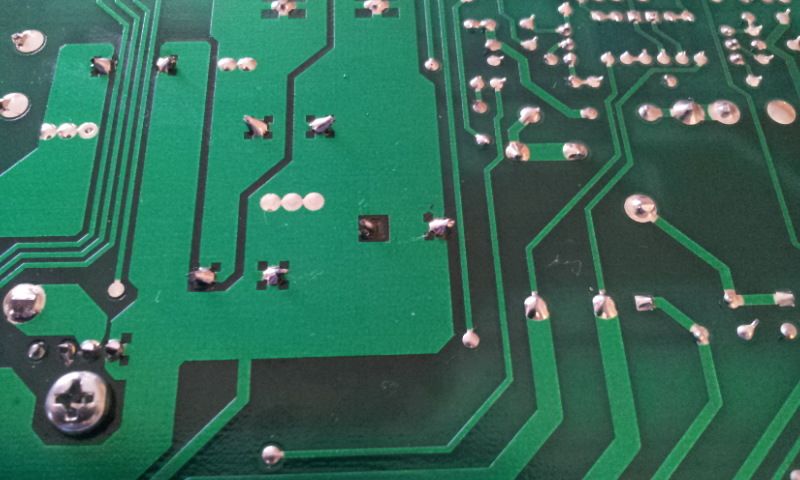
After removal of terminal. Looks as if some of the board traces were pulled off during the last repair job. What do you suggest as a fix?
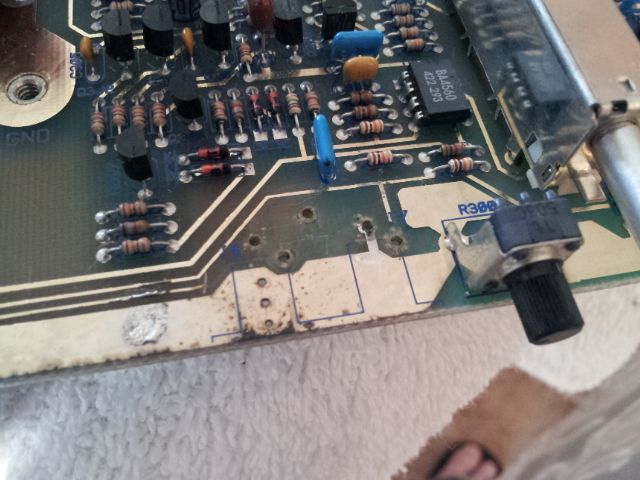
Here I was replacing the caps, this is the only one which wouldn't take solder (via on left in center of picture). Do I fix per your instructions above?
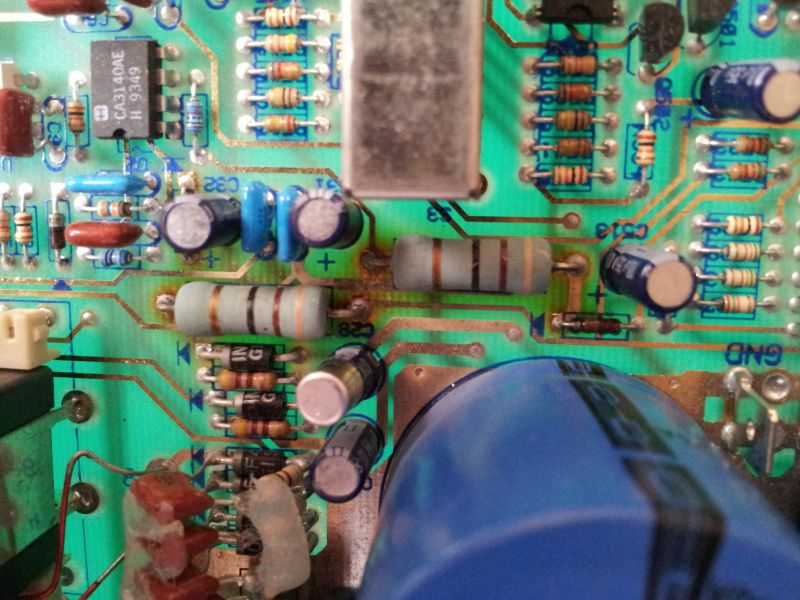
And finally a look at the hottest part of the board, obviously the small cap below the resistors started melting away its exterior. Do you suggest replacing the (2) resistors or just resolder them as they looked a bit cold under the board.
Re: how to repair damaged tru-holes while replacing caps
Posted: Wed Jul 04, 2012 7:55 pm
by nico boom
Repairing the rca terminals was not so badly done, install the new ones like that and you'll be fine.
About the cap replacement; I think the method that I described to repair this kind of damage will work.
I advice to replace the small caps and re-solder the resistors as caps that have been under a lot of thermal stress may fail any time.
Over all it's not so hard to save this amp, and have it up and running again.
Good luck,
Nico
Re: how to repair damaged tru-holes while replacing caps
Posted: Thu Jul 05, 2012 5:37 am
by JayGold
nico boom wrote:Repairing the rca terminals was not so badly done, install the new ones like that and you'll be fine.
About the cap replacement; I think the method that I described to repair this kind of damage will work.
I advice to replace the small caps and re-solder the resistors as caps that have been under a lot of thermal stress may fail any time.
Over all it's not so hard to save this amp, and have it up and running again.
Good luck,
Nico
Thanks Nico, I'll give this all a try.