Page 1 of 2
FJ Cruiser Install
Posted: Sun Nov 18, 2007 7:21 pm
by mr tibbs
Well, here it is. I should finish it up tomorrow and I'll upload the final pics then. Here is a list of the equipment used.
Amp: PG Xenon 200.4 (with the Onyx cover)
Front stage: Exile XP 65 comps
Sub stage: Exile XT 12" (in a custom made sealed .9cuft box)
Headunit: Stock (6 disc mp3 changer)
Misc: SLD44 Line Driver/LOC, RAAMmat sound deadning, Ensolite sound absorbing material, 1/0 wire ran into a distro block then split into (2) 4 gauge runs to the amp, Sirius radio hard wired into the vehicle.
I really thought I could get this done in 2 days, but I thought wrong. I'll update it tomorrow.
Pics
Posted: Sun Nov 18, 2007 7:32 pm
by Eric D
Nice job on the enclosure.
Is that fleck paint?
If it is, that means you and I are the only guys left on the face of the Earth willing to use that stuff in an install.
Posted: Sun Nov 18, 2007 7:33 pm
by fordtough1
Nice work.

Even the cat thinks so.

Posted: Sun Nov 18, 2007 7:34 pm
by mr tibbs
Eric D wrote:Nice job on the enclosure.
Is that fleck paint?
If it is, that means you and I are the only guys left on the face of the Earth willing to use that stuff in an install.
Yep it sure is!!! This is great Doc, we finally agree on something!!!
I thought it turned out rather well, it kinda fits the ruggedness of the FJ.
Posted: Sun Nov 18, 2007 7:40 pm
by Eric D
Did you get the mounting idea from me? If not, that would still make sense, as it is a straightforward way to do it. I am just curious if you did, as I hope all the shit I post online is actually beneficial to someone out there who happens upon it. Here is the install I did which looks like a clone of your work here…
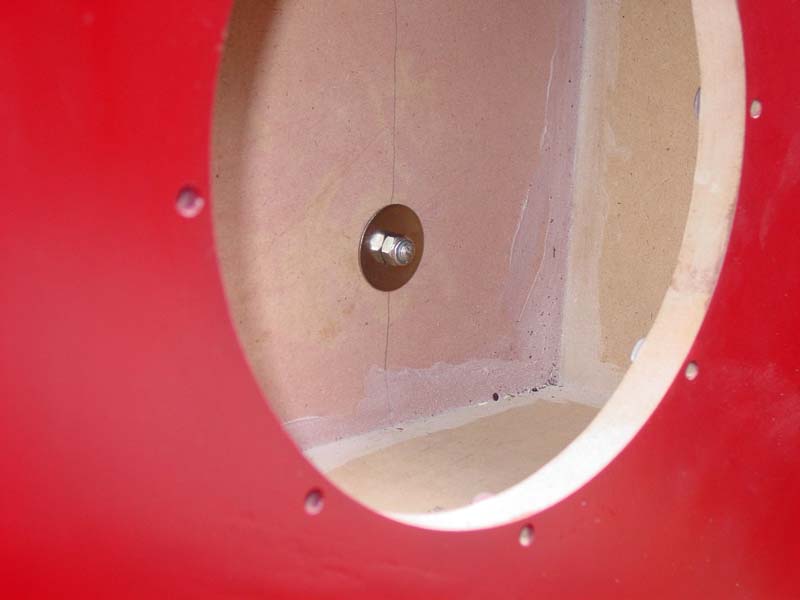
I used caulk under the fender washer as well, but the stuff I used was clear so it does not show up in that photo.
This was the box I bolted in.
Posted: Sun Nov 18, 2007 7:46 pm
by mr tibbs
Actually no, I have done it this way in a past install. In the FJ it was even easier because the bolts were already welded into the interior for the factory sub and tie downs. All I had to do was dab some thread lock on the all thread, and lock it in there. It really does work well, the box is rock solid in there.
Posted: Sun Nov 18, 2007 7:50 pm
by Eric D
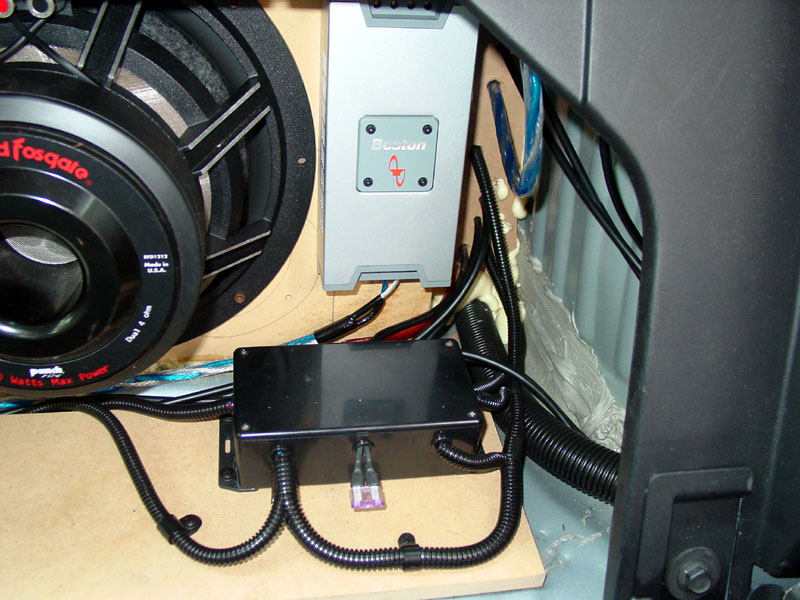
As a suggestion, I think you would benefit from covering the wires around the SLD44 with some split loom tubing. It is very cheap, and would help prevent a possible snag of something on your wiring. Chances are you personally will never snag anything on those wires, but any passenger should be seen as a threat to your install.
For example, I have never seen a drivers side kick panel grill smashed in, only passenger side grills ever get this abuse. I wonder why?
Posted: Sun Nov 18, 2007 7:53 pm
by Eric D
This is the stuff I am talking about...
Posted: Sun Nov 18, 2007 8:04 pm
by mr tibbs
Eric D wrote:This is the stuff I am talking about...
I see your point, but the line driver is consealed under the center console. Neither it or the wires can be seen or touched. When I do the final adjustments tomorrow I'm going to have to take the center console off, make the adjustments, then re-install the center console. That is a good tip though, I'll have to remember that!
Posted: Sun Nov 18, 2007 8:09 pm
by Eric D
If it buried then this would be no benefit to you.
From the photos I got the impression it was mounted under a front seat.
Posted: Sun Nov 18, 2007 8:48 pm
by dedlyjedly
Good job Casey. How do you and your girl, scratch that, FIANCE like it? I ALWAYS underestimate the time required to properly install sound treatments, even after doing many full-blown deadening/foam jobs for customers. Time just gets the best of you when it comes to that type of work.
LMAO at the fleck-stone!
Believe it or not, many of the panels in the demo room of the shop in Logan is STILL covered in that stuff. But we're talking nasty colors straight from the 80's! The owner just couldn't see why an update was necessary!

The stuff you chose does fit in for the FJ but I despise that stuff because of my past experiences with it.
Posted: Mon Nov 19, 2007 7:27 am
by stipud
Sweeeet. How does it sound? I still haven't heard any Exile stuff yet.
Posted: Mon Nov 19, 2007 7:30 am
by soth
Posted: Mon Nov 19, 2007 9:28 am
by Bfowler
Looking great. as i looked thgought the pictures a lot of made me think "nice! thats exactly what i would have done!" (the tweets especcially) kick ass
Posted: Tue Nov 20, 2007 5:29 pm
by mr tibbs
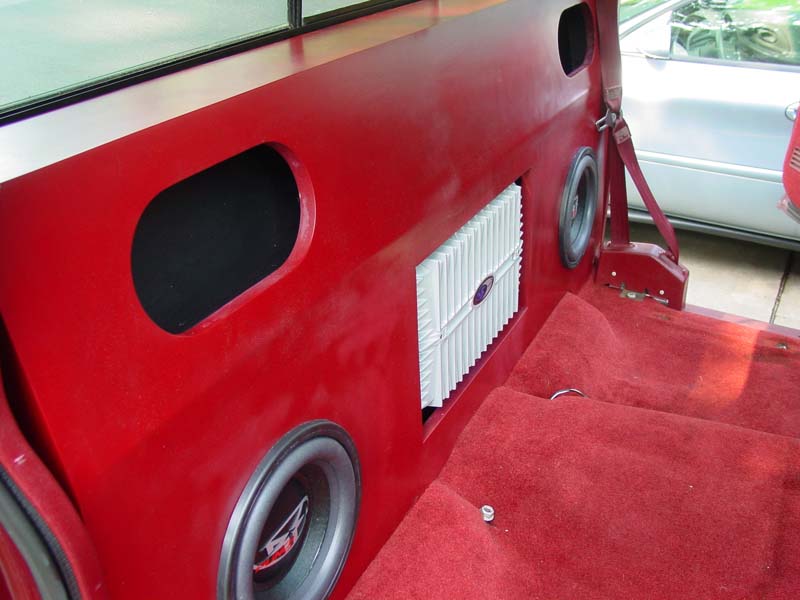
Thanks guys!! Here are a few final pics of the install. All I have left to do is a little bit of wire management around the amp and some tuning. O'yeah, and wire up the lpl when it comes in.

Sirius sat hardwired in.

Aux plug in for sirius

Sub box

Amp

Amp again (thanks Vin!!)

Look from the back

Where the lpl will be going
As far as the sound goes so far it's pretty darn good!! It still needs some tuning and playing with the x-overs, and the drivers still need some break in time, but I'm liking it. The mids seem to have plenty of midbass and the sound stage is surprisingly good. I was afraid that with the mids and the tweets being so far apart it would be wayyyyy off, but it seems just fine. The sub is not overpowering and blends well with the front stage. I'm sure when the lpl comes in I can crank it up when I want to though.
Posted: Tue Nov 20, 2007 6:32 pm
by stipud
Noooo! You're using red wire for power AND ground? Didn't we teach you better than that?
If you really want to clean up that Sirius install, tap into the wires behind the aux in port to make yourself a second (hidden) mini jack, run in parallel to the front aux. Alternatively you could install a switch too. This way when the Sirius isn't playing you also have an alternative aux port you can use.
Posted: Tue Nov 20, 2007 6:46 pm
by mr tibbs
stipud wrote:Noooo! You're using red wire for power AND ground? Didn't we teach you better than that?
If you really want to clean up that Sirius install, tap into the wires behind the aux in port to make yourself a second (hidden) mini jack, run in parallel to the front aux. Alternatively you could install a switch too. This way when the Sirius isn't playing you also have an alternative aux port you can use.
I was wondering who would catch that!
I made the mistake of assuming I had enough black 4 gauge wire, and of course I was incorrect. I had to use the red for the ground for now, but it will be fixed in the future.
As for the aux port that might be a nice weekend project on of these days! I guess I should read up on how to do that, any suggestions?
Posted: Tue Nov 20, 2007 7:03 pm
by stipud
mr tibbs wrote:As for the aux port that might be a nice weekend project on of these days! I guess I should read up on how to do that, any suggestions?
Go to Radio Shack and pick up a headphone output plug. Alternatively you can buy a headphone extension cord and chop the end off... THE CHOICE IS YOURS!
As for picking which wire is which, ground is always easy... not too sure about the L/R colors in your car, but you could probably figure it out easily with a multimeter.
Posted: Wed Nov 21, 2007 12:22 pm
by mr tibbs
And finally, here are some pics of the under hood wiring and more of the amp rack. That will pretty much do it for this install. Not too shabby if I do say so myself.

Amp rack, distro block is installed in the removable panel you can see behind the amp.

Amp rack close up

1/0 through the firewall. You can see in this pic where the 2nd battery will be installed in the future.

Circuit breaker and battery terminals. The battery terminals will be replaced in the near future.

Circuit breaker and mount. The mount it a temp until the 2nd battery is installed.
Posted: Wed Nov 21, 2007 12:30 pm
by fuzzysnuggleduck
I like the amp rack, very clean and simple yet totally functional and secure.
Posted: Wed Nov 21, 2007 12:55 pm
by stipud
Black power wire under the hood, and red ground in the back? Sigh... I guess I should just take down the forum. It's obviously doing no good at all.
Upgrade your battery-frame-engine grounds to 0 gauge as well. I guess you can use red 0 gauge to keep in tune with your current theme
Nice solid amp rack at least
Posted: Wed Nov 21, 2007 1:22 pm
by mr tibbs
Posted: Wed Nov 21, 2007 1:35 pm
by Bfowler
tom, you put too much stock in colors!
if he can tell which is which....meh
the only thing i see that you might fix is some heat shrink over the terminals on your circuit breaker. the plastic on those is surprisingly fragile after a year or so of engine heat. (its unlikely, but worth the ease of mind)
Posted: Wed Nov 21, 2007 1:57 pm
by stipud
Bfowler wrote:tom, you put too much stock in colors!
Hey, I'm looking for a reason to bug him. What would this forum be without a friendly jab here and there? If there's no room for improvement, why would you post it? To get pats on the back? Sorry, Tibbs ain't Pandy... he can handle a little criticism
Tibbs your car looks wonderful you are a very special boy. GOOD JOB. Do you want a cookie?
Posted: Wed Nov 21, 2007 2:03 pm
by mr tibbs
stipud wrote:Bfowler wrote:tom, you put too much stock in colors!
Hey, I'm looking for a reason to bug him. What would this forum be without a friendly jab here and there? If there's no room for improvement, why would you post it? To get pats on the back? Sorry, Tibbs ain't Pandy... he can handle a little criticism
Tibbs your car looks wonderful you are a very special boy. GOOD JOB. Do you want a cookie?
:sniff:

:sniff:
, yes, can I have it with chocolate chips?