Okay here is the very first custom install I have ever done working with wood that is.. Of course I have "installed" stereo equip before, but never with wood involved aside from a pre built speaker box... So I have been learning allot, making mistakes, and fixing/correcting/redo'ing them, but for the most part I am very pleased with how it's coming... I will try to start from the begining and show what I had and work up from there.
And I know i am going to miss/leave out something, either in pic's or text.. but please feel free to ask, point out, or make suggestions..
And I will continue to add to it as things develope.. If I didnt have to sleep, eat, and go to work 6 days a week I could get a lot more done but that just isnt the case.. I started this back in Janurary (i think, maybe just feb, but anyways)
My Objective is to have the two 275's in their own lil "amp enclosures" off to the side and the 2250 upside down under the floor in the jumper cable cubby. My intention is to be able to display the boards of the amp's. With all sorts of nice trim, and accessories, etc.. i.e. 1/8" U-Channel around the boarder of the Lexan Glass I will be using as a protective sheild/window for the amps and their plexi's. I DO NOT/DIDN't WANT to have the amps plexi's accessible through the viewing windows as I would want to protect them, and as with lexan glass it posses a UV inhibitor quality, so I thought it might be good to use lexan as a cover/protector for the boards and amp's plexi's. Therefore It is basically double plexi'ed with one of them (The Lexan) being 250 times stronger than glass and helps protect against harmfull sunrays. I have also cut out a PG L0GO from a template I got from Wakeup (Thanks Wakeup) and cut a wood logo out to be used as/for embossing a PG Logo on top of the speaker box. If you take (see pic's) a 1/8" birch/poplar, plywood of somekind and cut out a logo (or anything you like) and glue it down to the speaker box prior to carpeting it will net an rasied/embossed look of what you cut out. The pictures that I have of my sample do no justice of how well/neat it looks in person.. I have 4 people around town already asking me to do just the same for them.. But none of them have PG gear.. so i am not all that anxious to do so (i will just not until i am finished wit'my stuff)... I just need template and I can prepare... But i digress. Have alook at the different stages of this here... if you see something that raises questions/concerns/etc.. please dont hesitate ... but lemme see where I should start... startt with what i have from begining
My '02 Nissan "Pathy"
-
mhyde71

- Dr. Jekyll
- Posts: 6231
- Joined: Sun Jan 20, 2008 8:34 pm
- Location: PG FanBoy in Green Mtn Vermont
- Contact:
My '02 Nissan "Pathy"
- Attachments
-
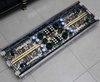
- another look with amp under/behind as it will be once installed. But no trim on the lexan glass as I hadn't gotten it by then.. so the rough edges are visible.. But that will be fixed... and yes I am aware that those caps need to be changed.. i have the
- IMG_3377.JPG (50.97 KiB) Viewed 21770 times
-
- closer look...
- IMG_3341.JPG (54.01 KiB) Viewed 21770 times
-
- carpeted
- IMG_3340.JPG (40.91 KiB) Viewed 21770 times
-
- I cut the wood to size, cut out the window and routered out the perimeter for the lexan to lay into once complete time for carpeting..
- IMG_3337.JPG (36.7 KiB) Viewed 21770 times
-
- I am starting off with (just the same stuff i have in signature..., the RARE Green MS2250TA, two MS-275's, two sealed w6's, I also recently acquired CXS62's (chamelions) form ID - 2 ohm drivers and with them on the 275's whoa.. NICE!!!
- IMG_3166.JPG (46.67 KiB) Viewed 21770 times
Last edited by mhyde71 on Sat Jan 30, 2010 5:26 am, edited 3 times in total.
PAST WORK/S HERE::
https://www.facebook.com/KhameleonKoatings/photos_albums
https://www.facebook.com/KhameleonKoatings/photos_albums

-
mhyde71
- Dr. Jekyll
- Posts: 6231
- Joined: Sun Jan 20, 2008 8:34 pm
- Location: PG FanBoy in Green Mtn Vermont
- Contact:
Thanks B!!!, I would have had a lot more pic's up but I learned that as you add pictures and such you have to do the uploading of them in reverse order so I had made the thread and all that and had gotten the next set of 5 or so pic's ready and come to find out that the pictures were reversed (first one last, last one first) which Im wondering if that can be changed or not.. but I'll live with it for now.. I just have to plan my five pic's with more carefull thought.
More to come tonight.. hopefully
More to come tonight.. hopefully
PAST WORK/S HERE::
https://www.facebook.com/KhameleonKoatings/photos_albums
https://www.facebook.com/KhameleonKoatings/photos_albums

Nice work so far! Keep the pics coming!
One suggestion to offer would be maybe consider painting the boarders of the plexi windows. Maybe an inch wide all the way around. Enough to hide the panel edge underneath and give a nice finished look. It will help with how particular you need to be (or not be) with tucking the carpet around the underside too. Painting the backside of plexi always turns out nice because the uniformity of the paint through the plexi is always perfect. So you don't have to be an expert painter to get a real nice look. I'll look for a pic as an example if you need. It might be clearer then what I'm trying to explain.
One suggestion to offer would be maybe consider painting the boarders of the plexi windows. Maybe an inch wide all the way around. Enough to hide the panel edge underneath and give a nice finished look. It will help with how particular you need to be (or not be) with tucking the carpet around the underside too. Painting the backside of plexi always turns out nice because the uniformity of the paint through the plexi is always perfect. So you don't have to be an expert painter to get a real nice look. I'll look for a pic as an example if you need. It might be clearer then what I'm trying to explain.
Greg Kitching
-
mhyde71
- Dr. Jekyll
- Posts: 6231
- Joined: Sun Jan 20, 2008 8:34 pm
- Location: PG FanBoy in Green Mtn Vermont
- Contact:
Well yes and in fact I didnt care for the "hard edges" either, so what I did and managed to track down (only one company in the states offers it) is 1/8" U-channel I will sliding the Lexan glass in and bolting the amps through it for added support. I will also be putting 45's on the edges via the mitre box, to have a nice trasistion around the corners. and ultimately covering up the hard edges. I Thought I mentioned that.. but cant see right now if i did or not,... but what's nice about the "framing" is that it is aluminum U-Channel with an aluminum satin finish.... Beautiful looking stuff and each of the window enclosures will have it, but it matches the W6's trim rign and of course the car's exterior as well. Just wait 'till you see what else I got up my sleeve, this has been given a whole lot of thought and planning, but and again, it is my first time working with wood...gkitching wrote:Nice work so far! Keep the pics coming!
One suggestion to offer would be maybe consider painting the boarders of the plexi windows. Maybe an inch wide all the way around. Enough to hide the panel edge underneath and give a nice finished look. It will help with how particular you need to be (or not be) with tucking the carpet around the underside too. Painting the backside of plexi always turns out nice because the uniformity of the paint through the plexi is always perfect. So you don't have to be an expert painter to get a real nice look. I'll look for a pic as an example if you need. It might be clearer then what I'm trying to explain.
PAST WORK/S HERE::
https://www.facebook.com/KhameleonKoatings/photos_albums
https://www.facebook.com/KhameleonKoatings/photos_albums
-
mhyde71
- Dr. Jekyll
- Posts: 6231
- Joined: Sun Jan 20, 2008 8:34 pm
- Location: PG FanBoy in Green Mtn Vermont
- Contact:
Well to continue.. here are the covers I have made up for the enclosures. This is where my first learning expirience came to play, as I made the first enclose with no opening to access the amp... duh, how am i going to install to the side of vehicle (in essence make a box) without being able to get inside, and then neva mind gain access to amp if need be. Hence the flip top covers for the 275 enclosures...
- Attachments
-
- Here is what it looks like with the raised/embossed look using the cut out underneath carpeting.. It's really unfortunale the camera doesn't pick it up well.. it's actually like really cool in person.. And better if done on actuall wood, versus the carboa
- IMG_3446.JPG (43.77 KiB) Viewed 21710 times
-
- Using metal sign as templat I traced and jigged out the PG LOGO
- IMG_3432.JPG (46.54 KiB) Viewed 21710 times
-
- Flip top close up and open position
- IMG_3440.JPG (42.28 KiB) Viewed 21710 times
-
- Top View
- IMG_3439.JPG (46.3 KiB) Viewed 21710 times
-
- Flip top cover no face polate or front plate... Hang on soon to come though
- IMG_3437.JPG (42.88 KiB) Viewed 21710 times
PAST WORK/S HERE::
https://www.facebook.com/KhameleonKoatings/photos_albums
https://www.facebook.com/KhameleonKoatings/photos_albums
-
mhyde71
- Dr. Jekyll
- Posts: 6231
- Joined: Sun Jan 20, 2008 8:34 pm
- Location: PG FanBoy in Green Mtn Vermont
- Contact:
Now lets have the enclosures placed in position to get a feel of how they look and then move onto the floor and builing of underneath of floor to support the 2250...
- Attachments
-
- With enclosures in place for demo purposes and fitment analysis. Enclosures are not secured just placed in to demo, check positioning, etc.. all good so far!
- IMG_3654.JPG (46.68 KiB) Viewed 21706 times
-
- Speaker box back in place that weekend was over with.. had to go to work again for the next 6 days. But getting an idea of how it is begining to look
- IMG_3484.JPG (35.84 KiB) Viewed 21706 times
-
- I prepared window in floor as a mock run.prototype, etc.. 1/4" MDF Board will not be used to support amp as I will still need to route out the perimeter for the lexan to be placed and 1/4" MDF frightens me to hold an amp up even with the assist
- IMG_3482.JPG (32.79 KiB) Viewed 21706 times
-
- Cut 1/4" MDF Board out to size. placed in cargo area...
- IMG_3477.JPG (34.07 KiB) Viewed 21706 times
-
- First I made the template out of cardboard... for good fit.
- IMG_3475.JPG (47.6 KiB) Viewed 21706 times
PAST WORK/S HERE::
https://www.facebook.com/KhameleonKoatings/photos_albums
https://www.facebook.com/KhameleonKoatings/photos_albums
-
mhyde71
- Dr. Jekyll
- Posts: 6231
- Joined: Sun Jan 20, 2008 8:34 pm
- Location: PG FanBoy in Green Mtn Vermont
- Contact:
Few more shots of the demo set up... and then on to making the door for the 2250
- Attachments
-
- IMG_3658.JPG (39.22 KiB) Viewed 21704 times
-
- IMG_3659.JPG (38.66 KiB) Viewed 21704 times
-
- IMG_3653.JPG (47.75 KiB) Viewed 21704 times
-
- INCIDENTLY that Pioneer head unit is for sale the DEH_p8MP PM me if you like/want
- IMG_3651.JPG (40.05 KiB) Viewed 21704 times
PAST WORK/S HERE::
https://www.facebook.com/KhameleonKoatings/photos_albums
https://www.facebook.com/KhameleonKoatings/photos_albums

-
mhyde71
- Dr. Jekyll
- Posts: 6231
- Joined: Sun Jan 20, 2008 8:34 pm
- Location: PG FanBoy in Green Mtn Vermont
- Contact:
well for me in this case, or lets say what I did...was took out the carpeting...placed it over big sheet of corrugated and simply traced.. I figured bigger would be better so when cutting I stayed out side the line and tried it... tweaked corners, edges, etc... as needed/desired. then once I got cardboard to fit just so...traced edged on the wood. I used a jig saw for the majority but skill saw for longer less precise cuts.
geese I almost sound professional, to think this is my first time I impressed my self...but wait until you see the finishing touches with lighting and trim work I have in mind...
the logo you see in pics under the carpeting is really just a sample. the real mccoy is the bare wood you see there... and it will Oh... lets say I have plans to) recarpet the speaker box and have it on top of the speaker box like that. I believe I will aso have my distrution blocks and cap up there as well. which wasn't really where I wanted to go with this. I wanted to have distribution under the floor along side the 2250...but its just not gonna work. I would have to raise the floor so much causing everything to be out of wack. so I figure on top of speaker box goes all the smaller peripheals along with raised PG Logo and/or the metal PG Logo with sanded plexis I got from church man with neons under it.
sorry about long post.. just allot going on with respect to this.
Last edited by mhyde71 on Sun May 04, 2008 7:32 am, edited 1 time in total.
PAST WORK/S HERE::
https://www.facebook.com/KhameleonKoatings/photos_albums
https://www.facebook.com/KhameleonKoatings/photos_albums
Bfowler wrote:so how do you accuratly guage the shape of the cardboard (or wood for that matter) i have a terrable time with that and it really holds back some installs
A little trick of the trade that makes life real easy. And this applies to any shape you may be trying to match. Whether you are trying to match the shape of a floor piece to the vehicle side walls. or any trim basically.
All you need to do is cut your piece close to the shape you're trying to match. Doesn't need to be perfect in any way, just close enough. Then tape off the part you're trying to match. And Bondo in the gaps. Let it harden and pull it out. The bondo won't stick to tape but will stick to the trim you are fabricating. So what you're left with is a perfect 'mold' of the piece you're trying to match. You can also use layers of tape as a build-up to allow for the thickness of the meterial you plan on rapping your finished piece in.
If that makes sense. I'm not the best at describing these things sometimes.
Greg Kitching
-
mhyde71
- Dr. Jekyll
- Posts: 6231
- Joined: Sun Jan 20, 2008 8:34 pm
- Location: PG FanBoy in Green Mtn Vermont
- Contact:
Okay... Now to make the door for the 2250. AND This here was another one of my learning expiriences. I at first thought of just cutting the window out in the floor and putting the amp under there then calling it a day... But if i ever wanted/needed to gain access to the amp, tweak, etc.. I would have to remove the entire set up to get access to under the floor. SOOOoooo... I had a couple of options the way I saw it... 1) Make like an access panel/reach in to gain access to amp controls/wires.. but that wasn't going to work as I still would not be able to remove amp maybe for repair or something. OR... 2) Make a swinging door, then the question how to have it swing. Left/Right or Front/Back (up/down). The left/right (like a book) seemed to be the answer at first, as the other way I would need to be mindful of the wiring, i.e. I would need slack in wire to accomodate the amp being lifted/swinging up on the door. So I figured that would be the best way... Now as I am typing this I am trying to recall why I didnt do the left/right swinging door. It may come to me... but now i'm concerned that maybe I was supposed to.. oh well lets see...
So lets have a look at the beginings of the door for the 2250 and a sneak peak of the trim work. I do not have any of the u-channel cut as of yet... but at least we'll get to see what it looks like (this rare stuff).
So lets have a look at the beginings of the door for the 2250 and a sneak peak of the trim work. I do not have any of the u-channel cut as of yet... but at least we'll get to see what it looks like (this rare stuff).
- Attachments
-
- Here is a look of the hindges that I will be using. Just regular ordinary "Gate Door" hindges. F%^&*#G exspensive too... $35.00 for a pair of them.. geese.
- IMG_3812.JPG (39.76 KiB) Viewed 21604 times
-
- Preliminary Spot Check/look over as to how it is looking/coming out.
- IMG_3784.JPG (44.5 KiB) Viewed 21604 times
-
- Now follow me on this one here. Given I am using 1/2" for the door, so I have added support, stronger/thicker wood, than the 1/4" MDF, and becasuse I didnt think about the routing and how far deep I would have to router.. I figured 1/2" wo
- IMG_3781.JPG (36.64 KiB) Viewed 21604 times
-
- Figured the hindges and where their placement will be and routered out the perimeter for the lexan to matcxh the two 275's with there Lexan cover.
- IMG_3777.JPG (37.11 KiB) Viewed 21604 times
-
- Cut out and prepare spot for door to go in
- IMG_3776.JPG (44.77 KiB) Viewed 21604 times
Last edited by mhyde71 on Wed Apr 23, 2008 4:22 am, edited 1 time in total.
PAST WORK/S HERE::
https://www.facebook.com/KhameleonKoatings/photos_albums
https://www.facebook.com/KhameleonKoatings/photos_albums
-
mhyde71
- Dr. Jekyll
- Posts: 6231
- Joined: Sun Jan 20, 2008 8:34 pm
- Location: PG FanBoy in Green Mtn Vermont
- Contact:
Now to get into the Door and Trim A little bit more in detail....
- Attachments
-
- Along side/Layed in against Carpet..
- IMG_3802.JPG (40.42 KiB) Viewed 21599 times
-
- 24 feet of U-Channel.. May have a little left over, depending on how many mistakes I make cutting my 45% angels for the corners.
- IMG_3798.JPG (25.97 KiB) Viewed 21599 times
-
- Back side of door, to show where and what I did for the mounting of the stinger fan I got.. Got one of those 8" fans easy mount stuff... See how that works.. Figured I'd give that a shot, I was a little/very disapointed that a shrouded 2250 would fi
- IMG_3807.JPG (36.51 KiB) Viewed 21599 times
-
- Finished door, save the carpeting, chisled corners, etc...
- IMG_3806.JPG (35.28 KiB) Viewed 21599 times
-
- Using the router only makes rounded corners... therefore I have to take a chisel to the corners to square them off. Works like a charm!
- IMG_3805.JPG (48.68 KiB) Viewed 21599 times
PAST WORK/S HERE::
https://www.facebook.com/KhameleonKoatings/photos_albums
https://www.facebook.com/KhameleonKoatings/photos_albums
-
mhyde71
- Dr. Jekyll
- Posts: 6231
- Joined: Sun Jan 20, 2008 8:34 pm
- Location: PG FanBoy in Green Mtn Vermont
- Contact:
Door hindges ... using regular gate door hindges. I like them becasue you can adjust the tension.. from sttrrrrooonnnggg to nothing simply by removing the pin. fricken expensive though, but real nice.. I needed something that had some surface to it to support the weight adn help support the flimsy ass MDF board. These look/ed good.
- Attachments
-
- IMG_3808.JPG (29.09 KiB) Viewed 21596 times
-
- IMG_3811.JPG (37.56 KiB) Viewed 21596 times
-
- IMG_3812.JPG (39.76 KiB) Viewed 21596 times
PAST WORK/S HERE::
https://www.facebook.com/KhameleonKoatings/photos_albums
https://www.facebook.com/KhameleonKoatings/photos_albums
-
mhyde71
- Dr. Jekyll
- Posts: 6231
- Joined: Sun Jan 20, 2008 8:34 pm
- Location: PG FanBoy in Green Mtn Vermont
- Contact:
OKAY! Carpeted Door & Floor and Prepared the Trim Work for 2250TA (floor Amp)... REALLY PUMP YO! It's gonna look G-G-Great when completed!! I'm Pumped... But I have learned form mistake/not making an allowence for the 1/16" of the aluminum U-Channel so I am having trouble getting it to fit in the designated artea of the flip door. I feel confident I'll be able to go down to PG (Portland Glass, not you know who PG), and have them cut/shave 1/8" off 2 of the sides and a buddy of mine is in the tool shop where we might be able to trim the U-Channel down accordingly as well to get the lexan to fit.. I am really not trying to have to make another door. Will have to worst case.. but REALLY wouldn't want to have to, that would suck!
- Attachments
-
- IMG_3857.JPG (29.7 KiB) Viewed 21088 times
-
- IMG_3855.JPG (43.78 KiB) Viewed 21088 times
-
- IMG_3848.JPG (94.14 KiB) Viewed 21088 times
-
- IMG_3846.JPG (41.52 KiB) Viewed 21088 times
-
- IMG_3845.JPG (46.42 KiB) Viewed 21088 times
PAST WORK/S HERE::
https://www.facebook.com/KhameleonKoatings/photos_albums
https://www.facebook.com/KhameleonKoatings/photos_albums
-
mhyde71
- Dr. Jekyll
- Posts: 6231
- Joined: Sun Jan 20, 2008 8:34 pm
- Location: PG FanBoy in Green Mtn Vermont
- Contact:
Stinger Fan I have installed along side to the Amp... Is intentionally pointed downward onto the amp... Not by much, but you can see in the pic's it looks a little uneven.. well this was intentional.. but just slightly so it would blow at an angle and figured it was better that way. One thing I learned here, is that those stinger fans only blow out of the bottom of the fan.. Soooo, as you can see what I had to do was get some threaded rod and erect a 4 point fan support. In the pic's the fan is not secured with nuts and bolt (nothing is for that matter) it was just layed there for demo purposes. But it's been real fun/interesting process. Maybe do some of this stuff on side... in fact got one job lined up for achick with USAmps Gear... If someone has something in mind they'd like to see for themselves and/or their Sound Gear.. holla at me, and maybe i can assist in some fashion..
Just PM me. CUSTOM BUILT STUFF - GREAT RATES AVAILABLE!! Who knows maybe the begining of something
Just PM me. CUSTOM BUILT STUFF - GREAT RATES AVAILABLE!! Who knows maybe the begining of something
- Attachments
-
- IMG_3860.JPG (51 KiB) Viewed 21085 times
-
- IMG_3861.JPG (51.9 KiB) Viewed 21085 times
-
- IMG_3864.JPG (53.42 KiB) Viewed 21085 times
-
- IMG_3866.JPG (52.31 KiB) Viewed 21085 times
PAST WORK/S HERE::
https://www.facebook.com/KhameleonKoatings/photos_albums
https://www.facebook.com/KhameleonKoatings/photos_albums