Page 1 of 5
da build....
Posted: Tue Nov 18, 2008 1:42 pm
by bretti_kivi
I have a new plan.
Question: do you guys think that the power LEDs are powerful enough to light the amps? I'm thinking about windows and maybe floating the amps on clear plexi with LEDs in the middle... I think I'm going to go that way.
At my present rate, this might be done in 2012


Pics: (apologies, they're not up to my usual standards)
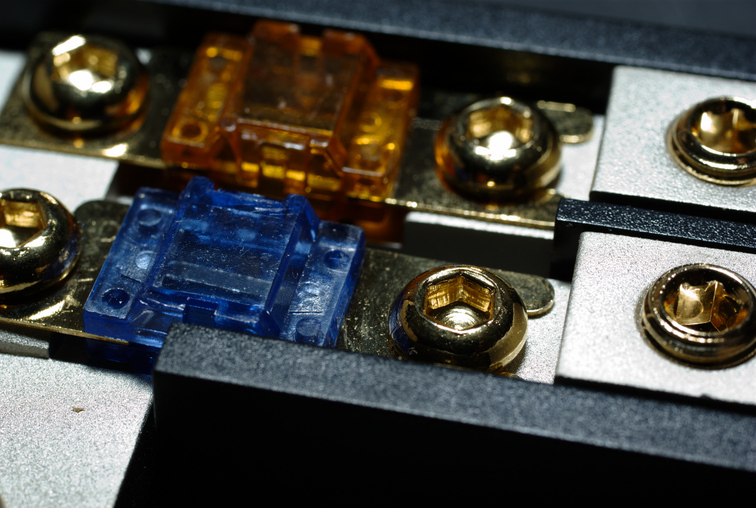
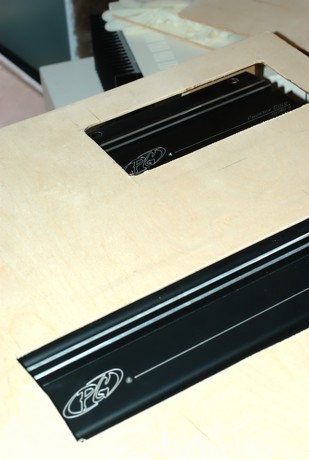
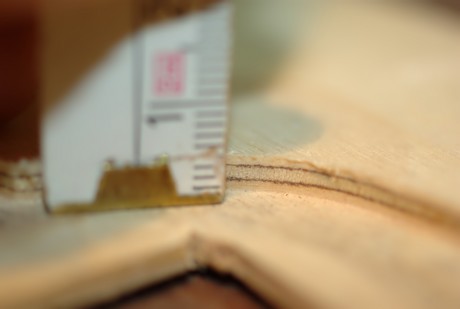
The streetwires CBR44S is now here - and debadged - as is the FBR24S.
So, I think there's going to be windows over each of the PG logos and down to the model name, and I'll float on plexi, I think. Should look OK.
I'll then add the RGB LEDs later, then there will be some of those in all the door pockets, behind the door openers, the vent controls and I have some fibre optic tails I'm going to try and integrate into the headlining

Question; Fuses open or closed - behind a window or open? Closed in terms of protected with their standard cover, fine, but with a window on the outside? I'm mildly worried about having to change them.
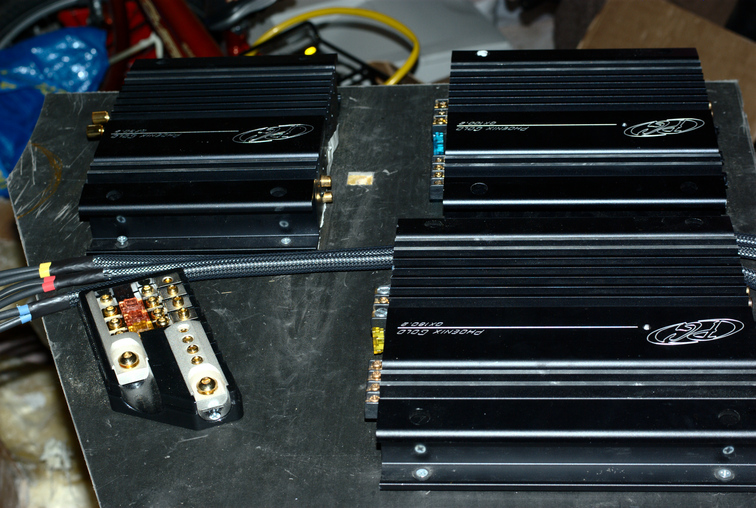
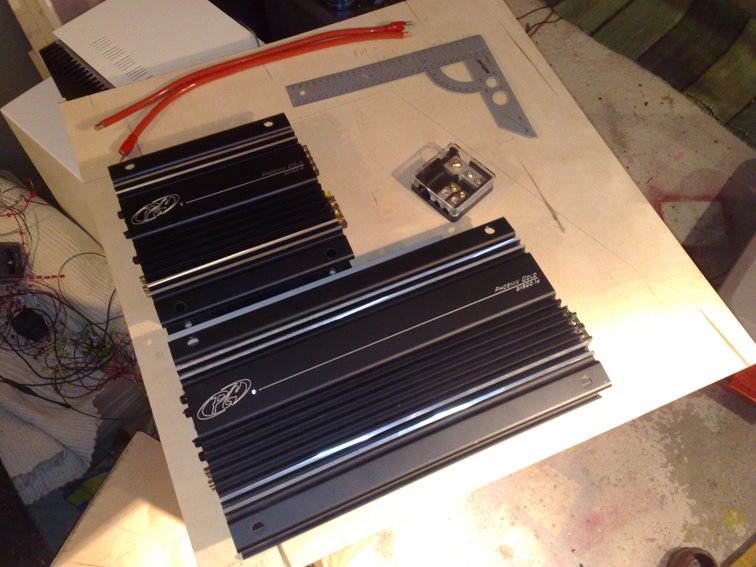
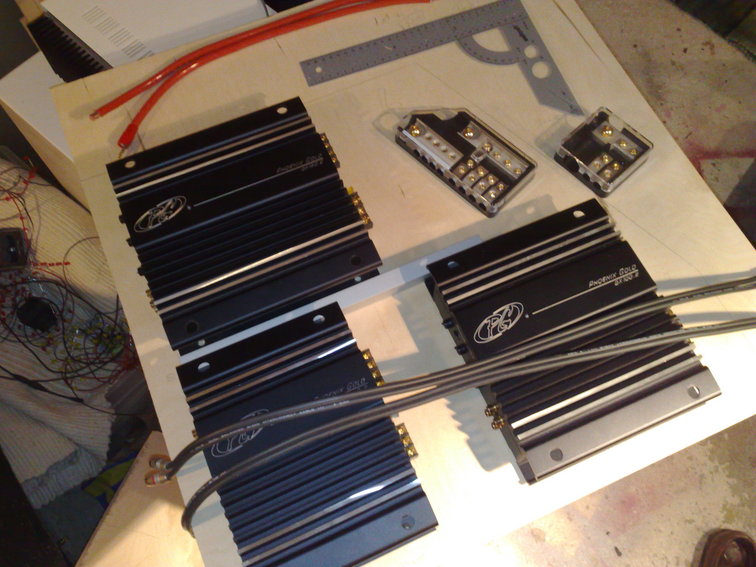
The source will be a CarPC with Terratec Phase26USB; on the right will be the 900.1d and a bridged 180.2 for midbass, on the left the other 180.2, the 100.2 for mids and 90.2 for tweets. The CBR44 will be on the left, the FBR24 on the right...
The Sub will be on the right on the floor - there's a nice hole - and the rest of the floor will be oiled oak or something else I can find. Maybe birch
or local granite ("mäntsälän punainen").
thoughts?
Bret
Posted: Wed Nov 19, 2008 9:08 pm
by brenzbmr@sb
thats what my friend used in this install...
the same leds from the titanium amps...
aloha

Posted: Thu Nov 20, 2008 8:43 am
by oldskoolmseriesfan
Very subtle and clean. Very nice!!
Posted: Thu Nov 20, 2008 8:57 am
by bretti_kivi
I don't want blue LEDs and I don't want to light the sub, either... but then I was thinking about which wood to use for the floor and what to use for the strips... so that when you put something in, you can push it to the back.
I like the look; i found a reasonably cheap source of 5mm plexi, too, cut to size for around €25 - that's 10 pieces, too, so not bad at all IMO.
Also found a source for fiber optics, which would be nice... and generally everything is coming together. I need to go saw some more parts now and then I can start sawing up more ply for feet, so i can get really on with it this weekend. Won't get everything in, because I don't have the inserts I need, there's still 500 in teh UK, but I should be able to screw the amps into place and wire up the power. Then I just need fuses and to make some more RCAs. And and and ...

Bret
Re: da build....
Posted: Thu Nov 20, 2008 8:59 am
by stipud
bretti_kivi wrote:Question: do you guys think that the power LEDs are powerful enough to light the amps? I'm thinking about windows and maybe floating the amps on clear plexi with LEDs in the middle... I think I'm going to go that way.
No, you probably wouldn't see those LEDs at all. You will probably need to buy bigger ones and set it up like brenz.
bretti_kivi wrote:I'll then add the RGB LEDs later, then there will be some of those in all the door pockets, behind the door openers, the vent controls and I have some fibre optic tails I'm going to try and integrate into the headlining
You are going to be blind at night
bretti_kivi wrote:Question; Fuses open or closed - behind a window or open? Closed in terms of protected with their standard cover, fine, but with a window on the outside? I'm mildly worried about having to change them.
You know the right answer
As long as they are easy to change, and don't require disassembly of half of your trunk...
bretti_kivi wrote:"mäntsälän punainen"
Anything called Poonany is good in my books.
Posted: Fri Nov 21, 2008 8:45 am
by denim
Keep the pictures coming.
Posted: Fri Nov 21, 2008 10:52 am
by bretti_kivi
going to go over to a friend's tomorrow and get some routing done. I'll order the plexi over the weekend, and then the aim tomorrow is to get the spacing and the hinges set up, so that the baseboards can be bolted in and the top board will swing up and down. That way, I can get a lot of the power cabling sorted this weekend and prepare for the plexi, but that wouldn't have to be in place. Plus I can also fix the amps down, I think, if I have enough M4 screws.... maybe I need some more, maybe I just drill holes and cut / solder cables.
Bret
Posted: Sat Nov 22, 2008 12:22 pm
by bretti_kivi
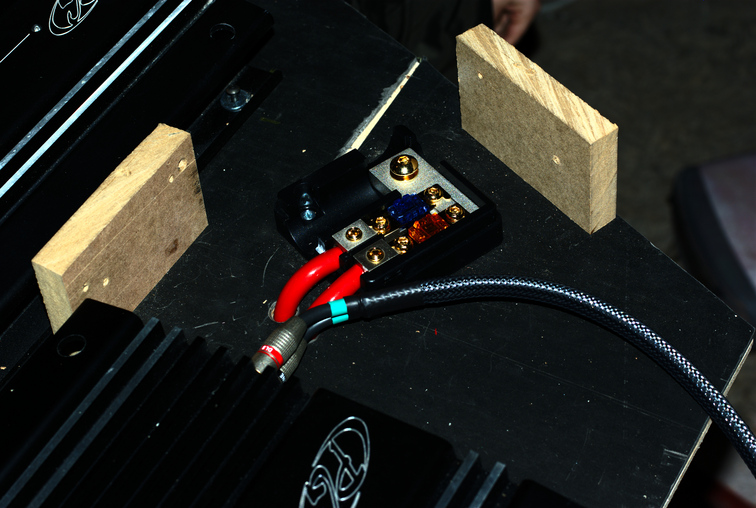
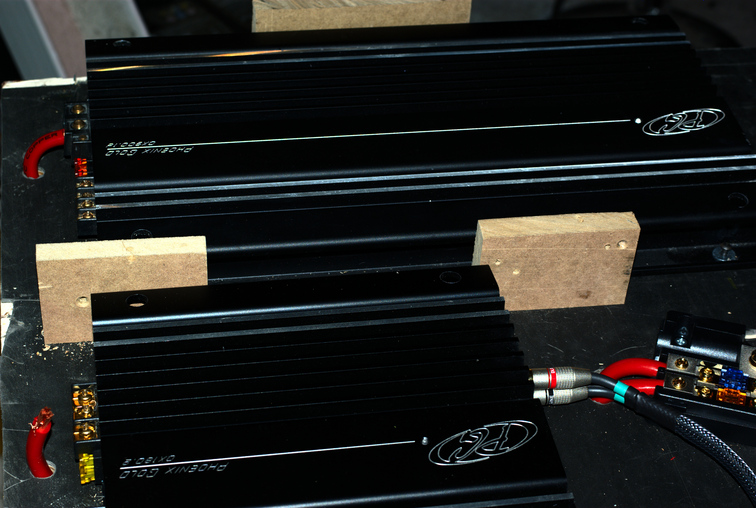
pics...
900.1d nestling in its probable new home

windows - top board sitting directly on the amps
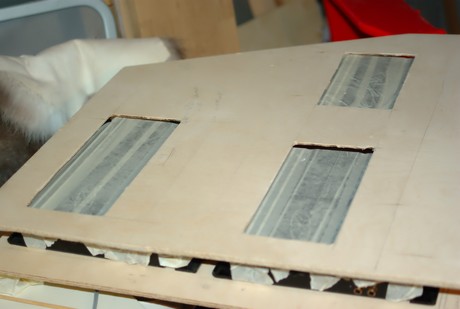
right now, the distance between the two is 100mm, it's too high. I'll be dropping it another 30mm or so tomorrow, I think.
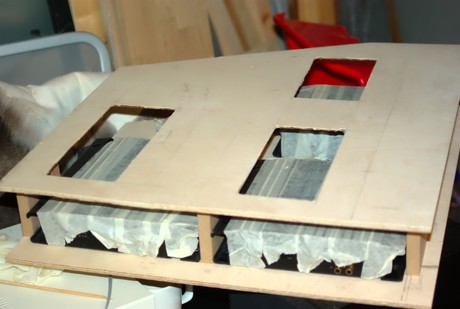
I've added a pair of 16mm boards underneath the amps and they look great like that.
the windows - complete with dodgy routing behind, but it's for a purpose...
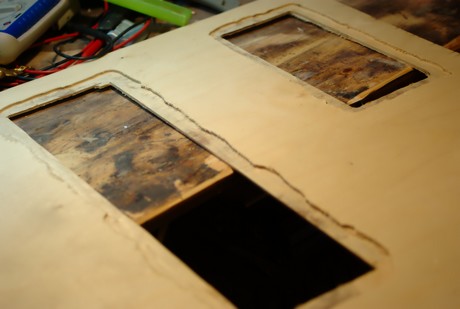
- and here's the height of rebate (3mm).
thoughts? I won't be lighting them from underneath, there's no point.
Bret
Posted: Sun Dec 07, 2008 2:16 pm
by bretti_kivi
right, the 180.2 and 900.1d are in the car, they're fine. The spacers are down to 60mm and work fine.
The mounting holes are drilled for the 90.2, 100.2 and other 180.2 That should be on its way to me tomorrow.
Problems: the top board needs a rebate so that the seat will still come down.
The right hand amps: the 180.2 is at the rear of the car, and that is wrong. I will need to move it, so that the fusebox can be at the rear.
Still need:
fuses
ring terminals
to cut and solder my cables
another distro for + and check that my - one is big enough.
prove the software combination for the carPC, or find an active XO pronto. Most of this will work without an XO (at least the 180.2s and sub), but mids and tweets will need XO of some variety. and 4-way XOs are rarer than rocking horse shit.
Maybe need a new soundcard, though I don't want to do that right now, maybe I'll feed the sub amp from the 180.2 pass through.
Bret
Posted: Thu Dec 11, 2008 1:48 pm
by bretti_kivi
so....
fuses are here.
Software might work, haven't tested yet.
I need to cable, UPS will try and deliver my box tomorrow with the other 180.2 in. That's also got my inserts and stuff.
Mate is also at his parent's place all weekend, so if I want to get some glassing done, this will be the time to do it. Going downstairs in a sec to check on the expandy foam in the sub box space - that's the positive form.
If I was to get the other + distro tomorrow, I could have a running system by Monday. Scary thought!
Bret
Posted: Sun Jan 11, 2009 11:12 am
by bretti_kivi
Posted: Sun Jan 11, 2009 11:45 am
by waynehead
Nice work, I wish i had the patience to build a trick setup. Im lucky to have my rca's matching and my amps fastened down lol.
Posted: Sun Jan 11, 2009 12:25 pm
by bretti_kivi
thanks
I don't really "have time", I make it. Evenings, weekends - I go down to the garage and "do stuff". Time to get this running, the system has essentially been sitting still for nearly three years in parts (!!!).
I just techflexed most of the power cables to match. Now I need to check the RCA lengths (which depends on where the soundcard is), hack the supports for the 3-amp side together, and get power going.
Then I need to worry about speaker cables, I think I'm going to take the complete interior out at some point in Feb, simply because I'll have a day or so free of family, so I can run wires and add sound insulation in peace.
Bret
Posted: Sun Jan 11, 2009 12:36 pm
by Wakeup
Nice Bret! Really nice...I kinda miss my Qx900.1d now.
Posted: Sun Jan 11, 2009 1:12 pm
by bretti_kivi
thanks. Oh yes, I forgot; I'm intending to hardware hack the 180.2s so that they are fixed "bridged", i.e I'm going to short both channels on the input pins, because otherwise I'll need some form of Y, and I don't want that.
Bret
Re: da build....
Posted: Sun Jan 11, 2009 3:46 pm
by smgreen20
bretti_kivi wrote:
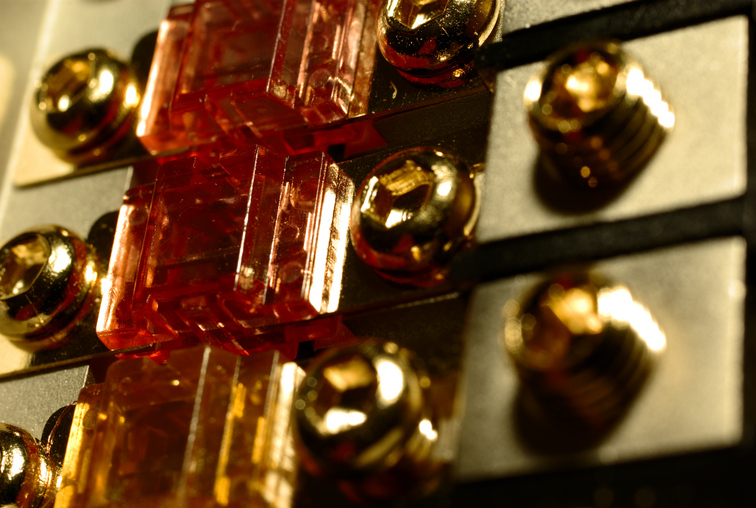
The streetwires CBR44S is now here - and debadged - as is the FBR24S.
Bret
How did you debadge them w/o hazing the plexi. I hav the exact one and had a friend of mine that works at a decal shop make a PG logo (Old school) and put that over the streetwires badge.
Thought I had some pics of it, but I guess not. Now I'll have to have him make me another one and debadge this one. It cost me $10.00 IIRC.
Posted: Sun Jan 11, 2009 11:54 pm
by bretti_kivi
10 micron sandpaper and re-polish. Took about 20 mins.
Bret
Re: da build....
Posted: Mon Jan 12, 2009 4:36 am
by smgreen20
bretti_kivi wrote:
Question; Fuses open or closed - behind a window or open? Closed in terms of protected with their standard cover, fine, but with a window on the outside? I'm mildly worried about having to change them.
Place the cover over it. It's easy to pop off the cover. Put a PG logo on it too.
Posted: Mon Jan 12, 2009 4:52 am
by bretti_kivi
your friend will make a couple?

Posted: Mon Jan 12, 2009 8:40 am
by denim
Excellent work, and very nice macro shots!
Posted: Mon Jan 12, 2009 11:13 am
by fuzzysnuggleduck
Very clean! I wish my wiring looked half that nice.
Posted: Mon Jan 12, 2009 11:42 am
by nico boom

So they still exist....those guys who really pay attention to every detail; I like it Brett!

Posted: Mon Jan 12, 2009 1:07 pm
by bretti_kivi
thanks, it's taken long enough, the details should be good
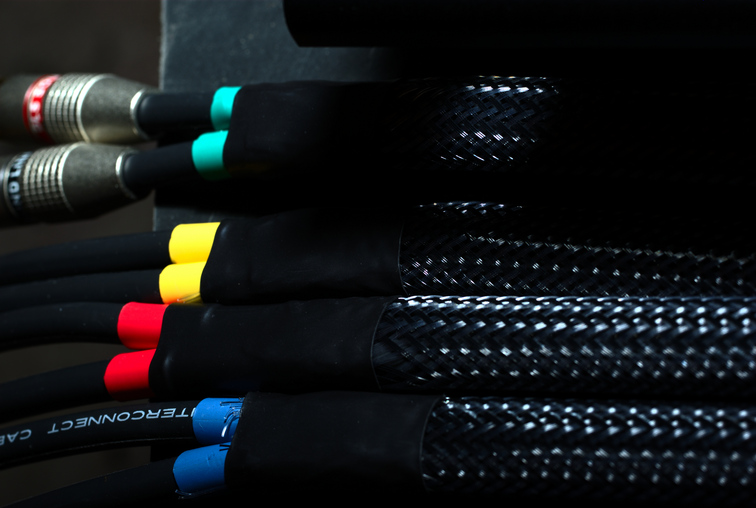
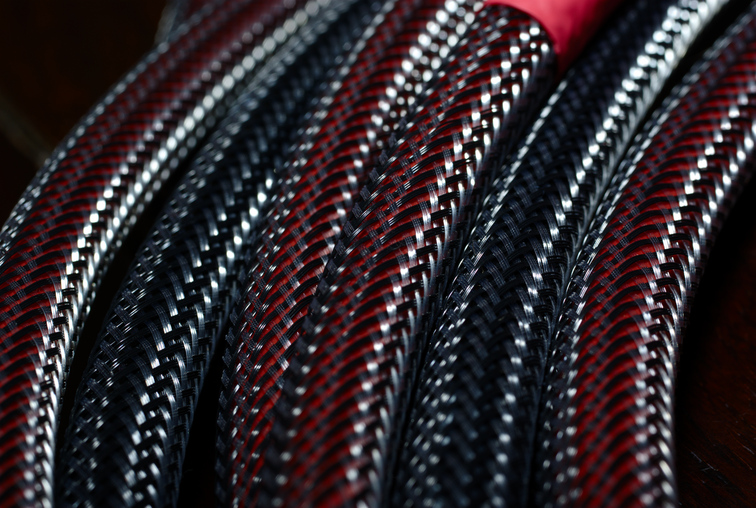
and now for some cable porn:
Posted: Mon Jan 12, 2009 1:10 pm
by deathcloud
where do you get those type of jackets? I need those so bad! I just have mine electrical taped every few feet but I would rather have those sick ass jackets like you got....
Posted: Mon Jan 12, 2009 1:15 pm
by bretti_kivi
a seller called fuzzyletters on da bay. he's in the US.
It's 3/8" "carbon" techflex over 4 AWG cable. There's also one with a gold stripe...
installation for 4AWG: Cut it to the same length, push the most frayed end over first (try not to catch it on anything!) then tape down the one end - where you started from - and push the heatshrink on. Both ends' worth, then remove the tape and the tape over the copper to stop it catching.
make sense?
Why the most frayed end? because you'll fray the other more when pushing the cable down. 1/2" heatshrink worked fine for me last night, I'm getting some 3/4" for the other stuff (2:1 means it's good down to these diameters).
Bret