momstang rebuild begins.
momstang rebuild begins.
Insurance totaled the car, I kept ownership of it and got a check for the remaining value that should cover the expenses if I can get a good donor-parts car for a good price. Shouldn't be too hard to find a 94-98 mustang(v6/gt/cobra/what ever) with out frond end damage and air bags(knock on wood). BUT if anyone here knows one say between indy/Nashville and Louisville/st Louis, or could maybe do a quick search of your craigslist to help a brother out I would appreciate it. I am already searching there and ebay but need all the help I can get. Will get some pics up hopefully later tonight as I am having issues with them now.
what else can I say I am a grumpy asshole most of the time.
-
Starunit10

- Posts: 308
- Joined: Thu Mar 29, 2012 3:33 pm
- Location: Ont. Canada
Re: momstang rebuild begins.
I see them in junkyards from time to time, but they are usually missing the front clip
Heres a semi-local listing (down in desoto MO)
http://stlouis.craigslist.org/cto/3958414047.html
Heres a semi-local listing (down in desoto MO)
http://stlouis.craigslist.org/cto/3958414047.html
Pioneer keh9595 + deh80prs, Phoenix Gold xs6600 PG M10p, and some randon speakers in a van
Re: momstang rebuild begins.
was driving home last Friday afternoon in light traffic. Was 4-5 car back when the car in front of me started to slow down. Wasn't a large deceleration so I just took my foot off the gas and moved over too the brake. Right about the time I needed to start braking (2-3 car lengths now) the car 2 up from me came to a sudden stop, and the car directly in front of me went into emergency braking. He said he was only able to stop an inch at the most from the car in front of him, me not so much... I stomped on the brakes hard enough to feel the abs kick 3-4 times but was just watching the car slide into the bumper at that point.
Got the car home today and took a good look, isn't really all that bad. bumper cover, drivers side fender, core support/radiator air bags/sensors/driver and it will be running again. Tore the hood and bumper cover off, will do the fender tomorrow. Already found a place to get the parts from and will hopefully take care of that tomorrow. Good news was the battery mounts I made held up as well as I hoped. Didn't move a mm and didn't even bend anything either. Bad news was the custom fiberglass pod I made to house the dd10 took some damage but it is repairable. It will come back even badder then before....


and now with your left ear on your left shoulder....(Sorry)

I am going to smooth out the gap between the new shinoda chin spoiler and the stock bumper to make it look like one piece, as well as with the new rear spoiler and decklid. I already had to take the hood-blanket off the hood as after adding the trick flow heads it raised the intake up 1/2" and was rubbing it so if I am going to put a hood on it I am going to add a slight cowl to give enough space for the future supercharging plans. Finally will get the whole car painted to take out all the stupid little dents, smooth out the antenna and some other small areas and it will be badder then ever....
Got the car home today and took a good look, isn't really all that bad. bumper cover, drivers side fender, core support/radiator air bags/sensors/driver and it will be running again. Tore the hood and bumper cover off, will do the fender tomorrow. Already found a place to get the parts from and will hopefully take care of that tomorrow. Good news was the battery mounts I made held up as well as I hoped. Didn't move a mm and didn't even bend anything either. Bad news was the custom fiberglass pod I made to house the dd10 took some damage but it is repairable. It will come back even badder then before....
and now with your left ear on your left shoulder....(Sorry)
I am going to smooth out the gap between the new shinoda chin spoiler and the stock bumper to make it look like one piece, as well as with the new rear spoiler and decklid. I already had to take the hood-blanket off the hood as after adding the trick flow heads it raised the intake up 1/2" and was rubbing it so if I am going to put a hood on it I am going to add a slight cowl to give enough space for the future supercharging plans. Finally will get the whole car painted to take out all the stupid little dents, smooth out the antenna and some other small areas and it will be badder then ever....
what else can I say I am a grumpy asshole most of the time.
-
LowandLoud
- Posts: 601
- Joined: Sat Sep 08, 2012 6:52 am
- Location: Cambridge Ont., Canada
Re: momstang rebuild begins.
There you go. Look at the positive side of it. No sense dwelling on something you cannot change. Now you get to have fresh paint and a perfectly straight body! Glad to hear it isnt as bad as first thought. Have you considered shaving the door handles? I think that would look trick on your car.
LL
LL
Always looking for:
Install accessories
LE amps
Processing
Unique pieces
Install accessories
LE amps
Processing
Unique pieces
Re: momstang rebuild begins.
I was actually positively for it prior to this wreck and for some reason the inability of me being able to open my door/move my windows has made me thing twice about it. I mean if the window was up, I was out, I guess people outside could break the window if they had to pull me out but when I thought about how much confusion it could cause in an accident when every second counts suddenly I am an old fogey.... I seriously thought about it and then realized that I don't hate the door handles that much after all....
what else can I say I am a grumpy asshole most of the time.
Re: momstang rebuild begins.
found a parts car and made a deal for it. They are pulling the motor/tranny out and will be dropping it off later this week. After that I started on the car. Had to use my old blue truck as an anchor for the come-along to pull the core support out enough to get the rad/condenser out. Was surprised how easy it was really.

Also cut the fender off. Yes I said cut, the side exhaust skirts were screwed/bonded to the fender on the bottom. This was just a rough cut to get it out of the way. I will make the final cut down at the very bottom and make it so the new fender meets up with it perfectly so it doesn't draw attention. Will also be doing a wire tuck to the engine bay to get the non-urgent vac/power lines out of the way, moving the stock fuse box as well as the PG blocks I mounted into the fender. I will be installing some panels on the sides of the motor bay to smooth them out and clean everything up with a small access panel on the drives side to get to the fuseboxes.

Also cut the fender off. Yes I said cut, the side exhaust skirts were screwed/bonded to the fender on the bottom. This was just a rough cut to get it out of the way. I will make the final cut down at the very bottom and make it so the new fender meets up with it perfectly so it doesn't draw attention. Will also be doing a wire tuck to the engine bay to get the non-urgent vac/power lines out of the way, moving the stock fuse box as well as the PG blocks I mounted into the fender. I will be installing some panels on the sides of the motor bay to smooth them out and clean everything up with a small access panel on the drives side to get to the fuseboxes.
what else can I say I am a grumpy asshole most of the time.
Re: momstang rebuild begins.
Some good news today for a change. I have a buddy that use to buy wrecked/salvaged cars and rebuild/flip them for a number of years that did a couple of mustangs of similar years to mine. When he saw it he was amazed they totaled it as he pointed out the bumper crush points had not even been touched. He reminded me of the cars he did prior and mine has a lot less damage them those. So we dug in and after a couple of hours its ready to go to the frame shop to be pulled. After all the cars he did he has a hook-up with that as well so that was cool as well. I also started yesterday pulling all the accessories off of the fenders. While it is down I am going to do a wire-tuck on the engine bay and weld in some panels to smooth out the entire engine bay. Going to pull the motor and paint it a nice clean black. Also ordered some new headlights that I will do a retro fit on with some mirimoto projectors.
what else can I say I am a grumpy asshole most of the time.
Re: momstang rebuild begins.
ordered a mishimoto radiator, canton coolant expansion tank for my year(94-95) as well as one for an 86-93 that I am going to try to modify to use as the windshield wiper fluid tank. Also got the headlights in and started working on the retrofit for them. Got them apart yesterday and now I am stuck waiting for some other parts to arrive.


The two piece reflector has me wondering what I should do. I will be adding a carbon fiber hood so I would like to carry that into the lights and use some carbon fiber vinyl, as well as paint the rest either black or the body color dark green and the lens is smoked. Can't really decide what would look best. I think I will paint the front reflector green and the rear reflector black/carbon fiber but could do the opposite. Anyone have an opinion I would welcome it.
The two piece reflector has me wondering what I should do. I will be adding a carbon fiber hood so I would like to carry that into the lights and use some carbon fiber vinyl, as well as paint the rest either black or the body color dark green and the lens is smoked. Can't really decide what would look best. I think I will paint the front reflector green and the rear reflector black/carbon fiber but could do the opposite. Anyone have an opinion I would welcome it.
what else can I say I am a grumpy asshole most of the time.

Re: momstang rebuild begins.
Id paint the front piece black first and see what it all looks like under the smoked lens then decide from there.
Re: momstang rebuild begins.
Going to try that as well as to paint it the body color to see what it looks like. BUT that will have to wait as my parts car was delivered last night so its time to put some stuff back on the car for a change now.
what else can I say I am a grumpy asshole most of the time.
Re: momstang rebuild begins.
I missed this rebuild thread and posted in the other one....
GL with this, seems you have a plan.
GL with this, seems you have a plan.
screw car audio, I'd rather go fast....errr, wait a minute.
Re: momstang rebuild begins.
Thanks, yes I do and its starting to come together now. I made a deal for a parts car 3 weeks ago now with the agreement that they were going to pull out the eng/tranny that they wanted and then would call me. They made it sound like they had it planned to do that weekend when I was there on a wed. I called last week just to check and it was a short call with them saying they hoped to have time the next weekend to do it. On wed of this week I figured they were not done yet, probably hoping to get it done this weekend so I did a quick search to see if there were any other cars that would be good. I found a better car with no body damage and an eng but automatic tranny with some issues and a clean title for 150 more then I was I was going to pay before. Made some calls, looked at it and the guy said he would throw it on his trailer and deliver it that night. SOLD! STarted in on the parts car yesterday.

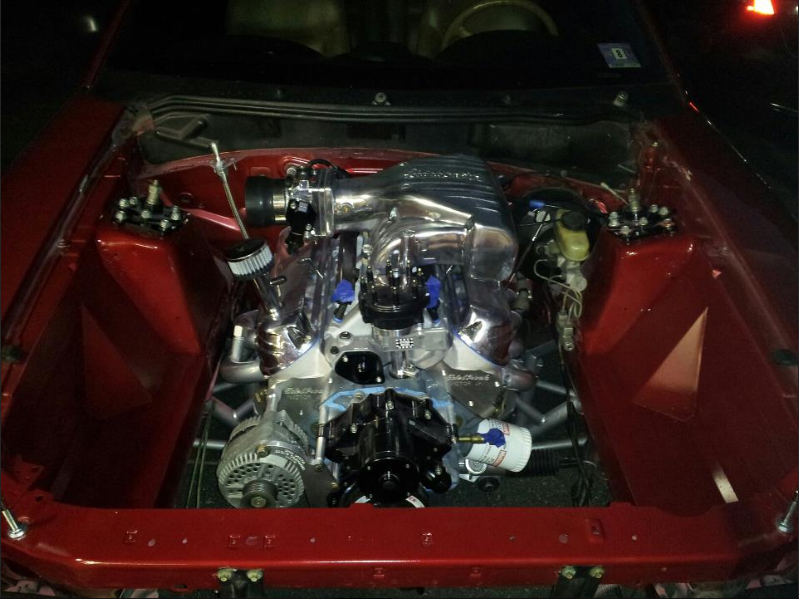
Completely stock motor from the air-silencer/filter up.

after the 1rst round of tear-down.

And I know I am not the only one that hates to be interrupted while I am working and concentrating, but I also know not many of us would mind the UPS dude stopping us to deliver some perty rebuilding goodies like these expansion tank overflow bottles.

The small bottle is actually for an older model mustang. I had to get rid of the stock wiper fluid reservoir to smooth out the engine bay. Can't really hide it anywhere so I figure I will stick it next to the rad on the other side from the stock tank and hopefully I can mount it down lower and it will blend in. Going to be polishing both tanks as well.
So yes the plan is coming together. The tears and frowns(figuratively speaking) have been replaced with busted knuckles/blood and grins(literally speaking) of putting it back together now and getting new parts in. Wish it was going faster of course as my digestive issues still limit my time on it but can't help that.
Completely stock motor from the air-silencer/filter up.
after the 1rst round of tear-down.
And I know I am not the only one that hates to be interrupted while I am working and concentrating, but I also know not many of us would mind the UPS dude stopping us to deliver some perty rebuilding goodies like these expansion tank overflow bottles.
The small bottle is actually for an older model mustang. I had to get rid of the stock wiper fluid reservoir to smooth out the engine bay. Can't really hide it anywhere so I figure I will stick it next to the rad on the other side from the stock tank and hopefully I can mount it down lower and it will blend in. Going to be polishing both tanks as well.
So yes the plan is coming together. The tears and frowns(figuratively speaking) have been replaced with busted knuckles/blood and grins(literally speaking) of putting it back together now and getting new parts in. Wish it was going faster of course as my digestive issues still limit my time on it but can't help that.
what else can I say I am a grumpy asshole most of the time.
Re: momstang rebuild begins.
Gotta love anything fabricated out of aluminum.Id give anything if I could weld aluminum its an art. Canton makes nothing but top quality pieces.Always had great luck with their stuff.
On a side note,you know im not the worlds biggest Mustang fan,but it almost seems a shame to strip a car that straight.
Of course Id strip a brand new car to fix my pride and joy!!
On a side note,you know im not the worlds biggest Mustang fan,but it almost seems a shame to strip a car that straight.
Of course Id strip a brand new car to fix my pride and joy!!
Re: momstang rebuild begins.
Funny enough I might be selling what I have left to the guys I was going to buy the original parts car from. When I told him I found a better car for my repair he said it was cool and to let him know what parts I have left over as he parts out mustangs regularly. I told him that he could take the parts off of the car I was going to buy, put on this one and fix the tranny and have a clean titled mustang and he said to let him know when I finished. So it will probably be back on the road again.
I bought my welder with a spool-gun so I could learn to weld aluminum. Still need to learn metal but in time, aluminum will come as I would like to do a lot of the supports for the amps/sub boxes out of it.
Got to work today fitting the pass fender. Had to do a lot of cut/trim/fit/repeat but after a couple of hours I have them lined up fairly well now. I need to weld a piece in behind the bottom part for the fender to rest against but I hope it will not stick out too much from the norm with the door panel ending the same way next too it. This pic was actually prior to about an hour of fine trimming with a file tonight to get them to line up better. Now they are nearly perfect and will probably wait till the frame is tweeked to finish them of further.

Was also happy to receive another shipment. These are Scott Rod panels that are made to be welded into the engine bay to smooth out the aprons nice and easy.

This is a better example of what they look like when they are done.
Can't wait to pull the motor and put those in.
I bought my welder with a spool-gun so I could learn to weld aluminum. Still need to learn metal but in time, aluminum will come as I would like to do a lot of the supports for the amps/sub boxes out of it.
Got to work today fitting the pass fender. Had to do a lot of cut/trim/fit/repeat but after a couple of hours I have them lined up fairly well now. I need to weld a piece in behind the bottom part for the fender to rest against but I hope it will not stick out too much from the norm with the door panel ending the same way next too it. This pic was actually prior to about an hour of fine trimming with a file tonight to get them to line up better. Now they are nearly perfect and will probably wait till the frame is tweeked to finish them of further.
Was also happy to receive another shipment. These are Scott Rod panels that are made to be welded into the engine bay to smooth out the aprons nice and easy.
This is a better example of what they look like when they are done.
Can't wait to pull the motor and put those in.
what else can I say I am a grumpy asshole most of the time.
Re: momstang rebuild begins.
Wow those will make a huge improvement when you open the hood!
Are the skirts bonded on? Is that why you cut the fender like that?
Are the skirts bonded on? Is that why you cut the fender like that?
Re: momstang rebuild begins.
The side exhaust skirts were screwed and bonded to the stock fender with PBA. The passenger fender was actually undamaged in the accident but since I am getting it all done I wanted to be able to get behind if I needed too as I will be moving the stuff currently mounted to the aprons inside the fenders. And yes it will make a HUGE difference under the hood with the wire tuck and the panels, new overflow tanks that I think I will be polishing unless a friend can get them coated for cheap.
what else can I say I am a grumpy asshole most of the time.
-
LowandLoud
- Posts: 601
- Joined: Sat Sep 08, 2012 6:52 am
- Location: Cambridge Ont., Canada
Re: momstang rebuild begins.
Nice progress 
LL
LL
Always looking for:
Install accessories
LE amps
Processing
Unique pieces
Install accessories
LE amps
Processing
Unique pieces
Re: momstang rebuild begins.
Hows the work going?
Re: momstang rebuild begins.
Got the drivers fender cut close to where I need it. Still needs some minor trimming/fitting but that will probably wait till after the frame shop. My brother came into town 3 days ago so work was put on hold to hang out. He is going to teach me to weld which I will need to know to finish the job so its more of a study break for me. Today we got the last of the welding supplies with the Ar/CO2 tank and a fire ext. Its funny as we have had one hanging in a pantry for the house as long as I could remember so I checked it and wasn't really surprised to see that it needed to be recharged. Now I was surprised to flip it over and see the pressure tank was actually old enough that it was out of date. 23 yrs out of date.... Says it was made in 1980 damn thing is only 5 yrs younger then me so needless to say I bought 2 extinguishers. Got the mishimoto radiator though can't wait to get back on it but unfortunately my brother and I could not be any more different with cars as he doesn't like working on them, takes after my dad.
what else can I say I am a grumpy asshole most of the time.
Re: momstang rebuild begins.
Good deal.Did you keep some of the panels to practice welding on?
Practice makes perfect!
Funny thing about fire extinguishers is you rarely ever need them,but seems like that one time you do.They are dead.
'75? Guess that makes us the same age,lol.
Practice makes perfect!
Funny thing about fire extinguishers is you rarely ever need them,but seems like that one time you do.They are dead.
'75? Guess that makes us the same age,lol.
Re: momstang rebuild begins.
yup 75 and we moved into this house in 76. Yea I have all the scrap I need now and its good that its the same gauge/year of the metal as well so I can figure out the settings and how fast I have to move. All the scrap pieces are around the back of the house under the deck just for this reason. I have a small project ready to just get a feel for it and use to it before I start on the cars scrap to learn better. Was REALLY looking forward to it today after I don't know how many years of wanting to learn, and now months of picking out the welder and now setting it all up yesterday to be ready. This is by far the most expensive tool I have bought(miller 211 again) so the chance to finally play with the new toy*COUGH*tool has been killing me and the opportunity to have my brother teach me is a huge bonus. We could not be more dissimilar as he is the artist, I am the athlete so the chance to actually share something is damn near priceless really. Woke up this morning and my stomach said OH HELL NO!!! Thought I was going to be back in the ER for the usual crap but somehow managed to get control of it and now just trying to drink as much water as possible. I was kinda expecting it as I had a few half-good days before today so I was due for a bad one. Oh well hopefully tomorrow will be better and we can start on it then.
what else can I say I am a grumpy asshole most of the time.
Re: momstang rebuild begins.
Had some time off from it and learned to weld(started too anyways) and went to putting it right to use! The side exhaust skirts were screwed/bonded too the bottom of the old fenders. Wasn't a problem unless I needed to get to something in the fender which wasn't much or a problem till now but I am doing a wire tuck/engine bay smoothing out so I will need to mount the pieces that were inside the bay, now in the fender and might need access later. I cut the stock fenders right at the point that the bottom of the door ended so that is basically the top of the rockers now. I also needed some support behind that lower section so the now bottom of the new fender had something to rest against. I cut out portions of the old fenders and the plug welded them in place so that they make a flange that the fenders rest on now.
 please forgive the ugly welds was the 5th time I ever turned my new toy/tool on. I will fill up past those holes all the way down the rocker to give a smooth/uniform look.

So with the new fender there is still some finishing to be done but I think you get the idea. Hopefully the line will not draw much attention and now I will still have access inside the fenders.
Did the same to the drivers side

Threw the hood up just too see how the gaps look and was happy to see that they are good. Hopefully that means there wasn't much done to the front end I can't tell you how much of a hurdle it seemed like to step back and see it lined up.

So then I was excited to have it ready for the core support to be replaced. Talked to the shop today and of course they are busy as hell. So instead I got some filler(short hair reinforced and lightweight) to start on some of the body mods I have planned. I have also been wanting a tool cart/roll-around to have a place to put stuff down around the car while working and saw a deal at harbor freight. Was regularly $259, marked down to $150 and $110 with the coupon holds 580 lbs and has 5000 cu in of space. So I wanted to put it and the welder to work so after some thought I realized I DON'T NEED NO STINKIN ANTENNA MANG! I started off by putting masking tape over the hole and then cut out the hole with a knife to use a pattern.

I put the tape pattern on the old green drivers side fender in the same location so it would have the same bend and then cut it out. Here a magnet holds it in place.

threw some sparks(6th time I turned the miller on) Will get some screws to throw in those holes and then tach them to fill.

Ground those down and after the fender is stripped that spot is ready for putty and no one will know.
please forgive the ugly welds was the 5th time I ever turned my new toy/tool on. I will fill up past those holes all the way down the rocker to give a smooth/uniform look.So with the new fender there is still some finishing to be done but I think you get the idea. Hopefully the line will not draw much attention and now I will still have access inside the fenders.
Did the same to the drivers side
Threw the hood up just too see how the gaps look and was happy to see that they are good. Hopefully that means there wasn't much done to the front end I can't tell you how much of a hurdle it seemed like to step back and see it lined up.
So then I was excited to have it ready for the core support to be replaced. Talked to the shop today and of course they are busy as hell. So instead I got some filler(short hair reinforced and lightweight) to start on some of the body mods I have planned. I have also been wanting a tool cart/roll-around to have a place to put stuff down around the car while working and saw a deal at harbor freight. Was regularly $259, marked down to $150 and $110 with the coupon holds 580 lbs and has 5000 cu in of space. So I wanted to put it and the welder to work so after some thought I realized I DON'T NEED NO STINKIN ANTENNA MANG! I started off by putting masking tape over the hole and then cut out the hole with a knife to use a pattern.
I put the tape pattern on the old green drivers side fender in the same location so it would have the same bend and then cut it out. Here a magnet holds it in place.
threw some sparks(6th time I turned the miller on) Will get some screws to throw in those holes and then tach them to fill.
Ground those down and after the fender is stripped that spot is ready for putty and no one will know.
what else can I say I am a grumpy asshole most of the time.
Re: momstang rebuild begins.
So the shop still isn't ready. Never did like that keyhole on the trunk lid so why not get rid of that? I was hoping it was all metal and was disappointed to realize it was a composite plastic as soon as the cutting wheel hit it. I mean I know how to do all this stuff but the mix/slather/wait to dry process of putty's isn't nearly as much fun as the spark/flash/done process of welding.... As I said I started off cutting off the keyhole, laying some mesh in behind the panels and then pushing some short hair reinforced putty into it on both sides. The long black strip on the top of the license plate frame is where I am going to flush in laser sensor/shifter to look like one piece.

Also decided to shave the license plate frame. and smooth-in the spoiler to look like one piece. Now that I have it all smoothed out I can start on the laser shifter lens and the top of the spoiler/decklid joint.

I ended up moving the keyhole over to behind one of the former bolt holes that will be hidden by a flip down license plate. You can see the open hole as I was able to reuse the rubber gasket that use to go on the outside of the original hole. It was really a pretty easy modification as I only moved it 3" to the side and it cable-actuates the lock.
Also decided to shave the license plate frame. and smooth-in the spoiler to look like one piece. Now that I have it all smoothed out I can start on the laser shifter lens and the top of the spoiler/decklid joint.
I ended up moving the keyhole over to behind one of the former bolt holes that will be hidden by a flip down license plate. You can see the open hole as I was able to reuse the rubber gasket that use to go on the outside of the original hole. It was really a pretty easy modification as I only moved it 3" to the side and it cable-actuates the lock.
what else can I say I am a grumpy asshole most of the time.
Re: momstang rebuild begins.
Almost got the back end of the rear-deck smoothing done now. Finally took the time to insert the laser shifter lens. Its a little hard to see but its below the 3rd tail light, I still need to take the tape off of it.

Also got the billet vac tree to replace the stock plastic crap.

Other good news I stopped by the body shop yesterday and he said that he should be good to have the car dropped off next week. Hopefully it will be quick/easy/cheap but I have a feeling that I am asking a lot...
Also got the billet vac tree to replace the stock plastic crap.
Other good news I stopped by the body shop yesterday and he said that he should be good to have the car dropped off next week. Hopefully it will be quick/easy/cheap but I have a feeling that I am asking a lot...
what else can I say I am a grumpy asshole most of the time.