Triple Ba 10.5LF Woof Box

Need help with your car stereo system? Have a technical question? Post here.
User avatar
HoseHead
Tim Horton Himself
Posts: 2262
Joined: Wed Dec 06, 2006 4:49 pm
Location: Ottawa, Ontario, Canada
Contact:

Triple Ba 10.5LF Woof Box

Post by HoseHead »

I'm finally building this, hopefully, great sounding piece.
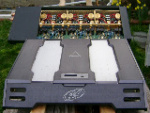
Qty 3 BA 10.5 LF woofs each in it's own chamber.
BA specifies 11" X 11" X 7" for a sealed enclosure.
With such a small panel, I used dado cuts vice bracing for support.
The dado also provides a "lip" around both large panels, protecting the woof on the front and the connection ports on the back.
I used 3/" MDF, 1 5/8" fine drywall screws and WeldBond glue.
Woofs are held in by T-Nuts and brass screws for bling. I ground off one point on each T-Nut so they wouldn't protude into the woof hole. There ain't no way, no how these will come loose and I can get back inside if needed. More pix to come. This is a mockup and can be dismantled at this point. I'll take pix during final assembly......... :D
Attachments
Top and end piece showing more dadoes.
Resize of 2C7E4429.JPG (54.59 KiB) Viewed 10796 times
Here's a quick mockup to confirm my measurements. Chmaber partitions were cut last to ensure a tight fit. note the "upright" panales are front/rear and are sitting in a dado. Should be very strong once glued and screwed....
Resize of 2C7E4424.JPG (45.73 KiB) Viewed 10796 times
This is how I set up my router table for the dadoes. Prepare all pieces first, then you can cut all dadoes in a single jig.
Resize of 2C7E4422.JPG (51.89 KiB) Viewed 10796 times
Woof holes and dado markings are visible. Perimeter markings a 3/8" from the edge - 1/2 of 3/4 - as this edge fits into a dado.
Resize of 2C7E4421.JPG (35.29 KiB) Viewed 10796 times
24" X 48" 3/4" MDF. measure, re-measure and then measure again. I used each corner as a reference as factory cuts are square. Scrap ends up in the centre.
Resize of 2C7E4420.JPG (43.3 KiB) Viewed 10796 times
Last edited by HoseHead on Tue Oct 28, 2008 9:44 am, edited 4 times in total.
The only stupid question is the one not asked .......
User avatar
HoseHead
Tim Horton Himself
Posts: 2262
Joined: Wed Dec 06, 2006 4:49 pm
Location: Ottawa, Ontario, Canada
Contact:

Post by HoseHead »

More pix is progress. Test fits are done and final assembly later today.... I hope... :D Two addtional BA 10.5 LF's unmounted in the back ground. The Tantrum CS and 8" Klipsch units are my bench testers.
Attachments
Bugger's weighs about 100 lbs though.....
Resize of 2C7E4437.JPG (57.85 KiB) Viewed 10794 times
120 drywall screws all together. A lot of measuring to make the holes symetrical. Holes were marked and the countersunk on a drill press. Unit was then assembled using clamps and pilot holes drilled. There's only 12 screws holding this together right now.
Resize of 2C7E4436.JPG (52.31 KiB) Viewed 10794 times
With each chamber wired to it's own port, I can re-configure wiring from the outside. See how the "lip" protects the terminals allows this unit to have the woofs face up without the ports being crushed.
Resize of 2C7E4434.JPG (39.97 KiB) Viewed 10794 times
The only stupid question is the one not asked .......
User avatar
stipud
Voltage Ohms
Posts: 14719
Joined: Sat Nov 26, 1983 4:00 am
Location: Burnaby, BC
Contact:

Post by stipud »

Damn, it would almost be a pity to put carpet over that. Nice woodworking!
User avatar
KHPower
Posts: 878
Joined: Wed Apr 23, 2008 2:18 am
Location: In the Phoenix Phorum's boiler room , east of the janitors closet
Contact:

Post by KHPower »

Very nice! and the placement of all the screws , perfect!
[color=#8040BF]Kenwood 993
Team Sundown:4500D
(2) Digital Designs 9500's
6 Cubes tuning 3 HZ
Team Kinetik: HC3800 ,(2),1200s (2) 600's
Factory Authorized Kinetik ,Sundown,MB Quart Dealer[/color]
User avatar
Rold Gold
Dirty Harry
Posts: 5685
Joined: Sat Jan 26, 2008 11:53 pm
Location: Oregon Grown

Post by Rold Gold »

That's what I'm talkin about!!!!! Nice work. :thumbs: Plus you could add a cover to hide the woofers..... :hmm:
Those tender little burgers with them little, itty-bitty grilled onions that just explode in ya mouth like flavor crystals every time you bite into one.. just makes me want to burn this muthafuka down.... Come on, Pookie, let's burn this muthafuka down!!!
Thumper88
Posts: 1122
Joined: Tue Feb 20, 2007 9:03 pm
Location: Michigan

Post by Thumper88 »

never thought of adding a lip... :lol:

good idea.
User avatar
scorpio86
Posts: 618
Joined: Wed Jul 16, 2008 5:29 am
Location: SE Ohio

Post by scorpio86 »

very nice indeed. somethin bout the lf woofers that are so subtle and sexy..!! :shock:
Have no fear, only uncertainty!
User avatar
Rold Gold
Dirty Harry
Posts: 5685
Joined: Sat Jan 26, 2008 11:53 pm
Location: Oregon Grown

Post by Rold Gold »

JUST AN IDEA........ Router the edges with a 3/8 radius...... Looks like ya have the tools to do it...... 8) It just adds the "professional" look to the enclosure.
Those tender little burgers with them little, itty-bitty grilled onions that just explode in ya mouth like flavor crystals every time you bite into one.. just makes me want to burn this muthafuka down.... Come on, Pookie, let's burn this muthafuka down!!!
maka78
Posts: 172
Joined: Sun Sep 07, 2008 7:41 pm

Post by maka78 »

okay, okay... so next are gonna be pictures of my box... lol (just kidding). Mine looks like crap compared to this. Seriously dude, nice work with that. I wish Ottawa was close to Jersey so I could swing by and have you help me re-make my box.
User avatar
HoseHead
Tim Horton Himself
Posts: 2262
Joined: Wed Dec 06, 2006 4:49 pm
Location: Ottawa, Ontario, Canada
Contact:

Post by HoseHead »

Thanks for the kudos, dudes. I'm fortunate to have a complete woodworking shop and a technical testing shop as well. Took 30 years, but it's sure worth it now.

So I put this casket together last night. It ain't coming apart. Let's hope it sounds as anticipated. I do have a quick question for advice as to I should line the chambers with insulation. Comments? Suggestions? I can always try it naked first and then line it to experience the difference.

On to the build pix....... :D
Attachments
A close up of a T-Nut. One prong was ground off. These are solid. I used a C-clamp to squeeze these in place after drill pressing appropriate sized pilot holes.
Resize of 2C7E4445.JPG (36.54 KiB) Viewed 10717 times
A pre-assembly view without the rear, top or end panels. Should have dadoed the ends with just a small lip of 1/2" vice the 1" I used on the front and back.
Resize of 2C7E4442.JPG (62.46 KiB) Viewed 10717 times
T-Nuts and screw pilot holes that were drilled earlier. Take the time to drill these so the MDF won't split. I used a cordless hand drill.
Resize of 2C7E4441.JPG (43.81 KiB) Viewed 10717 times
I fully test mounted one sub using foam tape designed for sealing gaps in household doors and windows. The cast bead in the woofer basket seems to have sealed very well. It's easy to apply (sticky one side) and doesn't leave a residue.
Resize of 2C7E4440.JPG (37 KiB) Viewed 10717 times
This shows that the chamber corners are dadoed, except the two end pieces where traditional butt joints are used. I should have dadoes here as well. Next time.
Resize of 2C7E4447.JPG (33.36 KiB) Viewed 10719 times
Last edited by HoseHead on Wed Oct 29, 2008 5:13 am, edited 1 time in total.
The only stupid question is the one not asked .......
User avatar
HoseHead
Tim Horton Himself
Posts: 2262
Joined: Wed Dec 06, 2006 4:49 pm
Location: Ottawa, Ontario, Canada
Contact:

Post by HoseHead »

More....... :shock:
Attachments
Here is the glue I used. goes on white and dries clear. It "flows" very well and firms up in about 10 minutes. Great container and nozzle as well. Recommended. I picked it up at Home Hardware.
Resize of 2C7E4466.JPG (47.58 KiB) Viewed 10710 times
My helper..... Kozmo. 10 months old. Outstanding animals.
Resize of 2C7E4454.JPG (45.49 KiB) Viewed 10713 times
Final pre-assembly to ensure all pieces are correctly orientated. I ran glue beads in each "dado corner" to ensure complete coverage along the entire joint.
Resize of 2C7E4451.JPG (60.46 KiB) Viewed 10713 times
Reverse view of front and rear panels.
Resize of 2C7E4449.JPG (50.76 KiB) Viewed 10713 times
All pieces vacuumed and ready.
Resize of 2C7E4448.JPG (59.69 KiB) Viewed 10713 times
Last edited by HoseHead on Wed Oct 29, 2008 9:41 am, edited 1 time in total.
The only stupid question is the one not asked .......
User avatar
bretti_kivi
Shutterbug
Posts: 1595
Joined: Tue Aug 26, 2008 1:06 pm
Location: Päijät-Häme or Uusimaa

Post by bretti_kivi »

definitely some fluff in there. Personally, I'd also smear bitumen sealant all over the inside walls and round off the inside corners with it, then a couple of ounces of fluff inside. I think the peak performance was reached at 1lb of fluff per cuft...

nice job!

Bret
User avatar
HoseHead
Tim Horton Himself
Posts: 2262
Joined: Wed Dec 06, 2006 4:49 pm
Location: Ottawa, Ontario, Canada
Contact:

Post by HoseHead »

And even more..... :shock: :shock: :shock:
Attachments
When I routered the dadoes, I had to pass the entire piece through the bit, creating these cavities. I filled them with glue to ensure no leaks what-so-ever.
Resize of 2C7E4469.JPG (45.24 KiB) Viewed 10708 times
Screws heads really standout, so the time spent on keeping them symetrical paid off. Kosmo crashed out.
Resize of 2C7E4464.JPG (57.78 KiB) Viewed 10708 times
After all the screws were sunk, I ran a bead of glue along all seams inside each chamber. Again, the glue container's smaller size allowed me to fill "blind" through the woof hole. No leaks guaranteed.
Resize of 2C7E4463.JPG (45.88 KiB) Viewed 10708 times
Just the end pieces to go now. Some glue squeezed through, but not enough to my liking.
Resize of 2C7E4457.JPG (61.35 KiB) Viewed 10708 times
I glue beaded down all dado "corners", hoping the glue would squeeze up through the seams. It came out the screw holes once compressed with clamps and secured with screws.
Resize of 2C7E4455.JPG (47.7 KiB) Viewed 10708 times
The only stupid question is the one not asked .......
gkitching
Hair Metal
Hair Metal
Posts: 1266
Joined: Thu Jul 19, 2007 12:43 pm

Post by gkitching »

Dude, why didn't you dado the ends of the top and bottom piece to accept the side pieces? You're such a half asser :lol:

Seriously tho, looks like you had fun building it! Looks like your helper had fun too.

I would use some liner. It definitely wouldn't hurt and there are plenty of arguments for the benefits of it. Mostly helping break up any standing waves being that the speaker baffle is parallel to the back.

Oh and I still say you 'workmate' is too clean!
Greg Kitching
User avatar
stipud
Voltage Ohms
Posts: 14719
Joined: Sat Nov 26, 1983 4:00 am
Location: Burnaby, BC
Contact:

Post by stipud »

Yeah, THIS is a workmate :lol:

Image

Nice puppy :D
gkitching
Hair Metal
Hair Metal
Posts: 1266
Joined: Thu Jul 19, 2007 12:43 pm

Post by gkitching »

Now that's how a workmate should look! :P
Greg Kitching
User avatar
fuzzysnuggleduck
Soy Milquetoast
Posts: 4423
Joined: Wed Dec 06, 2006 1:08 pm
Location: The best place on earth
Contact:

Post by fuzzysnuggleduck »

Haha, I've got a workmate here in our server room. It's mainly used to for transferring equipment in and out of the racks. It look like HH's workmate :D
SOLD: '91 PG 4Runner
User avatar
HoseHead
Tim Horton Himself
Posts: 2262
Joined: Wed Dec 06, 2006 4:49 pm
Location: Ottawa, Ontario, Canada
Contact:

Post by HoseHead »

And that's how my first ever Workmate looked. It got run over by a truck last year. Pooched. Had to buy this one and it's a piece of crap in comparison. Sure it does this, that and several other generally useless configs. The 25 year old ones were built like tanks. The new ones are Korean.

HH
Attachments
Pig Pen.........
Pig Pen.........
Resize of 2C7E4470.JPG (61.51 KiB) Viewed 10687 times
Goodie Room...........
Resize of 2C7E4471.JPG (67.9 KiB) Viewed 10687 times
The only stupid question is the one not asked .......
User avatar
oldskoolmseriesfan
Sherlock Homey
Posts: 2517
Joined: Sun Oct 19, 2008 10:03 pm
Location: WEST SIIIIDE!!

Post by oldskoolmseriesfan »

HoseHead wrote:And that's how my first ever Workmate looked. It got run over by a truck last year. Pooched. Had to buy this one and it's a piece of crap in comparison. Sure it does this, that and several other generally useless configs. The 25 year old ones were built like tanks. The new ones are Korean.

HH
dude that is the kinda shop I need!! Very nice! Noticed some extra gear, like EVERWHERE! Would you trade one of those M44'S straight across for a brand new AUDISON SRX 2S??????? :)
User avatar
fuzzysnuggleduck
Soy Milquetoast
Posts: 4423
Joined: Wed Dec 06, 2006 1:08 pm
Location: The best place on earth
Contact:

Post by fuzzysnuggleduck »

That is a dope shop, man. Looks like working hard does pay off :D
SOLD: '91 PG 4Runner
User avatar
HoseHead
Tim Horton Himself
Posts: 2262
Joined: Wed Dec 06, 2006 4:49 pm
Location: Ottawa, Ontario, Canada
Contact:

Post by HoseHead »

Here's the entire BA setup I'm going to use for this ride.
Qty 3 10.5 KF woofs - BA recommends 50-1200 watts each.
BA 6.53x Component Set - BA recommends 20-500 watts.

The BA XOvers are massive, would be hard to place and I figure active is a better solution anyway. They are three way though.

I pulled out a few amps to refresh my memory, select and design an amp rack.
M Series, TI or Tantrum
I have another M44 shroud in transit.

M100 (Shroud) bridged for subs w/LPL
M44 (Shroud) for 6.5" LF and 4" MR
M25 for Neo5 Tweets
EQ215 optional

Ti 800.1 for Subs w/LPL
Ti 600.2 for 6.5" LF
Ti 500.4 for 4" MR and Neo5 Tweets
Bass Cube
DD10 - but it would be too much for this system.

Tantrum 1200.1 for subs w/LPL - not shown, but available
Tantrum 500.2 (or 600.4 bridged) for 6.5" MR
Tantrum 400.4 or 600.4 for 4" MR and Neo5 Tweets
Bass Cube
DD5
EQ215x optional

Comments? Suggestions? SQ is the goal.
Attachments
2C7E4478.JPG
2C7E4478.JPG (76.89 KiB) Viewed 10653 times
2C7E4477.JPG
2C7E4477.JPG (72.47 KiB) Viewed 10653 times
2C7E4476.JPG
2C7E4476.JPG (69.75 KiB) Viewed 10653 times
2C7E4472.JPG
2C7E4472.JPG (66.56 KiB) Viewed 10653 times
The only stupid question is the one not asked .......
User avatar
Rold Gold
Dirty Harry
Posts: 5685
Joined: Sat Jan 26, 2008 11:53 pm
Location: Oregon Grown

Post by Rold Gold »

Whats yer address........????? :lol: :lol: :lol:

That's gonna rock!!!!!! :thumbs:
Those tender little burgers with them little, itty-bitty grilled onions that just explode in ya mouth like flavor crystals every time you bite into one.. just makes me want to burn this muthafuka down.... Come on, Pookie, let's burn this muthafuka down!!!
User avatar
stipud
Voltage Ohms
Posts: 14719
Joined: Sat Nov 26, 1983 4:00 am
Location: Burnaby, BC
Contact:

Post by stipud »

Hockey equipment! Welcome to Canada, eh!

I say use the Ti's, just for the crossover versatility. Unless you want to upgrade your headunit to something with a ton of crossover settings, the Ti's are the only line that will let you run everything actively with their built-in crossovers.
User avatar
harobkr90
Posts: 150
Joined: Sun Oct 12, 2008 1:09 pm
Location: Maryland

Post by harobkr90 »

very very nice! the shop, the enclosure, the collection. :shock:
User avatar
HoseHead
Tim Horton Himself
Posts: 2262
Joined: Wed Dec 06, 2006 4:49 pm
Location: Ottawa, Ontario, Canada
Contact:

Post by HoseHead »

Glue results.......
Attachments
This stuff has cured for about 6 days now. Kinda of like epoxy.
Resize of 2C7E4484.JPG (34.57 KiB) Viewed 10606 times
Resize of 2C7E4483.JPG
Resize of 2C7E4483.JPG (30.63 KiB) Viewed 10606 times
The only stupid question is the one not asked .......
Post Reply