Page 1 of 1
Amp artwork
Posted: Mon Nov 10, 2008 10:26 am
by Jacampb2
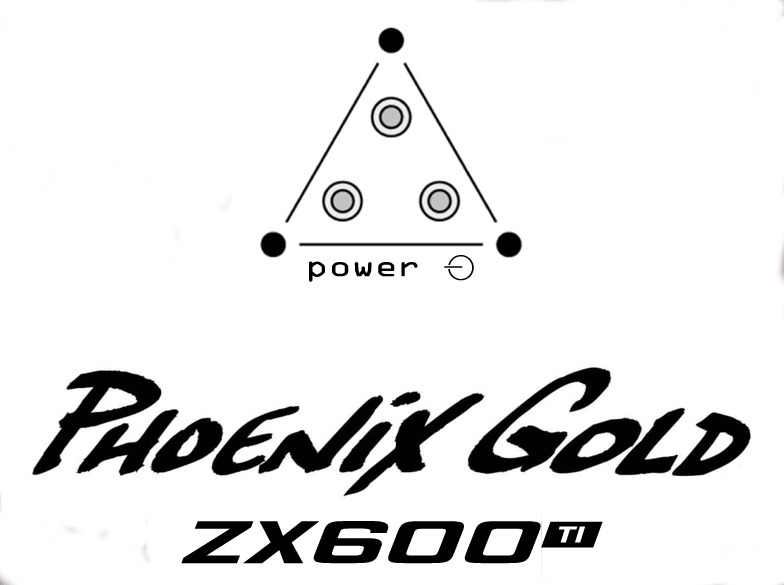
I just wanted to get your opinion on if this appears accurate enough? I have a ZX600Ti that is so rusted that I stripped it and am going to repaint it. I intend to try to re-screen it with DIY instructions I found on line. I re-did all of the graphics in MS photodraw, I think it is pretty much the spitting image of the factory artwork, except the "Phoenix Gold" is not shadowed like it is in the factory art. I did not want to monkey with multiple screen layers, so this is as good as it gets. This one could be easily vectorized and engraved, and I will take that route if I can't get the DIY screen printing to work. Take a look at the pic and let me know...
Thanks,
Jason
Posted: Mon Nov 10, 2008 10:44 am
by stipud
Wow... nice work on that logo! I had trouble finding a high res Ti one to use in the banner up top, so I had to cut it out of one of my amplifier pictures.
Posted: Mon Nov 10, 2008 11:45 am
by Jacampb2
Well, I started by scanning the cover of one of my better amps, then I went through and touched up the scan. I didn't like the results, so I searched for matching art to fill it in. I pulled the triangle logo from one of the .Pdf's, used Foxit PDF editor to pull the original photo instead of doing a copy from the displayed PDF. The embedded image seems to be higher res than the displayed image. I did the same with the "phoenix gold". I found a matching font for "power" and a matching font for the ZX600...
I resized and pasted the artwork on top of the original scan to get the correct sizing. It worked out pretty good, and the attachment in my post above should print actual size if anyone needs to use it too.
Later,
Jason
Posted: Mon Nov 10, 2008 3:32 pm
by Jacampb2
Here are some pics of the case I am doing. I'd appreciate opinions on this as well. The first shot is the before pic. I bought the amp for $8, so the condition was a non issue. I am actually going to use the case for my custom Zx600 that I modified in another thread.
I am probably going to strip it again and sand it with a belt sander to raise a grain in the same style as the original. It looks unique, but the swirl marks from sanding make it a little too unique. The paint is a rattle can metallic blue candy. I did not expect to have the base metal show through so much though.
Before:

After striping and paint:

Later,
Jason
Posted: Mon Nov 10, 2008 3:51 pm
by KHPower
That is awesome dude! You say that paint came outta a shake can? please advise on the paint used and color

and where you purchased the stuff
Excellent work ! Ill send you my zx500 and my RSD1200.1's
Posted: Mon Nov 10, 2008 7:10 pm
by Jacampb2
KHPower wrote:Excellent work ! Ill send you my zx500 and my RSD1200.1's
Thanks! ...but no thanks

I have enough projects w/o refinishing other peoples amps too

Most of the big rattle can paint manufacturers make this type of paint. It is normally marketed to "look like anodizing". I can't remember the brand of the can I just used, but it is either Krylon or Duplicolor. The whole setup for painting virtually anything with this stuff is a reflective metallic silver base coat/primer and the candy metallic of your color choice, they have several. I have used the paint before on engine parts, using the reflective primer first, it looks pretty good, but no where near as translucent as the candy coat alone. That is why I was surprised that the sanding swirls showed up so clearly.
I don't know, I may leave it like this. It looks really freaking weird in person, as you move, the swirls shift and change depth. I am just not sure if it is too much or not...
Later,
Jason
Posted: Mon Nov 10, 2008 7:30 pm
by KHPower
Thanks for the info
I was gonna send you a nice shiny ten dolla bill for your work on my amps but i guess you dont like to make money

j/k
Nice work regardless , I would sport that in my van any day
Posted: Mon Nov 10, 2008 7:36 pm
by stipud
Duuuuuddeeee acid flashback
Looks a lot better than the first pic! Hell, I like it.

Maybe try the belt sander idea, and "anodize" it to near black. That might look cool as well, with white lettering.
Posted: Mon Nov 10, 2008 10:37 pm
by thedeal7235
JASON, u inspire those who thought they couldn't, but ACTUALLY CAN! I LUV IT , the candy blue like that-if ur gonna do more, then, i cant wait 2 c it after more!!!!!!!( looks cool as is, i think
Posted: Tue Nov 11, 2008 5:44 pm
by Jacampb2
thedeal7235 wrote:JASON, u inspire those who thought they couldn't, but ACTUALLY CAN! I LUV IT , the candy blue like that-if ur gonna do more, then, i cant wait 2 c it after more!!!!!!!( looks cool as is, i think
Thanks, when I was little my pops used to tell me "I could do anything I put my mind to". Turns out I believed him. Sometimes I tackle things I have absolutely no business doing. Fortunately for all of us alive now, the internet has put virtually any knowledge in reach of virtually any person.
Anyhow, I tried to make my screen for printing the artwork before work today. It did not pan out so good. Too much fine detail. I have found a method for doing the screens with a photo transfer process. It costs a bit more than puzzle glue and old nylons, but it may be worth it. The photo transfer will do virtually any resolution that falls w/i the size of your screen and capability of your printer. We will see how it goes.
Later,
Jason
Posted: Wed Nov 12, 2008 7:54 pm
by Jacampb2
...So, who thinks it would be incredibly hoaky and a total cop out to redo the artwork with decals?
I have recently found a place that sells decal paper that you can print on your inkjet. Remember putting together model cars/planes when you were a kid? Remember the decals that you stuck in a cup of water for a minute and then they slid off as an ultra thin painted decal? Well, they make the same thing for ink jets, print it yourself...
I think if A: it can be put in place w/o tearing (the problem I always had as a kid), B: it isn't to thick, and C: it can be clear coated to preserve it (according to the directions, it can) then it may be the way to go. It definitely looks like a simple way to refurb your amps... Even just buffing out a rusted out TI, re-spraying clear, and putting down new art would be a great leap forward for a lot of amps...
Maybe there are not as many people with nasty Ti's as I think... If you have one that needs cosmetic work, tell me your opinion? Based on the amount of people who have asked how to refinish these things, I thought this would generate a bit more discussion on how you did it, and how it should be done...
stipud wrote:"anodize" it to near black. That might look cool as well, with white lettering.
I meant to respond to this earlier. I was about to mention that I didn't think anyone had a black paint like this, and I found one that is "smoke". I may roll with it on a different amp. I am thinking maybe on a ZX500/ZX450... They would looks sweet as hell in smoke with gold lettering to match the GP boards...
Good idea!
Later,
Jason
Posted: Wed Nov 12, 2008 8:51 pm
by Wakeup
Hmmm...something about stickers makes me say NOOOOooooo dont do it...but.....Ya never know....
if you can cut out the excess sticker where it is not necessary...like in the 600....hollow out the 0's...and the circle for the 6....etc? Then maybe? Cuz the hole would have the sticker covering the blue paint...might look weird after the clear coat? Not sure...I dont know anything about stuff like this...just putting my 2 cents (even tho it aint worth nearly 2 cents!) in.
Posted: Wed Nov 12, 2008 8:53 pm
by blake
Why not have it airbrushed?
Posted: Wed Nov 12, 2008 9:15 pm
by Jacampb2
Wakeup wrote:Hmmm...something about stickers makes me say NOOOOooooo dont do it...but.....Ya never know....
if you can cut out the excess sticker where it is not necessary...like in the 600....hollow out the 0's...and the circle for the 6....etc? Then maybe? Cuz the hole would have the sticker covering the blue paint...might look weird after the clear coat? Not sure...I dont know anything about stuff like this...just putting my 2 cents (even tho it aint worth nearly 2 cents!) in.
Well, I left the "leds" inside the triangle to help align it when I went to silk screen them. The image there would not have been transferred, but was just a way to get the screen in the exact correct place.
The decal paper is not really "stickers" it should be much, much thinner than that, and it is clear as well. According to the manufacturer, you print your stuff on their "decal paper", which, from what I understand is a thin layer of gelatin over ordinary paper. You then clear coat the paper with acrylic clear. Several thin coats. After the clear coat dries, you cut the decal to size, and then soak in water. The paper dissolves/comes loose from the gelatin leaving you with a thin layer of what amounts to clear paint with the gelatin still holding the color layer. You affix it into position and when the decal dries out, the gelatin adheres to the surface. If you then coat the whole thing in clear coat, it should remain permanent. The big "IF" is how thick this stuff ends up being. If it is truly as thin as the model decals you used to get, then you will never be able to tell it is a decal after a few coats of clear. It isn't a big deal to try it, but they want a fair chunk of change for the paper. It isn't terrible, but about $15-20 for 5 sheets via mail order. Then money for the clear coat. Probably $30 to get it off the ground. It would cost about the same to get the photo transfer stuff for screen printing, but that is looking more and more like a huge mess....
blake wrote:Why not have it airbrushed?
I like to do things myself, and while I do own an airbrush, I am not that good with it.
I would also like it to come out as close to factory look as possible and airbrush people tend to be stylish and flighty, and the ones who could do a good reproduction are going to be big money.
I have several amps that need refurbished, and I just will not be able to afford to farm it all out.
There is also another side to the amp, the front panel, that is going to require a fair amount higher resolution detail that an airbrush artist will not be able to do. I have to re-label all of the controls, inputs and outputs in addition to the larger cover artwork.
Thanks for the input, keep it coming!
Later,
Jason
Posted: Wed Nov 12, 2008 9:25 pm
by Wakeup
Well you could airbrush the Big logos and such using a template eh? put it over the spot you want then brush the Phoenix gold and zx600ti and quite possible the circles of the triangle/led part?
But if the decals are as thin as you say, again cutting out the hollowed part of the letters still would help with the clear coating dont you think? paper thin or less than paper thin is still a layer. But that's my thoughts...again just bringing it up...because it is also possible that the decals could trape air or dirt/dust in between, as well. The less decal the better IMO...?
Posted: Wed Nov 12, 2008 9:56 pm
by Jacampb2
Yes, you are right, there is a bigger chance to F it up. If that is the case, then I am not out a heck of a lot. I can just sand it off and start over.
Interesting thought on using a stencil. It had crossed my mind, but cutting one out with an exacto knife would suck. There is a possibility that I could cut it all out of a thin piece of aluminum with the mill, and then use it like a stencil and just spray or brush paint whatever I wanted for that stuff. It still wouldn't work for the very fine stuff, but it would for the majority of the work!
Hmmm... I like it.
Thanks,
J
Posted: Wed Nov 12, 2008 10:35 pm
by thedeal7235
i know screening sux, but may be best bet, i think; my wife's aunt and uncle own a print shop- im gonna show them my beatup zx450 cover, and the nice zx350 cover and seewhat they say-the ph has rubbed off on my zx450, but still looks like day 1 on the zx350- ill let u know if they come up with anything; if you could make a template, you could use your candy blue color, and then see how it looks with template in place-i mean a reverse of the logo, all cover candy blue, then logo comes thru as a negative-know what i mean?
Posted: Thu Nov 13, 2008 1:35 am
by Wakeup
Ya...totally on the stencil thing....had an X-Gfriend that used to etch glass....made her own stencils... worked pretty well...but she didn't need to be perfect....just more than close....
I think if you get it right it'll look nice...I mean as you said you have the air brush already....
soooo....with a stencil you dont need to be perfect if your stencils are perfect...or close to...and again if you mess up you can sand and redo!
or....
Posted: Thu Nov 13, 2008 3:40 am
by Jacampb2
We are back to the silk screen thing now. I found a pretty cool product tonight, it is premade screen that is already coated with a photosensitive emulsion. Doesn't require the frame and all of the other BS. You expose it, wash it, and then start printing. Probably not as durable as doing the full blown process, but looks uber simple. Supposedly, these screens will last for 400 prints. Kind of pricey at ~$40 for 3 8.5x11 sheets shipped, but I should be able to get a lot of artwork on one sheet. The stuff is called photoEZ if anyone wants to look into it for themselves.
Later,
Jason
Posted: Thu Nov 13, 2008 7:23 am
by stipud
Jacampb2 wrote:stipud wrote:"anodize" it to near black. That might look cool as well, with white lettering.
I meant to respond to this earlier. I was about to mention that I didn't think anyone had a black paint like this, and I found one that is "smoke". I may roll with it on a different amp. I am thinking maybe on a ZX500/ZX450... They would looks sweet as hell in smoke with gold lettering to match the GP boards...
I was thinking something like spray tint.
Posted: Thu Nov 13, 2008 3:45 pm
by Jacampb2
stipud wrote:I was thinking something like spray tint.
I will look into it, I really don't have any idea what it is.
Later,
Jason
Posted: Thu Nov 13, 2008 4:55 pm
by thedeal7235
hey i just cut/copied photoEZ to web browser; looks like a simple solution????!! I hope it works, please let me know how it turns out-dont have the funds right now to buy, but im very interested-