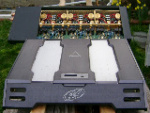
started with today removing the boards from the 275 sinks, and replacing the cap's.
Everything went well for the first board/half, now onto the second.
QUESTION(s):
1) I tried cleaning the board up with laquer thinner and paint remover. Nothing bad happened just cant get the crud/junk off the board's nice gold plate??? any other suggestions???
2) i have the nice blue/silver twisted wire, what do you like to see in there the red/black or blue/silver??? I kinda like the different wire (blue/silver) wire better?? 2a) Doesnt matter so much to me, but if I do that, should i also then change the LED's to maybe blue or something?? Keeping in mind that, in the end/final product, it will have the franked trim work and color of text on the persplex... a purple-ish/pink-ish trim (aka franked). The plexi will also be pinkish/purple-ish too with PG Logo on there as seen on the end caps now.. with the Franked "Phoenix Gold".
3) What do folks suggest filling the holes in on the heat sink?? and is it even neccessary? I am thinking that it might prohibate/restrict disapation with various voids in the sink. So I thought of filling them up... JB weld type of stuff, or two part expoxy weld mix? or just drop some solder in there?? plan is that whatever I drop in there and once sanded and smoothed out, go have it anodized. 3a) Or do the holes not even need to be filled/plugged up???
4) Should I throw in Burr Brown's?? does it matter/make a difference?? If so, I'll do it!
W/O FURTHER ADIEU MS-475 - "Cousin of Frank"
-
mhyde71

- Dr. Jekyll
- Posts: 6231
- Joined: Sun Jan 20, 2008 8:34 pm
- Location: PG FanBoy in Green Mtn Vermont
- Contact:
W/O FURTHER ADIEU MS-475 - "Cousin of Frank"
- Attachments
-
- IMG_6604.JPG (172.91 KiB) Viewed 8965 times
-
- IMG_6578.JPG (229.89 KiB) Viewed 8965 times
-
- IMG_6608.JPG (163.97 KiB) Viewed 8965 times
-
- IMG_6619.JPG (179.52 KiB) Viewed 8965 times
-
- IMG_6618.JPG (183.42 KiB) Viewed 8965 times
Last edited by mhyde71 on Sat Dec 18, 2010 7:13 am, edited 2 times in total.
PAST WORK/S HERE::
https://www.facebook.com/KhameleonKoatings/photos_albums
https://www.facebook.com/KhameleonKoatings/photos_albums
-
mhyde71
- Dr. Jekyll
- Posts: 6231
- Joined: Sun Jan 20, 2008 8:34 pm
- Location: PG FanBoy in Green Mtn Vermont
- Contact:
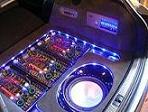
Just to get/give a sneak peak of the two boards laying along side each other in the sink....
I like the mirror image the two amps make sitting back to back with each other.. the speaker wiring and caps and stuff... looks cool reversed like that... might look good with PG surfer logo instead given that kinda swirly thing going on. hmmm...?
You can also tell which board has yet to be cleaned and re capped pretty easily enough...
Excited to get'er completed and all polished off, like it so far..
Still have same concerns/need for suggestion(s)...
See first post...
- Attachments
-
- IMG_6627.JPG (156.11 KiB) Viewed 8952 times
-
- IMG_6628.JPG (156.85 KiB) Viewed 8952 times
-
- IMG_6631.JPG (145.99 KiB) Viewed 8952 times
-
- IMG_6623.JPG (226.66 KiB) Viewed 8952 times
-
- IMG_6624.JPG (221.02 KiB) Viewed 8952 times
PAST WORK/S HERE::
https://www.facebook.com/KhameleonKoatings/photos_albums
https://www.facebook.com/KhameleonKoatings/photos_albums
Looks pretty good Matt........ I see that sink is being put to good use.....
Those tender little burgers with them little, itty-bitty grilled onions that just explode in ya mouth like flavor crystals every time you bite into one.. just makes me want to burn this muthafuka down.... Come on, Pookie, let's burn this muthafuka down!!!


-
mhyde71
- Dr. Jekyll
- Posts: 6231
- Joined: Sun Jan 20, 2008 8:34 pm
- Location: PG FanBoy in Green Mtn Vermont
- Contact:
nice, will do/give it a shot! Thank you!rolandk wrote:Cool! Try using a pencil eraser to clean the circuit boards.
and as an update:
1) Decided to go with Burr-Browns- They're ordered and on their way.
2) think i am going to fill holes with devcon metal hole filler, sand, and have anodized black, gold or violet.
QUESTION TO ROLAND (or anyone actually that might know): Are the heat sinks (2250's originals) have they been anodized on the inside? I ask, b/c I dont think you can anodize on top of something that has been anodized... or if anyone else knows?? looks like it has, but could just be the finish...?
PAST WORK/S HERE::
https://www.facebook.com/KhameleonKoatings/photos_albums
https://www.facebook.com/KhameleonKoatings/photos_albums
think the sinks are anodised all over, don't think you could anodize just that area anyway? i'm sure they anodized them so they didn't have to use sil-pads?
Ti1 headunit (unique)
Outlaw in crate.
2x original shrouded ms2250's.
Route 66 in box + custom m100 to match.
Roadster 66 in flight case
Octane LE in box.
Reactor #186 in flight case.
Reactor EQ232
Ti400.2 AL
AX204A + EQ232 + ZPX2 + TBA set
ZCS6 component set
Tantrum+Titanium bass cubes
Ti12d Elite sub
DD5 + DD10 + 6 Ti blocks!
-
mhyde71
- Dr. Jekyll
- Posts: 6231
- Joined: Sun Jan 20, 2008 8:34 pm
- Location: PG FanBoy in Green Mtn Vermont
- Contact:
Anodized on the exterior and Possibly anodized on the inside? I have an email into Matt J, we'll see i guess... Or i could just bring to shop that does the anodizing for us and see what he says.... but i do know you can not anodize over anodize.marko wrote:think the sinks are anodised all over, don't think you could anodize just that area anyway? i'm sure they anodized them so they didn't have to use sil-pads?
Last edited by mhyde71 on Fri Apr 03, 2009 6:13 am, edited 1 time in total.
PAST WORK/S HERE::
https://www.facebook.com/KhameleonKoatings/photos_albums
https://www.facebook.com/KhameleonKoatings/photos_albums
-
thedeal7235

- Posts: 1866
- Joined: Fri Jan 25, 2008 7:49 pm
- Location: Sanford, Florida(orlando area)
-
mhyde71
- Dr. Jekyll
- Posts: 6231
- Joined: Sun Jan 20, 2008 8:34 pm
- Location: PG FanBoy in Green Mtn Vermont
- Contact:
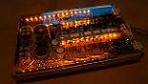
there are 3 OPAMP spots/on the amps that can get the BB's...if I'm not mistaken they are outputs / output based/affliated... IOW versus inputs/input circuit... but maybe 1 of them is dedicated for input circuitry, but I dunno the specifics.. I just know where they go. (see pic's)thedeal7235 wrote:Matt, can you be more specific, on what componenets of the amp, gotburr-brown upgrade? thanks-Christian( i know burr brown (in a h/u is d/a conversion, not sure what it does on a amp?
I have never done an A versus B comparison... I have heard that they make little to no difference, but from others I heard they swear by them. So I wanna try'em out.
Might add a little value to the project, or might actually decrease value, as it is not OEM...but then-again, neither is the whole amp/project anyways, so what the hell ya know??? I thought it would be good time to check'em out.
But i havent done them yet, they will probably be here shortly, and after reading your post once again i think maybe you were asking where were the BB's in the amps pictured in the franked 475?? you wont see them there as I havent done them yet...m
- Attachments
-
- BB's ON 275.jpg (97.42 KiB) Viewed 8821 times
Last edited by mhyde71 on Thu Jan 15, 2009 7:08 am, edited 1 time in total.
PAST WORK/S HERE::
https://www.facebook.com/KhameleonKoatings/photos_albums
https://www.facebook.com/KhameleonKoatings/photos_albums
-
thedeal7235
- Posts: 1866
- Joined: Fri Jan 25, 2008 7:49 pm
- Location: Sanford, Florida(orlando area)
-
mhyde71
- Dr. Jekyll
- Posts: 6231
- Joined: Sun Jan 20, 2008 8:34 pm
- Location: PG FanBoy in Green Mtn Vermont
- Contact:
you mean the bb's opamps? i haveen't ever heard them call ics's.. but could be wrong.. anywho-thedeal7235 wrote:excellent(nice job, btw, and if u hear a difference let me know-btw, how much were those (ics) I believe they aare called?
Got package of 10 for 50.00. if you're referring to the op amps.
PAST WORK/S HERE::
https://www.facebook.com/KhameleonKoatings/photos_albums
https://www.facebook.com/KhameleonKoatings/photos_albums
IC ist short for integrated circuit! I used to learn it to name it that way in school.mhyde71 wrote:you mean the bb's opamps? i haveen't ever heard them call ics's.. but could be wrong.. anywho-thedeal7235 wrote:excellent(nice job, btw, and if u hear a difference let me know-btw, how much were those (ics) I believe they aare called?
Got package of 10 for 50.00. if you're referring to the op amps.
Music is silver, PHOENIX is GOLD

sinks are anodised and end plates painted or powder coated, i know as i have 2 stashed away! this is only on the original ms2250 with shroud.
Ti1 headunit (unique)
Outlaw in crate.
2x original shrouded ms2250's.
Route 66 in box + custom m100 to match.
Roadster 66 in flight case
Octane LE in box.
Reactor #186 in flight case.
Reactor EQ232
Ti400.2 AL
AX204A + EQ232 + ZPX2 + TBA set
ZCS6 component set
Tantrum+Titanium bass cubes
Ti12d Elite sub
DD5 + DD10 + 6 Ti blocks!
Outlaw in crate.
2x original shrouded ms2250's.
Route 66 in box + custom m100 to match.
Roadster 66 in flight case
Octane LE in box.
Reactor #186 in flight case.
Reactor EQ232
Ti400.2 AL
AX204A + EQ232 + ZPX2 + TBA set
ZCS6 component set
Tantrum+Titanium bass cubes
Ti12d Elite sub
DD5 + DD10 + 6 Ti blocks!
Sorry for the delay in replying but I had to discuss with a few people first.mhyde71 wrote:
QUESTION TO ROLAND (or anyone actually that might know): Are the heat sinks (2250's originals) have they been anodized on the inside? I ask, b/c I dont think you can anodize on top of something that has been anodized... or if anyone else knows?? looks like it has, but could just be the finish...?
The heatsink is anodized but we highly recommend using either the standard MS275 sil pads or the black aluminum anodized insulator strips and bar clamps used on the later MS275's.
If you use sil pads be very careful securing the big transistors (output XSTR's and PS FET's) to the heatsink. It is critical that the entire backside of the transistor is flat against the heatsink. If there is any air gap the transistor will overheat and fail in just a few minutes. What I suggest doing is:
1. Mount the PCB's in the heatsink.
2. Mark the transistor mounting holes in the heatsink.
3. Remove the PCB's and drill the holes.
4. Desolder and remove all of the big transistors. Be careful because its easy to damage the pads and traces.
5. Install PCB's in the heatsink again.
6. Install transistors and sil pads. Screw the transistors to the heatsink and make sure they are flat against the heatsink BEFORE soldering. Also use compression washers.
7. Solder the transistors.
Good luck!
-
thedeal7235
- Posts: 1866
- Joined: Fri Jan 25, 2008 7:49 pm
- Location: Sanford, Florida(orlando area)
Sorry Matt, Im really bad at reading( im a visual person), but i noticed your 1 question about cleaning crud off the board, and if some 1 else already said, my bad for not reading thouroughly, but sometime ive found that a very fine toothbrush(never used with toothpaste-like new)with some rubbing alchol, and gentle agitation with the two, takes that crud away-just my experiences and my suggestions-
as she walked out the door she expressed, 'enjoy your amp addiction'
-
mhyde71
- Dr. Jekyll
- Posts: 6231
- Joined: Sun Jan 20, 2008 8:34 pm
- Location: PG FanBoy in Green Mtn Vermont
- Contact:
Okay, Very Good and Thank you Roland... !rolandk wrote:Sorry for the delay in replying but I had to discuss with a few people first.mhyde71 wrote:
QUESTION TO ROLAND (or anyone actually that might know): Are the heat sinks (2250's originals) have they been anodized on the inside? I ask, b/c I dont think you can anodize on top of something that has been anodized... or if anyone else knows?? looks like it has, but could just be the finish...?
The heatsink is anodized but we highly recommend using either the standard MS275 sil pads or the black aluminum anodized insulator strips and bar clamps used on the later MS275's.
If you use sil pads be very careful securing the big transistors (output XSTR's and PS FET's) to the heatsink. It is critical that the entire backside of the transistor is flat against the heatsink. If there is any air gap the transistor will overheat and fail in just a few minutes. What I suggest doing is:
1. Mount the PCB's in the heatsink.
2. Mark the transistor mounting holes in the heatsink.
3. Remove the PCB's and drill the holes.
4. Desolder and remove all of the big transistors. Be careful because its easy to damage the pads and traces.
5. Install PCB's in the heatsink again.
6. Install transistors and sil pads. Screw the transistors to the heatsink and make sure they are flat against the heatsink BEFORE soldering. Also use compression washers.
7. Solder the transistors.
Good luck!
Any/all input is greatly welcomed & appreciated!
It's actually funny that you suggested the black aluminum anodized insulator strips and bar clamps - I just sent email to Matt J. asking about securing a few of those for me.... Perhaps you could point him in right direction now that you are somewhat intimate with what it is I am looking to do... i.e. what exactly I would need/require to do it with respect to the insulator strips and bar clamps, as that is my preferred way to go...??
Pls & Thx, Many Many !
PAST WORK/S HERE::
https://www.facebook.com/KhameleonKoatings/photos_albums
https://www.facebook.com/KhameleonKoatings/photos_albums
-
mhyde71
- Dr. Jekyll
- Posts: 6231
- Joined: Sun Jan 20, 2008 8:34 pm
- Location: PG FanBoy in Green Mtn Vermont
- Contact:
oh, okay... well that's cool, thank you for looking into it for me...!
perhaps someone on here then might know (or even you Roland) as to maybe athrid party (i.e. digi key, mouser, etc... )That may have something just like it, or at least simliar in function/looks...
If not, it's not the end of the world, I can simply use the sil-pads I guess...
Is it okay to use sil-pads on the anodized aluminum??? I suspect so as it was suggested by you (Roland), but just wanna confirm...?
pls thx
matt
PAST WORK/S HERE::
https://www.facebook.com/KhameleonKoatings/photos_albums
https://www.facebook.com/KhameleonKoatings/photos_albums
-
mhyde71
- Dr. Jekyll
- Posts: 6231
- Joined: Sun Jan 20, 2008 8:34 pm
- Location: PG FanBoy in Green Mtn Vermont
- Contact:
Okay cool, and thanks again! I appreciate it!rolandk wrote:Not sure if anodized insulators are commonly available. If you end up using sil pads they are fine with the anodized heatsink.
OH AND HEY! I really dig your Avatar... it is like so fitting (not sure that is really the best word for what I wanna/try to say) but i get it, love it, etc..., more than some may think... funny!
PAST WORK/S HERE::
https://www.facebook.com/KhameleonKoatings/photos_albums
https://www.facebook.com/KhameleonKoatings/photos_albums
Not as much as you LOVE mine, hehe...mhyde71 wrote:OH AND HEY! I really dig your Avatar...
j/k...
I just wanted you to see a pic of what you should get from PG... It is strange that they had in stock one year ago, and none left now... Is it not possible to get them from anywhere else???
- Attachments
-
- Clamp Bars PG.jpg (100.73 KiB) Viewed 8718 times
Selling your Ti9 mids? PM me, please..
I also need a DD10...
I also need a DD10...
-
mhyde71
- Dr. Jekyll
- Posts: 6231
- Joined: Sun Jan 20, 2008 8:34 pm
- Location: PG FanBoy in Green Mtn Vermont
- Contact:
might there be a comparable type piece in stash of insulators and hold down bars , I'd be inclined to go with maybe something from/for a TA (if they were on the TA's)...rolandk wrote:Yeah Matt asked me about that. I just looked at our stash of insulators and hold down bars and didn't find anything for the MS275 or 2250. Sorry
But I bet those are probably some of the most used for repair pieces...up there with caps. Typically when damage occurs within that area I would think and affects that area pretty good.
Nope yup, ahhh... much more in a whole different way thoughpedi wrote:Not as much as you LOVE mine, hehe...
Any extras over that side of the pond Pedi??
sorry about not responding sooner.. I dont/didn't recall getting/seeing email for response, oooops !
PAST WORK/S HERE::
https://www.facebook.com/KhameleonKoatings/photos_albums
https://www.facebook.com/KhameleonKoatings/photos_albums