no, pg never made it but they should have. I wanted mine to match my amp so I stripped it down and did a CF paint job on it. I cut a piece of perferated metal to go under the window but it is hard to see in the pics. Late last night I decided that it would only make sence that because it was an octane edition, it needs the three blue LEDs so I am going to add those a little later so one will show the constant power, one will show the remote input and one will show the remote output. Many thanks to jacob for vectoring the DD5 Octane logo and I have my brother working on getting some decals to make it look like pg made it. Do you think I should go for a chrome type or a brushed metal? The brushed metal would look more like the amp but the polished style would pop a little more.
I am also probably going to add some small blue lighting both inside the DD5(to show the perferated metal) and a small piece above it shining down. Hope it isn't too much LED lighting but I have a switch to turn them off.
http://www.cardomain.com/ride/3237206/2
DD5 Octane Limited Edition NEW PICS!
DD5 Octane Limited Edition NEW PICS!
Last edited by ttocs on Sat Jul 11, 2009 5:32 am, edited 1 time in total.

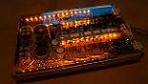
I finished soldering my leds and mounted them and temporarily wired them up for a pic(the site is updated now). I might want to dim the ones inside just a bit as I really only want them to show the perferated metal and not make it hard to read the green/red fuse leds. I am going to make a trip out later to get the three blue leds to mount on the cover and my neighbor can help me with the wire and a harness if I need to take the cover off. I'll try to finish it up by the end of the day and update the site with some better pics. I don't have the cover completely mounted yet.
had to go to 3 different stores to find 3 matching blue leds but I got them today. I used the plastic mounting pieces to mount them to the cover and wired in a small resistor to each of them. I connected the everything to a small 4 pin computer harness that is also mounted to the cover so that I can disconnect the wires going to them. I left about 12 inches of wire and I am able to coil it up under the side of the cover that doesn't have the window. I need to switch a wire going to a relay tomorrow to allow each of them to light up individually. Right now two of them(+12v constant and the input remote) come on at once and then the output remote led comes on afterwards. Can't wait to get the decals, again do you guys think a chrome or a brushed look would be better? I updated page 2 again with the lighted pics.

the tri-leds or the led strips on top an bottom? It would not be an issue to put a pot on either of them and tune them down a bit. The tri-leds look brighter in the pic then they are in person. I had to sit in the passenger seat to get a that pic of them so they are shining straight into the lense. I normally try to hide my leds so that you see the light that it emmits but not the light itself. The tri-led are obviously not under this thought.
Thanks for the kind comments. I worked as an installer but was mainly the wiring and security dude so I rarely got to do anything custom like I have done on my truck.
Thanks for the kind comments. I worked as an installer but was mainly the wiring and security dude so I rarely got to do anything custom like I have done on my truck.

They are in the works. Do you guys think I should use a brushed metal to match the way Phoenix gold is written on the octane amp, or a polished chrome that will pop a little more?
I switched a wire on my relay so that it now provides a ground when the ignition is on(not when the remote is on) so that the leds now light up in sequence when the radio is turned on.
I am happy to be able to finish putting the cover on that project and call it done till the decals come in. I took more pics of the lights in sequence and updated the page. I must have done it 4-5 times just for fun........
Hey, I checked out the work you've done and it all looks real sweet!!!
I must say I totally like the fact that I'm not the only person to have actually used a kitchen item for an enclosure . Have you listened to them yet? Mine sound very good and they are real small too boot. just make sure they are sealed up like a MOFO. took me a couple of silicone sessions to get them airtight but it was worth it.
The DD5 looks real tight.
I must say I totally like the fact that I'm not the only person to have actually used a kitchen item for an enclosure
The DD5 looks real tight.
screw car audio, I'd rather go fast....errr, wait a minute.
ok, my name is scott and I am a carbon fiber paint addict.... Check out the latest project I am trying to finish half way down the page, the RMD Octane series.
http://www.cardomain.com/ride/3237206/2
As it explains I left a portion of the lense clear so that I can light it behind the display. I am eventually going to use the dual output of the R-link to light the edges of the lenses display with the thermal monitoring leds from the R-link so that the lense will glow what ever the status of the amp is. This will go right behind the other amps status leds. If I feel well enoug tomorrow I will finish the wiring and update pics.
Whatcha think? Too much CF now?
I got the leds and wired them up tonight, they turn on/off with the lamp switch as well as when the door is open. The display is temporarily wired just into the switch that would control the lamp above it at the moment so it is convinient to turn it off. I want to keep that option but will have it measure the voltage from the rddp output. My neighbor runs cable for a living and has the ends and the cable I need so I will bug him tomorrow. There is some minor mounting bugs to work out(slightly hanging on the right side) as well as the wiring to change but I am happy with how it looks so far.
Now the bad, what the fuck is up with the display? It must have a loose pin on the display or something as it appears to be working but shows random shapes on the last 2 digits with V fluctuations, doesn't show anything from the first one. Has anyone else had this problem before?
Now the bad, what the fuck is up with the display? It must have a loose pin on the display or something as it appears to be working but shows random shapes on the last 2 digits with V fluctuations, doesn't show anything from the first one. Has anyone else had this problem before?
took the display out this morning and took a look at it. It seemed to work a little better when I would push on certain componants but all the solder joints looked ok. Finally the only thing that looked out of place was a small scratch that went across 4 of the trace lines. It was in the black ink that they use to cover/insulate the trace lines and didn't look like it went through the copper. I gently flexed the circuit board in the location of the scratch to see if I could get those places to make contact again and it worked. I soldered some wire across the joints(the back isn't a prett as it was before) and slapped it in. My camera is giving me some problems right now but I will update the working pics shortly.
Funny how the little stuff that you think does not matter ends up being the problem......
Funny how the little stuff that you think does not matter ends up being the problem......
I opened my mail today to find my be-lated birthday present from my brother. He has been busy and unable to make back to his former employer to make my decals but did not disappoint. Jacampb2 came through with the vector artwork and I can't thank you enough.
I can't decide if it is too big or what? This was the smallest that he was able to make the smallest letters so it dictated the size. does anyone know if it is ok to clear over vinyl decals? I thought about putting a coat of semi-gloss over it to dull the carbon look a little and to protect the decal if it wouldn't mess it up in some wierd chemical reaction.
I can't decide if it is too big or what? This was the smallest that he was able to make the smallest letters so it dictated the size. does anyone know if it is ok to clear over vinyl decals? I thought about putting a coat of semi-gloss over it to dull the carbon look a little and to protect the decal if it wouldn't mess it up in some wierd chemical reaction.
- Attachments
-
- DSCF1613.JPG (739.53 KiB) Viewed 14393 times

I added a couple of small changes. I added the word "series" after the word octane by cutting it out of another decal he sent at the same time. I also cleared over the decal to make it perminant and made the last coat a little rough to take teh glare off of it. I polished it the first time but didn't like it. I also made it so the leds do not stick out as far.
As I said I think it will look killer if I mold in a PG surfboard molded into the mesh as though it belonged. anyone got an extra the can sell:whistle:
As I said I think it will look killer if I mold in a PG surfboard molded into the mesh as though it belonged. anyone got an extra the can sell:whistle:
- Attachments
-
- DD5 cleared.JPG (750.55 KiB) Viewed 14317 times
-
oldskoolmseriesfan

- Sherlock Homey
- Posts: 2517
- Joined: Sun Oct 19, 2008 10:03 pm
- Location: WEST SIIIIDE!!