
I'm passing this along for Glenn:
Cyclone Subwoofer Cleaning Procedure
Glenn Phillips
Acoustics Dept.
PhoenixGold, Intl.
12/03/04
The majority of the Cyclone Low Frequency drivers, returned to PG for servicing, will exhibit grinding noise and resistance to motion with an applied signal. The high percentage of the problems stems from an outer layer breakdown of the motor magnet particle binder. This condition manifests itself as loose magnet material, which looks like dust, to create a bridge between the fixed stator and rotating magnet armature.
A simple procedure to remove the particulate nuisance is described here. Read through these directions before attempting this procedure.
Caution: The Cyclone motor system contains powerful magnets. Be alert! Slips can occur and fingers can be pinched during the disassembly and reassemble of the unit!
Tools Needed:
· 3/16 hex key
· 5/32 hex key
· Shop rag
· Sticky, automotive sealant putty (Gorilla snot)
· Compressed air
1. Check for noises and associated binding resistance to movement by rotating the blades back and forth by hand.
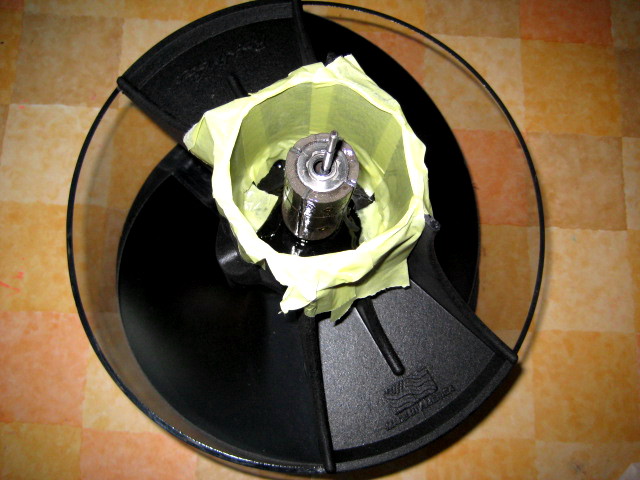
2. Place Cyclone driver on table and loosen the four long, (4) 3/16 head, plated, Allen bolts that retain the motor cap to the main housing. Set aside all 4 bolts.
3. Loosen the two, (2) 5/32 head, hex bolts securing the torsion spring axle clamp block. (These are hidden, at an angle, at the top center of the motor cap.) Gently loosen counter clockwise until they stop, then turn clockwise 1/4 turn for clearance. Do not remove the clamp block from its seat. It is bedded in silicone and floats during use.
4. Gently remove the motor cap from the main housing and let it dangle, to the side, from the input leads. Be very careful here, as it is easy to break the input leads from the motor cap to the stator. Do not break the leads.
5. Place Cyclone driver on smooth floor. In this step, place feet over mounting flange to hold driver housing while pulling the Stator assembly out of the housing. Do this by placing two of the long, 3/16 head, plated Allen bolts, into two opposing holes in the stator. Using the threads for gripping the stator, use both hands (and feet) to pull the stator up, and out of the housing. You may need to apply some opposing force outwardly to the bolts to maintain a grip. (This stator removal may take some effort depending on how severe the debris accumulation is in the gap.)
6. Inspect the stator for broken wires and particle debris. Inspect the magnet armature for particle debris and fragment cracks, or separation. Any magnet separation renders the motor unserviceable! Magnet particle debris can be removed.
7. To clean the armature, use the shop rag. Place a portion of the rag on the fingertips. Starting from bottom to top, draw as much of the magnet debris "up" the magnet, to create small piles. Pull the accumulated debris piles away from the magnet by "pinching" it from the surface, with the rag, and discarding it. Do this as many times as needed, until a very small amount of residue remains. The armature should be as clean as possible.
8. Using compressed air, blow out the stator, magnet and overall housing to remove dust and particles.
9. Using a small amount of putty, use the fingertips to begin rolling the putty up and down all the inside surfaces of the stator until all remains of the magnet debris are removed. Be careful not to break the input leads.
10. Using another small amount of putty. Roll the putty up and down the magnet surfaces thoroughly, to remove all debris. Be careful and avoid puncturing your hand on the torsion spring during this operation. Pay attention to small cracks, surface details and the undercuts between the magnet sections. All small details should be revealed when thoroughly cleaned.
11. Repair any broken leads at this time.
12. Place the main housing, once again, on the floor and secure with your feet. Hover the stator and motor cap over the magnet and main housing, aligning the four holes corresponding to the threaded holes in the bottom of the motor housing. The magnet is very strong. Grasp the stator tightly and very slowly lower the stator into the housing. Be careful not to let the stator jerk suddenly into the housing. Also be careful not to catch your fingers. Again, check for broken input leads.
13. Use two of the long hex head bolts and align the stator holes with the threaded holes by twisting back and forth so the bolts can seat in the threads. Remove the bolts.
14. Place the motor cap over the torsion spring and seat into the magnet bearing. The torsion spring should also go through the clamp block. Go slow. Align the four holes for the bolts. Be sure the leads are clear and not pinched or rubbing on the torsion spring before closing. Place the four long bolts into the housing and finger tighten. Place the blades in their natural (neutral) center stroke position.
15. Start progressively tightening the four long bolts, in an opposing pattern, to seat the motor cap squarely. Once snug, give 1/4 turn more and quit. Do not over tighten, as stress damage may occur.
16. Apply downward thumb pressure to the clamp block and tighten the two hex bolts securely. Keep the gap between the blocks parallel so the block floats during use.
17. Recheck to see if the blades are at their natural center.
18. Again, check for noise and binding by pushing on the blades by hand as initially done. The Cyclone should not make any noise and the blades should rotate freely. Any noise present is suspect to other internal problems, including:
· Bearings.
· Possible stress misalignment from over tightening.
· Racking, from parts not in absolute alignment.
· Trapped debris between the blades and the housing walls.
19. If none of the above appears, consider the unit ready for use.
Servicing a Cyclone
-
nico boom
- Deus ex MS

- Posts: 2089
- Joined: Fri Jan 05, 2007 1:40 pm
- Location: the land of wooden shoes
Servicing a Cyclone
This post is created to help everybody who has a cyclone subwoofer, or is thinking about buying one.
NOTE that this post is made by me with the best means I have available, combined with the original info provided by the grace of the technicians at PG ,which I thank for their time and effort to make this possible for us, here on this forum.
I have serviced several cyclones, learning all the time; now there is a simple and effective way of performing this operation yourself.
However; I do not take any responsibility for problems you might encounter while performing this operation, since there are variables in how bad the rotor is stuck inside the coil, and the degree of your own craftsmanship, as well as the availability of the tools needed.
there it is; BNIB.
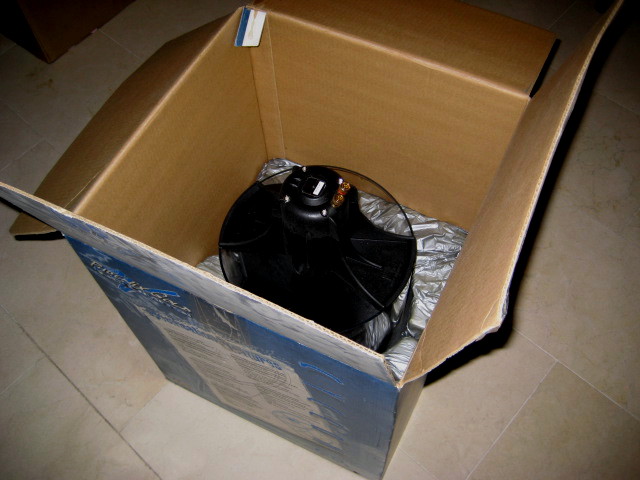
still.... it needed the servicing as seen in this post.
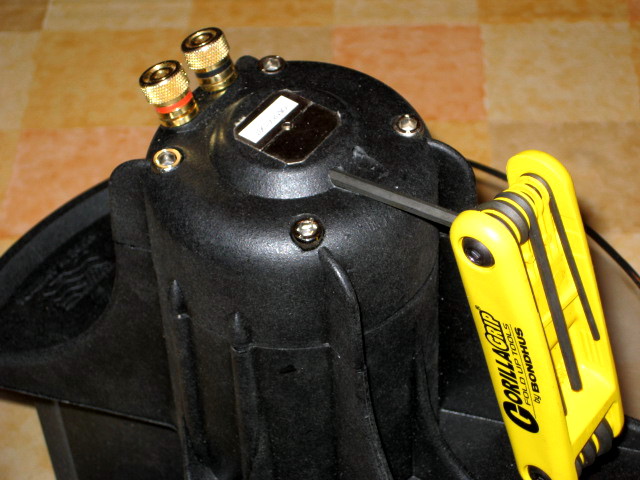
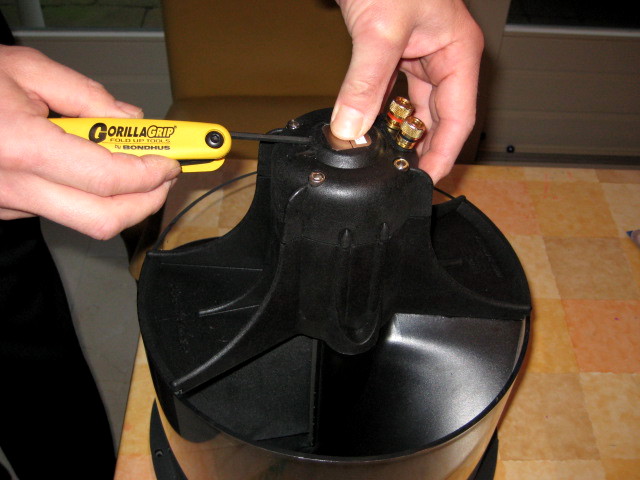
these "hidden screws" hold the clamps, in which the spring is hold to return the rotor to it's center position after each excursion.
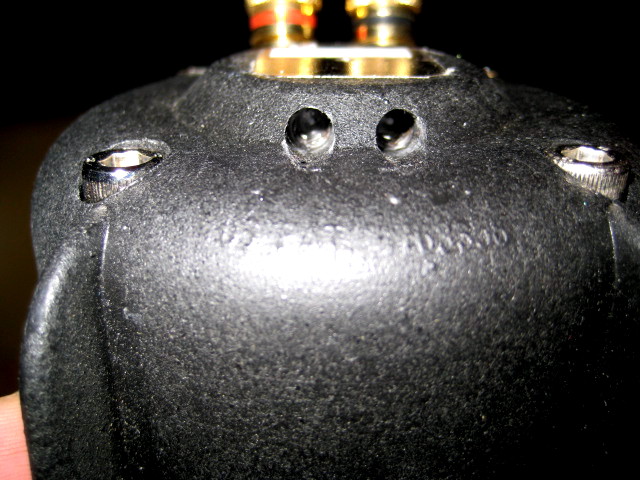
before unscrewing the hex screws, tap them gently with a lightweight hamer, to make sure the wrench is completely inserted in the screw.
these screws are TIGHT, and need quite some force to loosen.
ONLY LOOSEN ONE-TO ONE-AND-A-HALF TURN.
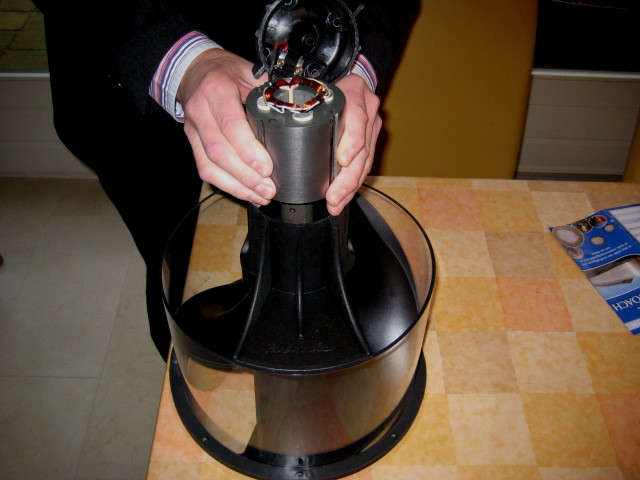
remove the four long bolts that holds the top section; observe, and maybe write down on which side the connectors are; while re-assembling, it will fit in two different ways.
carefully pry a screwdriver between the housing and the top; only on the four points where the housing is strengthened. do NOT use excessive force; by gently using the screwdriver on all sides, the top comes off easily. CAREFULL! the leads connecting the
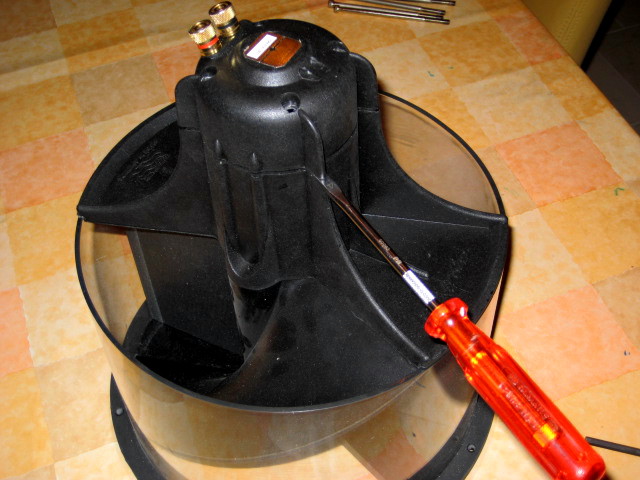
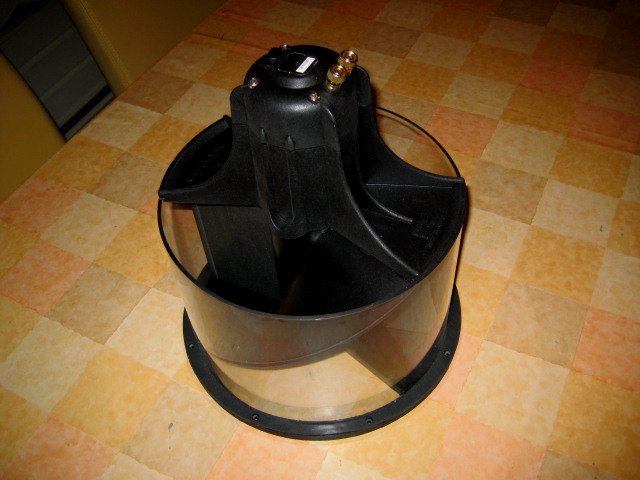
the top removed; be carefull with the leads; always move the coil around with caution, taking the coil in one- and the top in your other hand, supporting it with as little tension on the leads as possible.
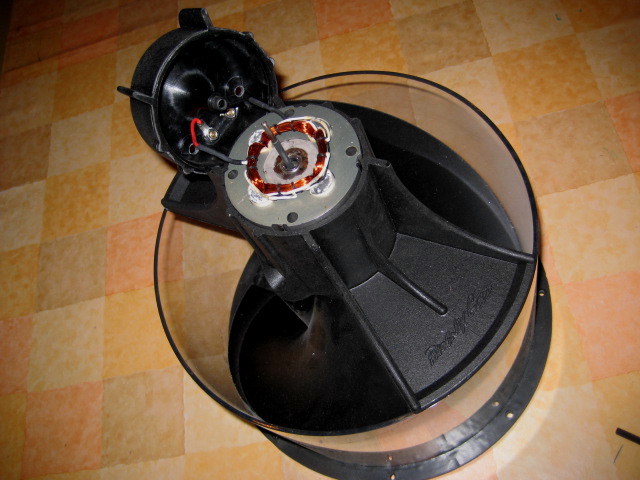
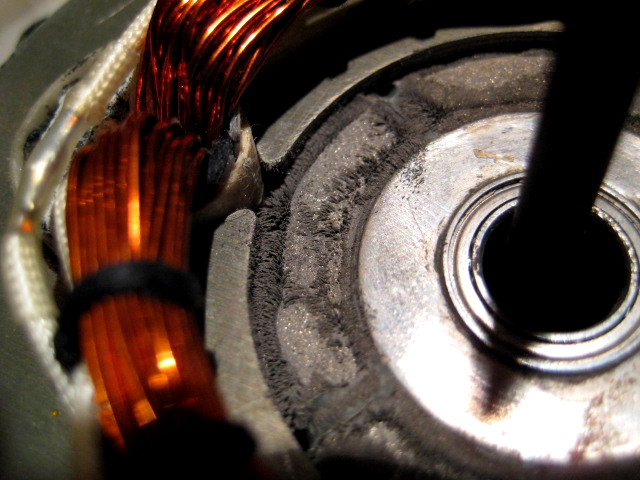
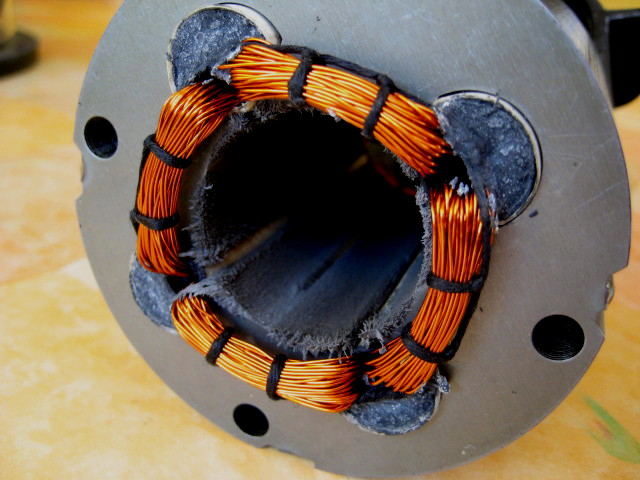
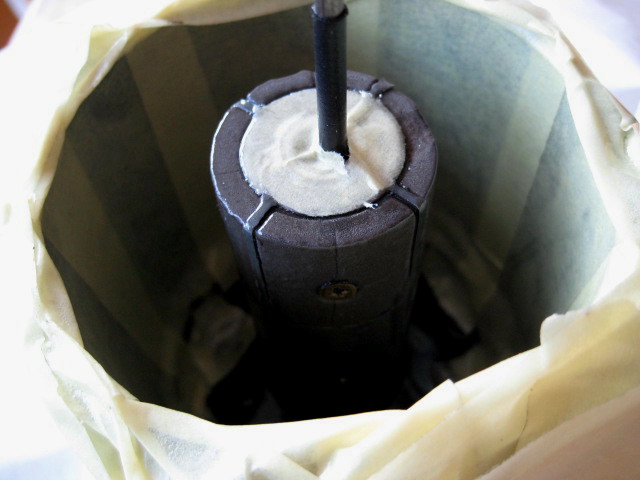
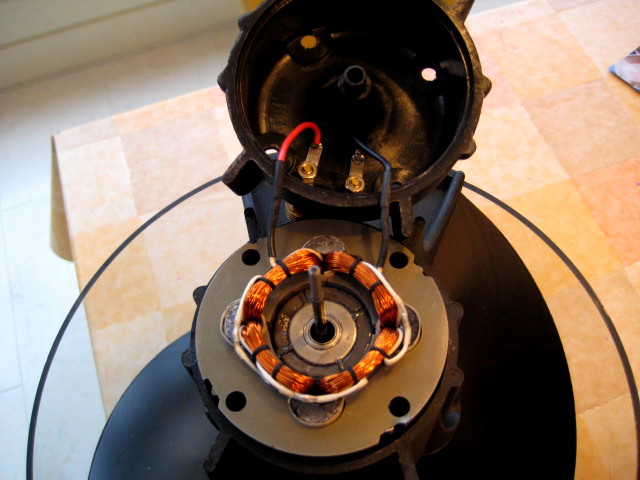
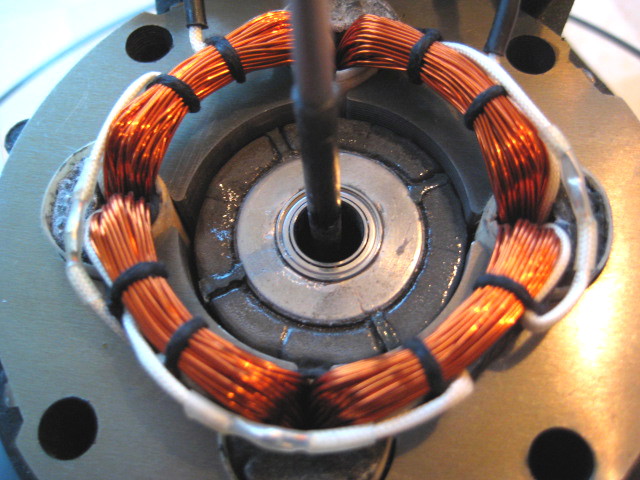
problem in full view; magnetic core stuck in the coil; putting power to it WILL DESTROY the coil due to overheating; NEVER TRY TO FIX THE PROBLEM BY PLAYING MUSIC, OR PUTTING POWER TO YOUR STUCK CYCLONE.
I tried two methods for removing the coil;
NORMAL WAY [advised by PG]
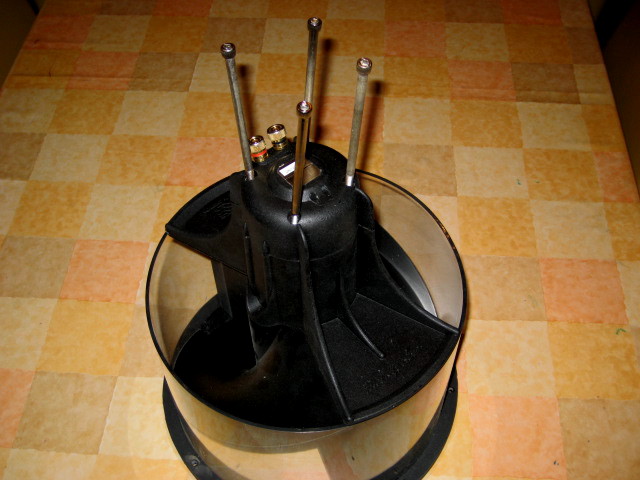
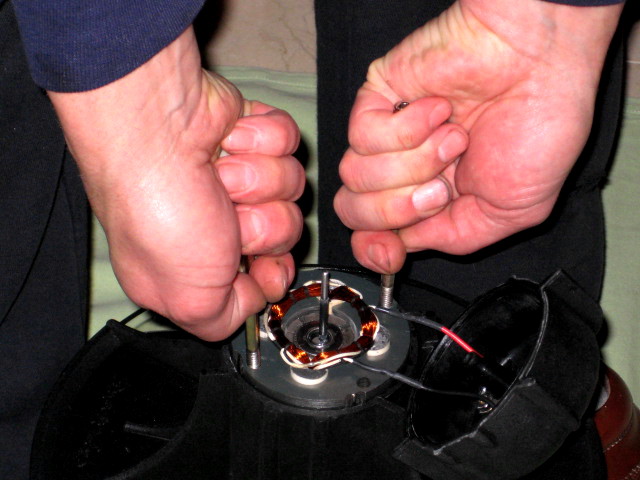
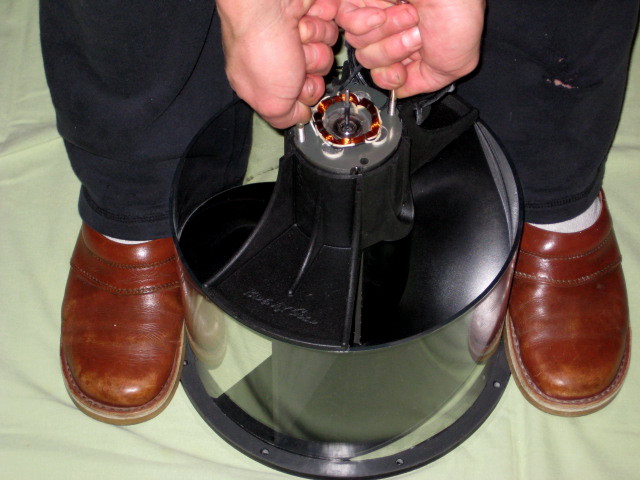
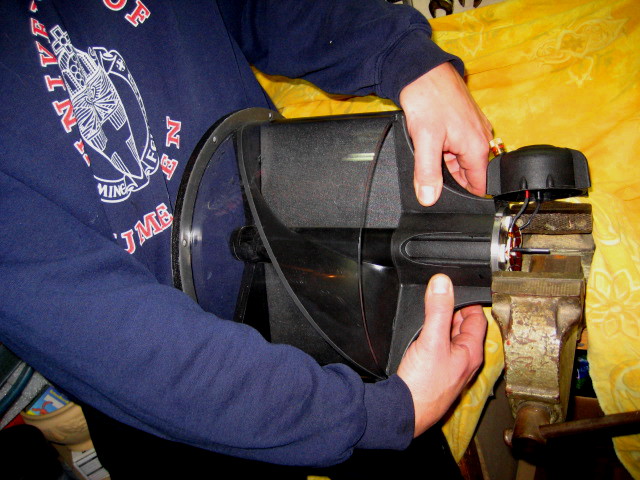
-pulling the coil out with two rods inserted halfway the thread; pull sideways and upwards, while placing your feet on both sides of the housing.
If not working; ask a friend to help you, inserting the other two rods as well, pulling at the same time [ again sideways and upwards].
the thread on the rods help to prevent slipping; insert half the length of the thread.
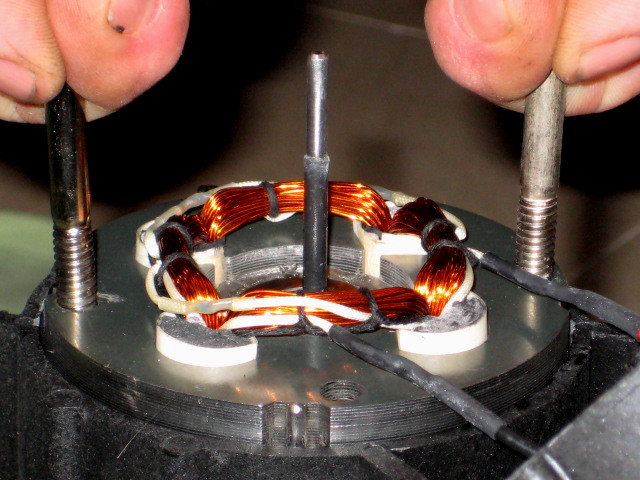
pulling out- and upwards; needs a lot of force both ways.
the correct position for first methode of pulling
THE ROUGH WAY [last remedy, advised by me since it worked fine for my cyclone]
-carefully place the edge of the coil in a vise, CAREFULL; make sure only to apply pressure at the points next to two of the holes, where the layers of the coil are welded together.
Also make sure the cap with the wires still attached to it rests in a way so that the wires are not under tensile stress.
Every time you pulled out about 2 cm. ; place the coil deeper into the vise, to gain grip on it.
This last remedy methode worked very well for my cyclone; the coil in it was completely stuck, so the normal way did not work.
If you have a bearing-puller that can be used, or you might find another way of removing the coil; share it with us.
I just gave you my simple methode.
pressure applied at the right points; next to the holes, where the welds are
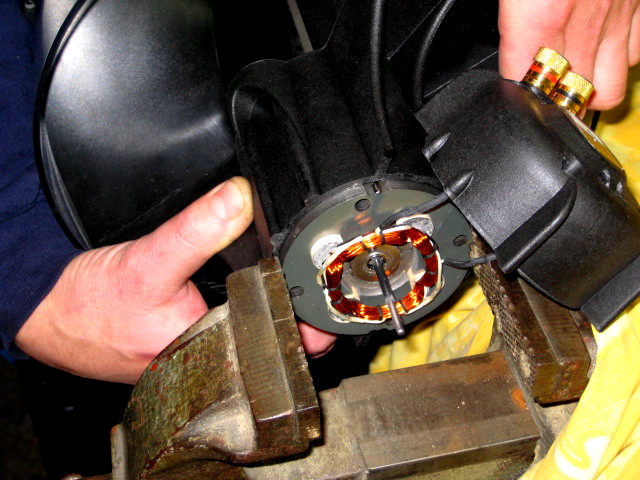
apply just enough pressure to prevent the coil from slipping out while pulling
the coil with top cap. CAUTION; while putting it aside, be carefull not to damage the leads to the coil.
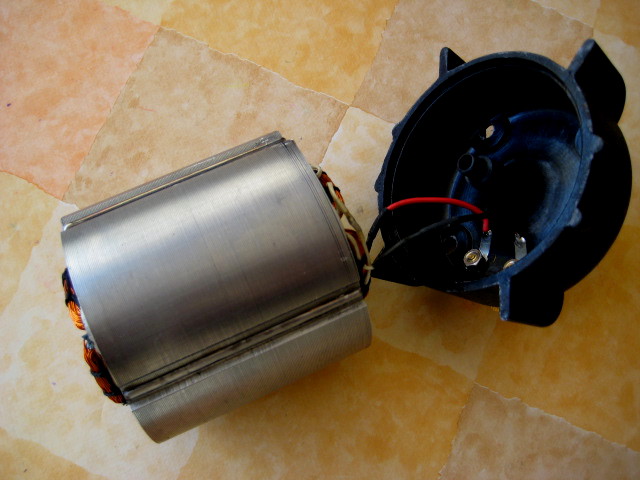
this is the problem; the magnet structure is slowly falling apart, with the debri getting stuck between the coil and the rotor. this can happen with used, AND ALSO BNIB cyclones; periodic maintenance is needed.
this is what the coil looks like before cleaning; this is the easy part to clean, as it does not attract the particles as strong as the magnetic core does.
BEFORE starting with the actual cleaning; TAPE THE CLONE SECURELY. reason for that is explained later.
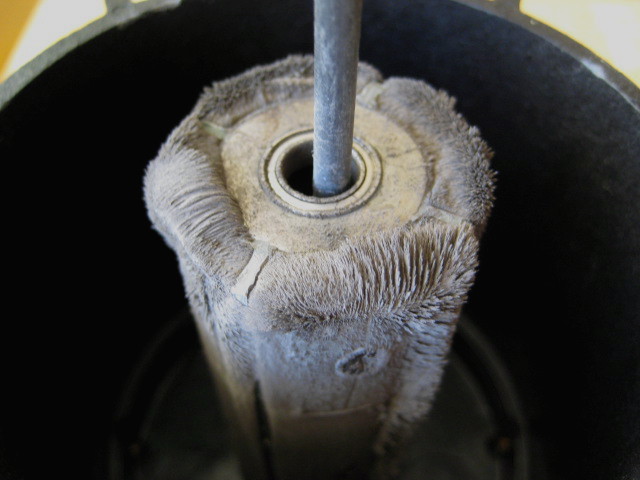
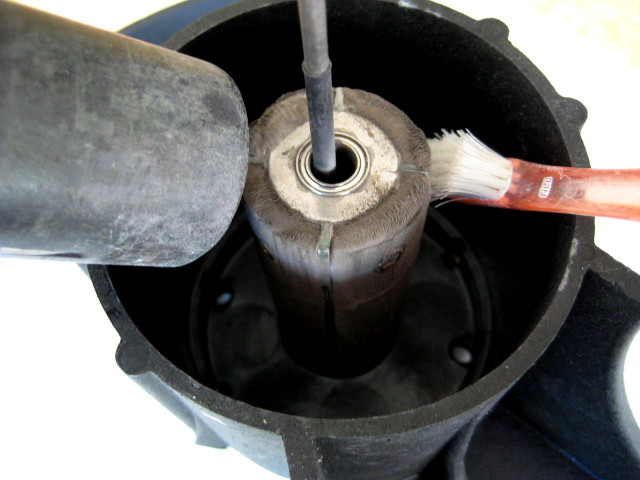
brush with a strong toothbrush while holding a vacuumcleaner close to it. CAREFULL; magnetic particles will be "catapulted "outwards.
Keep brushing upwards until the magnet is clean, then BLOW OUT WITH COMPRESSED AIR.
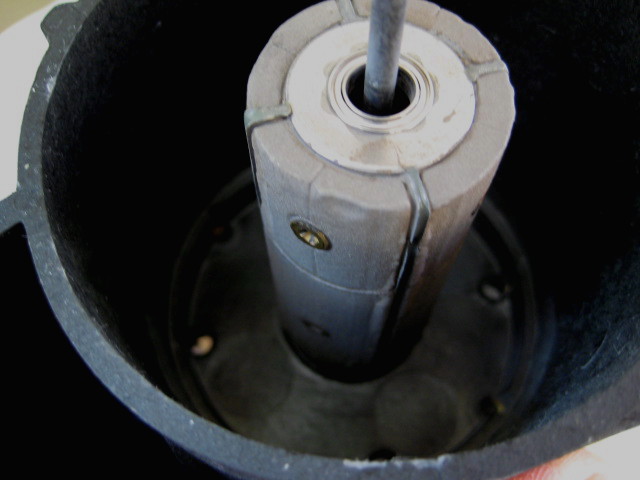
the cleaned magnet; at one point you have to decide that it's clean enough; if you keep on brushing, you will keep on loosening magnetic material.
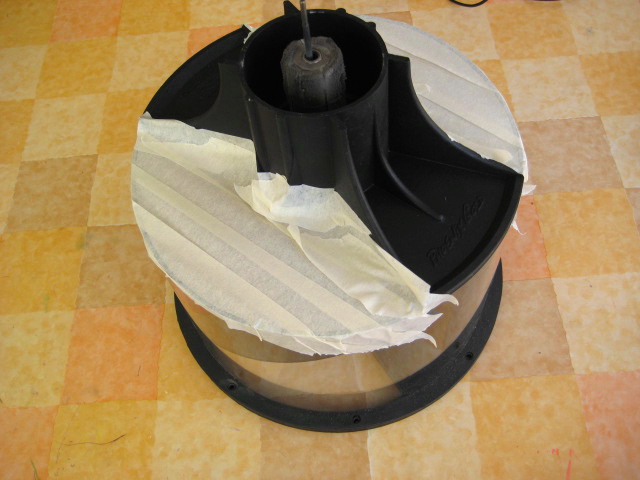
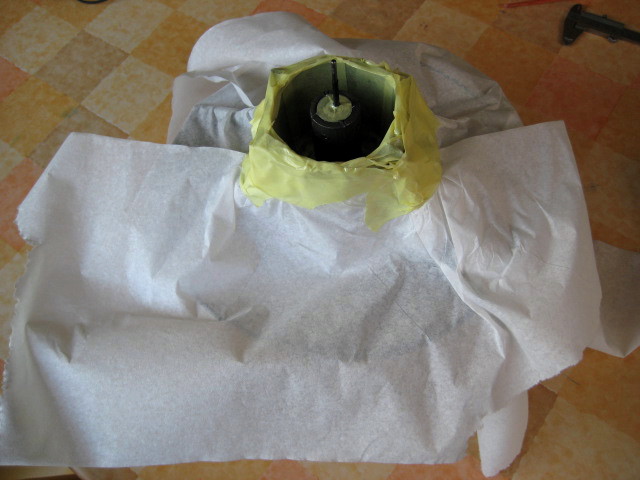
carefully tape the inside; watch the next pics for the important parts to be covered.
be sure to tape off the upper section, to prevent coating beeing sprayed on the center rod, and the top bearing in the magnet
fully taped, and covered. ATTENTION;note that I sealed the 4 holes in which the rods connect to the housing in the next pic.
the coated magnet; leave it time enough to dry and harden completely .
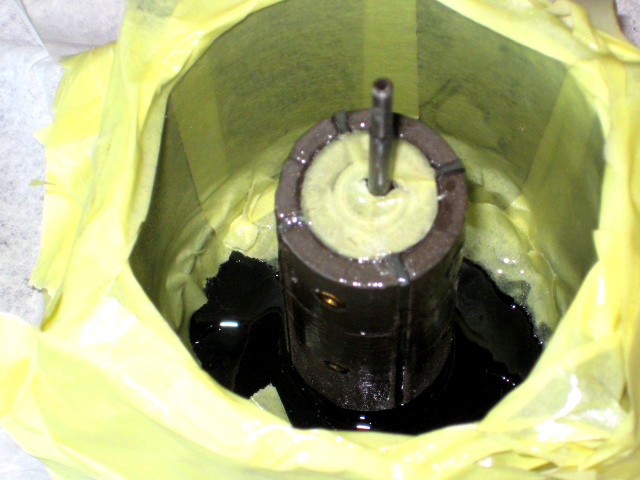
the laquer used for coating the magnet; any high temp resisting coating will do IMO.
carefully position the coil above the housing; CAUTION! the coil will be pulled down HARD by the very strong magnet, so be prepared, and put both your hands on the edge of the housing to keep control over the coil.
slowly proceed, using your fingers on each side.
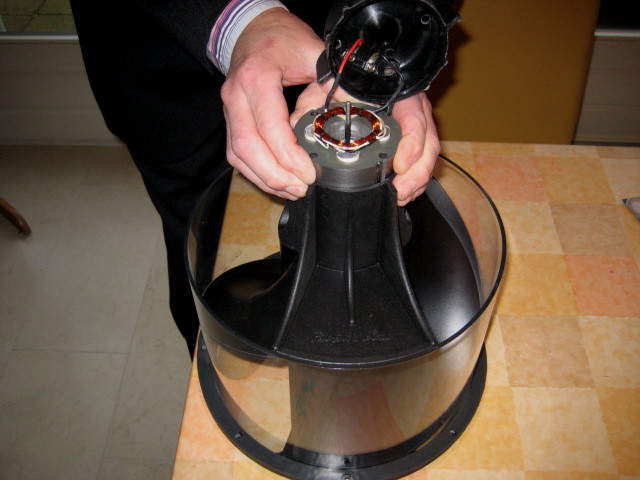
align the coil with the holes in the center piece by looking through the 4 holes and rotate the coil if neccesary.
the coil in place, with the coated magnet visible; do NOT try to rotate the rotor before the top cap has been fitted in place and tightened.
pressing down the clamps while evenly tightening the halves.
the two parts of the clamps must be tightened equally, so that the gap is the same left and right.
GOOD LUCK.
Nico
NOTE that this post is made by me with the best means I have available, combined with the original info provided by the grace of the technicians at PG ,which I thank for their time and effort to make this possible for us, here on this forum.
I have serviced several cyclones, learning all the time; now there is a simple and effective way of performing this operation yourself.
However; I do not take any responsibility for problems you might encounter while performing this operation, since there are variables in how bad the rotor is stuck inside the coil, and the degree of your own craftsmanship, as well as the availability of the tools needed.
there it is; BNIB.
still.... it needed the servicing as seen in this post.
these "hidden screws" hold the clamps, in which the spring is hold to return the rotor to it's center position after each excursion.
before unscrewing the hex screws, tap them gently with a lightweight hamer, to make sure the wrench is completely inserted in the screw.
these screws are TIGHT, and need quite some force to loosen.
ONLY LOOSEN ONE-TO ONE-AND-A-HALF TURN.
remove the four long bolts that holds the top section; observe, and maybe write down on which side the connectors are; while re-assembling, it will fit in two different ways.
carefully pry a screwdriver between the housing and the top; only on the four points where the housing is strengthened. do NOT use excessive force; by gently using the screwdriver on all sides, the top comes off easily. CAREFULL! the leads connecting the
the top removed; be carefull with the leads; always move the coil around with caution, taking the coil in one- and the top in your other hand, supporting it with as little tension on the leads as possible.
problem in full view; magnetic core stuck in the coil; putting power to it WILL DESTROY the coil due to overheating; NEVER TRY TO FIX THE PROBLEM BY PLAYING MUSIC, OR PUTTING POWER TO YOUR STUCK CYCLONE.
I tried two methods for removing the coil;
NORMAL WAY [advised by PG]
-pulling the coil out with two rods inserted halfway the thread; pull sideways and upwards, while placing your feet on both sides of the housing.
If not working; ask a friend to help you, inserting the other two rods as well, pulling at the same time [ again sideways and upwards].
the thread on the rods help to prevent slipping; insert half the length of the thread.
pulling out- and upwards; needs a lot of force both ways.
the correct position for first methode of pulling
THE ROUGH WAY [last remedy, advised by me since it worked fine for my cyclone]
-carefully
Also make sure the cap with the wires still attached to it rests in a way so that the wires are not under tensile stress.
Every time you pulled out about 2 cm. ; place the coil deeper into the vise, to gain grip on it.
This last remedy methode worked very well for my cyclone; the coil in it was completely stuck, so the normal way did not work.
If you have a bearing-puller that can be used, or you might find another way of removing the coil; share it with us.
I just gave you my simple methode.
pressure applied at the right points; next to the holes, where the welds are
apply just enough pressure to prevent the coil from slipping out while pulling
the coil with top cap. CAUTION; while putting it aside, be carefull not to damage the leads to the coil.
this is the problem; the magnet structure is slowly falling apart, with the debri getting stuck between the coil and the rotor. this can happen with used, AND ALSO BNIB cyclones; periodic maintenance is needed.
this is what the coil looks like before cleaning; this is the easy part to clean, as it does not attract the particles as strong as the magnetic core does.
BEFORE starting with the actual cleaning; TAPE THE CLONE SECURELY. reason for that is explained later.
brush with a strong toothbrush while holding a vacuumcleaner close to it. CAREFULL; magnetic particles will be "catapulted "outwards.
Keep brushing upwards until the magnet is clean, then BLOW OUT WITH COMPRESSED AIR.
the cleaned magnet; at one point you have to decide that it's clean enough; if you keep on brushing, you will keep on loosening magnetic material.
carefully tape the inside; watch the next pics for the important parts to be covered.
be sure to tape off the upper section, to prevent coating beeing sprayed on the center rod, and the top bearing in the magnet
fully taped, and covered. ATTENTION;note that I sealed the 4 holes in which the rods connect to the housing in the next pic.
the coated magnet; leave it time enough to dry and harden completely .
the laquer used for coating the magnet; any high temp resisting coating will do IMO.
carefully position the coil above the housing; CAUTION! the coil will be pulled down HARD by the very strong magnet, so be prepared, and put both your hands on the edge of the housing to keep control over the coil.
slowly proceed, using your fingers on each side.
align the coil with the holes in the center piece by looking through the 4 holes and rotate the coil if neccesary.
the coil in place, with the coated magnet visible; do NOT try to rotate the rotor before the top cap has been fitted in place and tightened.
pressing down the clamps while evenly tightening the halves.
the two parts of the clamps must be tightened equally, so that the gap is the same left and right.
GOOD LUCK.
Nico

-
oldskoolmseriesfan

- Sherlock Homey
- Posts: 2517
- Joined: Sun Oct 19, 2008 10:03 pm
- Location: WEST SIIIIDE!!
-
deathcloud

- Posts: 680
- Joined: Sun Jul 06, 2008 10:47 am


I have cleaned up this post and merged in Glenn's original information.
I hope I got the order right...
Are there any relevant posts we are missing from the other threads that I should also bring over?
http://phoenixphorum.com/how-to-service ... t8476.html
http://phoenixphorum.com/no-cyclone-for ... t8225.html
I hope I got the order right...
Are there any relevant posts we are missing from the other threads that I should also bring over?
http://phoenixphorum.com/how-to-service ... t8476.html
http://phoenixphorum.com/no-cyclone-for ... t8225.html
-
Delftenaar

- Posts: 65
- Joined: Fri Mar 21, 2008 12:27 pm
- Location: The Netherlands
I am going to follow your steps next week or the week after
Doesn't the spray effect the working of the magnet
Do you think (if I cannot do it) you could help me with it
Audison VRX 1.500.2
Audison VRX 4.300.2
Audison VRX 6.420.2
Genesis Four channel
Genesis Four channel
Genesis DM200
PPI 430iX
Crossfire vr404
Rockford 1051s
Rockford 851x
Steg K2.01
Steg K2.01
Steg K2.02
Steg K2.03
Steg K4.02
Audison VRX 4.300.2
Audison VRX 6.420.2
Genesis Four channel
Genesis Four channel
Genesis DM200
PPI 430iX
Crossfire vr404
Rockford 1051s
Rockford 851x
Steg K2.01
Steg K2.01
Steg K2.02
Steg K2.03
Steg K4.02
-
Delftenaar
- Posts: 65
- Joined: Fri Mar 21, 2008 12:27 pm
- Location: The Netherlands
OK, so I guess you did it to make the dust harder to hold on the magnet 
Does this cleaning proces also makes the "flaps" go smoother?
I hope I can get to it as soon as possible
Does this cleaning proces also makes the "flaps" go smoother?
I hope I can get to it as soon as possible
Audison VRX 1.500.2
Audison VRX 4.300.2
Audison VRX 6.420.2
Genesis Four channel
Genesis Four channel
Genesis DM200
PPI 430iX
Crossfire vr404
Rockford 1051s
Rockford 851x
Steg K2.01
Steg K2.01
Steg K2.02
Steg K2.03
Steg K4.02
Audison VRX 4.300.2
Audison VRX 6.420.2
Genesis Four channel
Genesis Four channel
Genesis DM200
PPI 430iX
Crossfire vr404
Rockford 1051s
Rockford 851x
Steg K2.01
Steg K2.01
Steg K2.02
Steg K2.03
Steg K4.02
-
bretti_kivi

- Shutterbug
- Posts: 1595
- Joined: Tue Aug 26, 2008 1:06 pm
- Location: Päijät-Häme or Uusimaa
something else to read about how and why the cyclone came into being:
http://www.diymobileaudio.com/forum/pro ... post679886
with a reference back to http://www.diyaudio.com/forums/showthread/t-55122.html
Bret
http://www.diymobileaudio.com/forum/pro ... post679886
with a reference back to http://www.diyaudio.com/forums/showthread/t-55122.html
Bret
Hey Nico...again want to say thanks for the VERY clear write up...I did mine a few months ago using your tutorial. And was VERY helpful.
One other comment to add...IF you are afraid (during this process) of ruining the cap and leads to the coil, just unhook the leads from the cap....that way there's less resistance on the leads. And also the cap won't get caught on something and accidentally tugged upon.
Worked great for me...and had no issues there.
Also the rods inserted into the coil to pull it up worked great for me...had my friend and I working on it....one of us held the body of the clone down while the other pulled up with the rods to pull the coil out....worked like a charm.

-
freshkryp69

- Posts: 644
- Joined: Sat Feb 23, 2008 10:17 pm
- Location: cocoa Florida
Re: Servicing a Cyclone
Back from the dead! This is a post thats referred to a lot from people all over the interwebz, all over the world. So I wanted to add, if rebuilding a Cyclone. Swapping the stock bearing for newer full Ceramic bearings is a great idea. They need no lube and have the least amount of friction of all bearings. Last longer too. They do cost a pretty penny but hey they are the best of the best. Boca bearings have all the bearings you could ever need.
Square 1
Re: Servicing a Cyclone
What to do, if magnetic core is falling apart. Does anybody know, if PG can still supply new core with magnets.
Re: Servicing a Cyclone
its really doubtful they would have parts for a clone. You would have to probably buy one for parts.
what else can I say I am a grumpy asshole most of the time.
-
nico boom
- Deus ex MS
- Posts: 2089
- Joined: Fri Jan 05, 2007 1:40 pm
- Location: the land of wooden shoes
Re: Servicing a Cyclone
The problem IS that the core is falling apart. Normally there will only be small particles coming loose from the core; if larger parts are coming loose I'm afraid it's "end of story".
Nico
Nico
Re: Servicing a Cyclone
I have came across two cyclones. one is extremely tight while one moves freely. I figure I will service the one that is tight since by reading the posts it is probably clogged up with junk. Other than these posts, is there any tips and tricks I need to know about?
Re: Servicing a Cyclone
I thought I had heard mixed reactions now about clear coating it that after a while it was a problem?
what else can I say I am a grumpy asshole most of the time.
Re: Servicing a Cyclone
Thanks for the heads up on the spray. I probably won't be using any. If it was to break off during use of the sub, that would be a foreign object in there getting banged around that was never there to begin with. I hope just a good cleaning of the parts will fix things.