I started my box.
Last time I had a shop make my box to 1.8 cuft but this time I made my own...but it looks huge. It is def 1.8 which is what everyone recommends so I am hoping it sounds awesome. I still have to seal it with silicone on the inside, carpet it, and then figure out where on the car I am gonna anchor the box so the crooks can't get it easy if they ever come back.
I will be giving it 2 bridged channels of an RSd500.4 so it should sound pretty sweet as efficient as this sub is. It sounded decent when I was running 170 watts to it when I had an RSd dvc hooked up to 2 seperate channels of the 500.4 so this should be better.
I had a little trouble since I chose particle board and some of the screws were a tad bit close to the edges but overall I am pleased with the construction.
For security I was thinking of using a metal strap and bolting the strap onto the box and then bolting the strap somewhere on the car and also screwing the sub itself in with star or square screws....paranoia...yes indeed....heh, but Ill be damned if I let it get taken easily if it gets taken at all. Let me know if you guys have taken any security measures that might work better than this^^...I have a compustar spread spectrum alarm this time around but that just isn't enough as many of you may know if you have been in my position before.
Finally Preparing To Reinstall
-
Phoenixcolt

- Posts: 795
- Joined: Tue Dec 19, 2006 7:45 pm
- Location: New Britain, CT
- Contact:
Finally Preparing To Reinstall
- Attachments
-
- IMG_1661.JPG (70.47 KiB) Viewed 5827 times
Rides History-www.cardomain.com/id/HotColt22
JL HD1200/1
JL HD600/4
ID XS65
IDMAX 10D4 V3
On Tap/Stash:
DQS+DDC
Ti12D Elite
RSd12
JL HD1200/1
JL HD600/4
ID XS65
IDMAX 10D4 V3
On Tap/Stash:
DQS+DDC
Ti12D Elite
RSd12

Make sure to seal the inside of that particle board with some resine cus it'll leak air if ya don't.
For security, I bolt shit down. It sux to take out should ya need to but 9 times outta 10 it'll still be there after a break-in.
For security, I bolt shit down. It sux to take out should ya need to but 9 times outta 10 it'll still be there after a break-in.
Those tender little burgers with them little, itty-bitty grilled onions that just explode in ya mouth like flavor crystals every time you bite into one.. just makes me want to burn this muthafuka down.... Come on, Pookie, let's burn this muthafuka down!!!
-
Phoenixcolt
- Posts: 795
- Joined: Tue Dec 19, 2006 7:45 pm
- Location: New Britain, CT
- Contact:
-
Phoenixcolt
- Posts: 795
- Joined: Tue Dec 19, 2006 7:45 pm
- Location: New Britain, CT
- Contact:
Nah man, Fuzzy's right... get some resin and coat the fucker! That will make a pretty stiff boxPhoenixcolt wrote:I will just remake it next weekend in mdf...this one was a waste of energy...bummer.
As an added trick, you can pour some into the corners, and stand it up at a 45 degree angle as it dries... the resin will pool, and make a really nice sealed corner.
-
Phoenixcolt
- Posts: 795
- Joined: Tue Dec 19, 2006 7:45 pm
- Location: New Britain, CT
- Contact:
-
fuzzysnuggleduck

- Soy Milquetoast
- Posts: 4423
- Joined: Wed Dec 06, 2006 1:08 pm
- Location: The best place on earth
- Contact:
-
Phoenixcolt
- Posts: 795
- Joined: Tue Dec 19, 2006 7:45 pm
- Location: New Britain, CT
- Contact:
I LOVE the gear, just been hesistating to put it back in since I got it cuz I'm a little scared to but I miss my full sound too much and I can't wait to get the vw back up to par....I am really psyched to get my comps back in, the coaxes r great but rnt doing it like I need them to, I need those beautiful comps and xovers back in there : ) .fuzzysnuggleduck wrote:I can't wait to see the install! I hope you like your gear!
I want to raise the hatch floor still and flush the amp and xovers a little but I am still trying to figure out a good way to do it.
I guess I could just cut the plywood to the hatch curves and get some 2x4s under it to raise it and just bolt the biotch down, I'm just a bit of a perfectionist and want to make sure I have a good plan tht will work well.
-
Phoenixcolt
- Posts: 795
- Joined: Tue Dec 19, 2006 7:45 pm
- Location: New Britain, CT
- Contact:

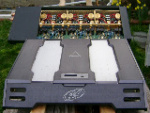
Just a little hint if you want to add a little security to your raised floor install.
Notice the gold circle between the TI and Xenon amp? It is a drawer lock that
you can get at any hardware store. I put a couple of those on my amp rack,
so that in order to get to the amps, you need the keys.
Notice the gold circle between the TI and Xenon amp? It is a drawer lock that
you can get at any hardware store. I put a couple of those on my amp rack,
so that in order to get to the amps, you need the keys.
- Attachments
-
- DSC00430.JPG (74.27 KiB) Viewed 5758 times
-
Phoenixcolt
- Posts: 795
- Joined: Tue Dec 19, 2006 7:45 pm
- Location: New Britain, CT
- Contact:
Sweet idea, so did u raise ur floor but not flush in the amps? R the amps bolted under the board?dwnrodeo wrote:Just a little hint if you want to add a little security to your raised floor install.
Notice the gold circle between the TI and Xenon amp? It is a drawer lock that
you can get at any hardware store. I put a couple of those on my amp rack,
so that in order to get to the amps, you need the keys.
I used the spare tire well to house the wiring and amp rack, but didn't flush
mount the amps because I didn't have room, and I couldn't access the controls
on the TI if I did that. The amps are bolted down with bolts and nylock nuts
so that you have to have access to the nylock nuts to get the bolts out. I also
used stainless steel straps for the drawer locks to lock on to.
mount the amps because I didn't have room, and I couldn't access the controls
on the TI if I did that. The amps are bolted down with bolts and nylock nuts
so that you have to have access to the nylock nuts to get the bolts out. I also
used stainless steel straps for the drawer locks to lock on to.
- Attachments
-
- Amp Rack + Wiring.JPG (195.92 KiB) Viewed 5718 times